Runtime Intelligence for Windows Phone Instrumentation Quick Start
advertisement
Runtime Intelligence for Windows Phone Instrumentation Quick Start
Getting your application configured and ready to use the analytics provided by the Runtime Intelligence for
Windows Phone can be accomplished in three simple steps:
1. Setting Up the Instrumentation Project – this involves using Dotfuscator to consume your existing XAP file
2. Configuring Analytics – this involves adding your CompanyKey, and marking start-up and tear-down events
3. Building the New Application – this involves using Dotfuscator for Windows Phone to generate a new,
instrumented XAP file to generate analytics reporting data
Step 1: Setting Up the Instrumentation Project
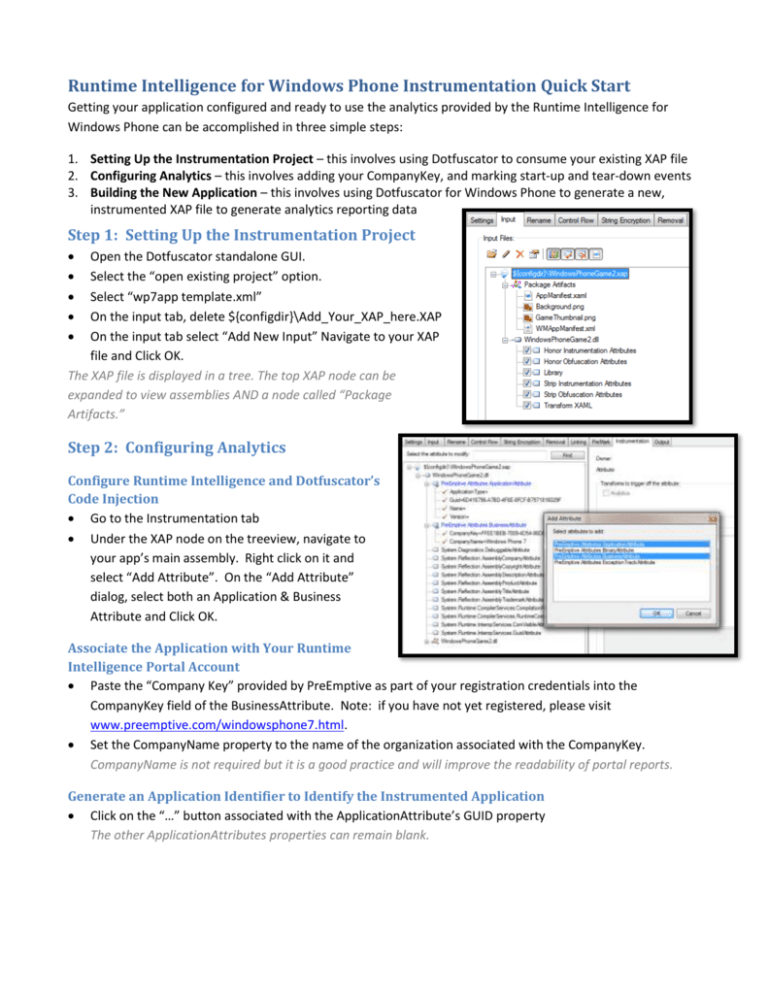
Open the Dotfuscator standalone GUI.
Select the “open existing project” option.
Select “wp7app template.xml”
On the input tab, delete ${configdir}\Add_Your_XAP_here.XAP
On the input tab select “Add New Input” Navigate to your XAP
file and Click OK.
The XAP file is displayed in a tree. The top XAP node can be
expanded to view assemblies AND a node called “Package
Artifacts.”
Step 2: Configuring Analytics
Configure Runtime Intelligence and Dotfuscator’s
Code Injection
Go to the Instrumentation tab
Under the XAP node on the treeview, navigate to
your app’s main assembly. Right click on it and
select “Add Attribute”. On the “Add Attribute”
dialog, select both an Application & Business
Attribute and Click OK.
Associate the Application with Your Runtime
Intelligence Portal Account
Paste the “Company Key” provided by PreEmptive as part of your registration credentials into the
CompanyKey field of the BusinessAttribute. Note: if you have not yet registered, please visit
www.preemptive.com/windowsphone7.html.
Set the CompanyName property to the name of the organization associated with the CompanyKey.
CompanyName is not required but it is a good practice and will improve the readability of portal reports.
Generate an Application Identifier to Identify the Instrumented Application
Click on the “…” button associated with the ApplicationAttribute’s GUID property
The other ApplicationAttributes properties can remain blank.
Set Baseline Instrumentation
Configuration
A SetupAttribute should be placed
on a method called at application
startup. Dotfuscator injects
initialization code into the tagged
method. The Teardown attribute
should be placed on a method that
is called at/near the end of the
application’s lifecycle. Dotfuscator
injects cleanup code at the end of
the tagged method.
Setup for Silverlight
Applications
Navigate to the Launching event (typically called “Application_Launching”) in the left hand treeview.
Right click on it and select “Add Attribute.”
From the attributes dialog, select the SetupAttribute.
The property editor on the right side of the UI
can override default settings. The default
settings send data to the PreEmptive
Runtime Intelligence portal via SSL and
offline caching is enabled. For Windows
Phone 7 applications, change the endpoint to
dedicated Windows Phone 7 application
portal.
Select the CustomEndpoint property and
click on the associated “…” button.
Use the Select Endpoint dialog to choose
the “Runtime Intelligence Services for
Windows Phone 7” endpoint.
The other SetupAttribute defaults are
appropriate for virtually all Windows Phone
apps.
Teardown for Silverlight Applications
Navigate to the handler for the Closing event (typically called “Application_Closing“) and add the teardown
attribute.
No additional configuration for the Teardown attribute is required.
Setup and Teardown for XNA Applications
Use the LoadContent method and OnExiting methods on the main Game class respectively.
Step 3: Build Application
Press the build button
Dotfuscator will output the instrumented XAP file to a “Dotfuscated” directory beneath the directory
containing the project file. The output XAP file can be deployed to the emulator or the device via the
Application Deployment tool.
Note: As this is a post-compile injection process, Step 3 must be repeated after each build. Dotfuscator for
Windows Phone 7 includes a command line and MSBuild integration simplifying and automating the
development process.
For a video demonstration of these three steps, visit: http://www.youtube.com/watch?v=QvTueq7EJuY
