Chiaroscuro Still Life Drawings
advertisement
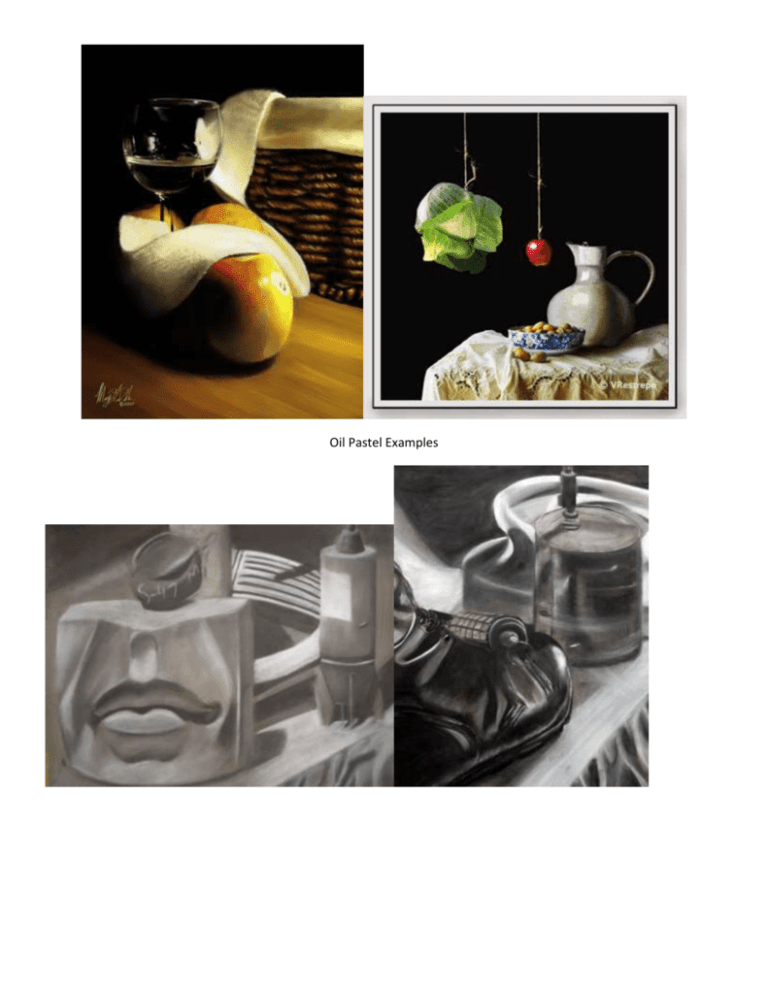
Oil Pastel Examples Charcoal Examples Soft Pastel Examples Advanced Art Studio WMHS Mrs. Zilly Name:________________________________________ 908 Chiaroscuro Still Life Drawings Objective: Each student will bring in an object to add to the class still-life. As a class student will arrange an interesting and creative still-life. Students will draw this still life using a chiaroscuro style in charcoal or pastel (oil or soft). This drawing should be in a large format and look aesthetically pleasing. Supplies: graphite pencil, large paper of student choosing, oil pastels, soft pastels, or charcoal, still-life objects and ruler. Time: 2 weeks Steps: Students bring in and set up class still life. Use new sketchbooks and sketch still life until you get an interesting composition. Questions to ask yourself, Am I using the space well? Does it have visual flow? Is it interesting? Is it balanced? Begin to add value to you sketch similar to the chiaroscuro style. Where will you create your strong contrast and dramatic light source. You should also add value in the medium you would like to use for this piece. Choose a large piece of drawing paper and begin to sketch out the still-life composition in pencil, lightly. Once you feel your composition is perfect, you may add value using your chosen medium. Vocabulary: Chiaroscuro - A word borrowed from Italian ("light and shade" or "dark") referring to the modeling of volume by depicting light and shade by contrasting them boldly. This is one means of strengthening an illusion of depth on a two- dimensional surface, and was an important topic among artists of the Renaissance. Renaissance - A revival or rebirth of cultural awareness and learning that took place during the fourteenth and fifteenth centuries, particularly in Italy, but also in Germany and other European countries. The period was characterized by a renewed interest in ancient Greek and Roman art and design and included an emphasis on human beings, their environment, science, and philosophy. Perspective - The technique artists use to project an illusion of the three-dimensional world onto a two-dimensional surface. Perspective helps to create a sense of depth — of receding space. Fundamental techniques used to achieve perspective are: controlling variation between sizes of depicted subjects, overlapping some of them, and placing those that are on the depicted ground as lower when nearer and higher when deeper. In addition, there are three major types of perspective: aerial perspective, herringbone perspective, and linear perspective. Example of perspective aAerial perspective - The perception of depth in nature can be enhanced by the appearance of atmospheric haze. Although this haze is most commonly humidity (or cloudiness), it could be rain or snow, smoke, or any other kind of vapor. Aerial perspective is the portrayal of that atmospheric haze - one means to adding to an illusion of depth in depicting space on a flat surface. It is achieved by using less focus, along with bluer, lighter, and duller hues for the distant spaces and objects depicted in a picture. Aerial perspective is also referred to as atmospheric perspective. Linear perspective - A system of drawing or painting in which the artist attempts to create the illusion of spatial depth on a two-dimensional surface. It works by following consistent geometric rules for rendering objects as they appear to the human eye. For instance, we see parallel lines as converging in the distance, although in reality they do not. Stated another way, the lines of buildings and other objects in a picture are slanted inward making them appear to extend back into space. If lengthened these lines will meet at a point along an imaginary horizontal line representing the eye level. Each such imaginary line is called an orthogonal. The point at which such lines meet is called a vanishing point. Oil Pastel Techniques: Use turpentine to create washes. I have used this oil pastel technique many times to either soften or flatten a section of my painting. Another use for turpentine is to blend the oil pastels together on the paper. If you dip oil pastels into turpentine, they start to dissolve and become very soft. Then you can use the softened sticks for smooth passages. You can also wet a brush with turpentine and use that to drag the pastel pigments across the surface. These washes look like watercolor washes, but they dry faster. Multiple layers of washes can be created this way. You can control the intensity of the colors by varying the amount of solvent you use. Use a palette knife or a razor blade to create a 'sgraffito' effect (the word is Italian, and it means incising). You can also use soft lead pencils, colored pencils for this purpose. This technique is great for creating fur-like textures on animals. Scrape areas with a razor to create a ghostlike or fuzzy look. As you add layers of oil pastels on top of each other, the painting can begin to look too heavy. Scraping off a region before adding more pigment allows you to avoid this problem while still adding layers. Just as a painting knife is important for an oil painter, so a razor is the oil pastel artist's friend. Soft Pastel Techniques: Line: Lines in a composition can be used in a variety of ways, but we won’t discuss this now. If the student is using pastel to create a line drawing, it’s best to use a harder pastel stick or a pastel pencil. The amount of hand pressure used will vary the line. Blocking: By using the side of a pastel stick larger areas of value or color may be applied into the various shapes of the composition. This has several advantages. It not only makes for a more efficient use of time, but by blocking in larger shapes of value throughout the composition it will be easier to achieve or evaluate value accuracy or color harmony in the composition. This should be done at the early stage of a painting. Blending color: To blend or not to blend. The pastelist has a choice. If a person chooses to blend, it’s best not to blend more than two colors since the colors will loose their intensity or purity. Blending is also best done at earlier stages since color will probably still be applied on top of a blend. Blending may be done in multiple ways; some conventional, some not. Preferably using a finger cot or wearing gloves, the fingers or hand may be used. For small areas many things may be used to blend; such as tortillons, paper stomps, leather chamois, foam makeup applicators, brushes (made from badger, horse or natural hair), rubber color shapers / nibs, even styrofoam peanuts that one student discovered! Layering colors to create colors: The process of layering color to create color is frequently used by pastelist's due to the fact it’s a dry medium. Beautiful colors can be achieved by using broken areas of color one on top of the other. Various techniques may be applied in the different layers to create atmosphere, colors, values or textures. Regular charcoal papers limit how many layers may be applied to their surface. Crosshatching: Hatching (use of parallel lines) or crosshatching (use of a combination of multiple parallel and NONparallel lines). This technique is great for building up color through layering, or creating form by using directional lines that follow the form in various directions. Scumbling: To scumble with pastel use the side of the pastel with very light pressure to skim the surface of the paper over previous colors to create textures, atmosphere and new color affects. In the landscape, this could be just the right technique to use when your distant space is lacking cooler, muted, lower value contrast colors that create aerial perspective. It will work better on a surface that allows more layers. Also, with softer pastel sticks, and possibly a light spray of fixative. Common Assessment -Art Rubric There are ____possible points on this project. Name__________________________________________________ Period_______________ All of the time 4 A majority of the time 3 Some of the time 2 Very little evidence 1 Daily Criteria- Process Consistent work effort: Did the student work on a consistent daily basis? Ability to listen/follow directions: Was the student quiet and respectful when the teacher was talking/presenting information? Did the student follow spoken and written directions on a consistent daily basis? Ability to work independently: Did the student work independently on a consistent daily basis? Positive attitude/respect for peers: Did the student keep a positive attitude on a consistent daily basis? Was the student polite and respectful to his or her classmates? Clean-Up: Did the student clean up his or her supplies/work area on a consistent daily basis? /20 points Exemplary 8 Accomplished 6 Developing 4 Very little evidence 2 Project Benchmarks- Product Student Growth/Comprehension: Did the student demonstrate an understanding of the major concepts outlined in this project? Did the student apply this understanding to promote personal growth in his or her skills, ability, and understanding? Did his or her finished project fulfill the assignment concept goals? Did the student draw a still life in the chiaroscuro style? Artistic Integrity: Did the student create a finished product that contains original/creative/innovative ideas or concepts? (The artwork should not be a copy of another work.) Did the student create an original composition from looking at the still life through high or low eye level, interesting angle, cropping, running objects off the page, etc…? Visual Attraction/Complexity: Did the student create a finished product that initially attracts the viewer to want to see more? Did the artist create a finished product that has conceptual depth/complexity that allows for a sustaining interest on the part of the viewer? (interest comes from detail. Did the student create intricate shapes, add lots of detail, surface texture, strong reflections, etc?) Composition/Mechanics: Did the student create a finished product that contains a dynamic composition based on the proper application of the elements of art and principles of design? Is the piece balanced, does it have a focal point, does the proper use of perspective move your eye through the piece? Craftsmanship: Did the student use craftsmanship with his/her materials (no pencil lines-smooth shading, no white space showing through objects, wrinkle free paper, smudge marks erased)? Did the student show overall care for this piece or does it look sloppy? No evidence 0 Points Earned No evidence 0 Points Earned Chiaroscuro: Did the student use strong contrast in their chiaroscuro execution? Media: Did the student use his/her media correctly to portray a wide range of values that coincide with a proper light source? Did the student use his/her medium well, using multiple techniques throughout the piece to create a realistic still life? Did the student turn in his or her original rubric with the project? Yes +4 No-4 Did the student turn in his or her project on time? Each day the assignment is late 10% will be deducted from the grade. +4 Final Project Grade 72 total points
