Earth Forces 5E Lesson Plan
advertisement
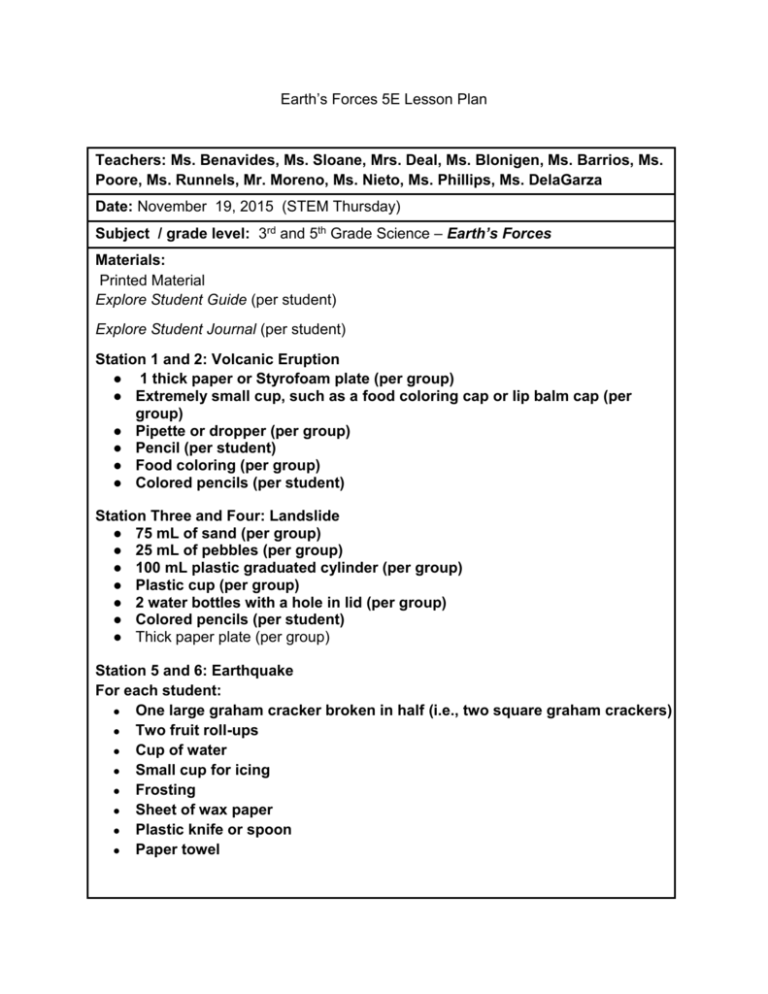
Earth’s Forces 5E Lesson Plan Teachers: Ms. Benavides, Ms. Sloane, Mrs. Deal, Ms. Blonigen, Ms. Barrios, Ms. Poore, Ms. Runnels, Mr. Moreno, Ms. Nieto, Ms. Phillips, Ms. DelaGarza Date: November 19, 2015 (STEM Thursday) Subject / grade level: 3rd and 5th Grade Science – Earth’s Forces Materials: Printed Material Explore Student Guide (per student) Explore Student Journal (per student) Station 1 and 2: Volcanic Eruption ● 1 thick paper or Styrofoam plate (per group) ● Extremely small cup, such as a food coloring cap or lip balm cap (per group) ● Pipette or dropper (per group) ● Pencil (per student) ● Food coloring (per group) ● Colored pencils (per student) Station Three and Four: Landslide ● 75 mL of sand (per group) ● 25 mL of pebbles (per group) ● 100 mL plastic graduated cylinder (per group) ● Plastic cup (per group) ● 2 water bottles with a hole in lid (per group) ● Colored pencils (per student) ● Thick paper plate (per group) Station 5 and 6: Earthquake For each student: ● One large graham cracker broken in half (i.e., two square graham crackers) ● Two fruit roll-ups ● Cup of water ● Small cup for icing ● Frosting ● Sheet of wax paper ● Plastic knife or spoon ● Paper towel TEKS: 3.7 Earth and space. The student knows that Earth consists of natural resources and its surface is constantly changing. The student is expected to: B) investigate rapid changes in Earth's surface such as volcanic eruptions, earthquakes, and landslides; Lesson Objectives: In this activity, students will create models of landforms, including volcanoes and landslides, and describe the forces that created them. SAFETY Discuss the importance of safety when using sand. Students should be wearing goggles at all times during this activity. Discussion Questions: ● How do these models relate to the real world? ● How are they different from the real world? ENGAGEMENT ● Video of earth’s forces that create the various landforms from Youtube:https://www.youtube.com/watch?v=6f3O7Ur-G1Y “Fast Processes.” End video at 4:44. Probing/Eliciting Questions: 1. How does lava turn into new land on Earth’s surface? 2. Landslides are exactly how they sound, land sliding down. What are some things that cause a landslide? (e.g. large amounts of rain or water in the soil, amounts of trees on the land) 3. What is happening when an earthquake is occurring? Transition Statement: We just watched a video about how the Earth’s surface can change very quickly due to volcanoes, landslides, and earthquakes. We will now explore these rapid changes by making our own volcanoes, landslides, and earthquakes. EXPLORATION 1. Students will be given a K/W/L chart to work on before and after stations. The first three groups will go to stations 1, 3, 5 while groups 2, 4, 6 begin K/W/L. After the first rotation, everyone will be working on a station. · Lab Stations: 6 stations: 1. 2. 3. 4. 5. 6. Station One: Volcanoes Station Two: Complete student lab guide section on volcanoes Station Three: Earthquakes Station Four: Complete student lab guide section on earthquakes Station Five: Landslides Station Six: Complete student lab guide section on landslides Procedure and Facilitation for Station One and Two: Volcanoes ● Prepare a small container of colored vinegar for each group (no more than 50 mL needed for each group). Use the food coloring with caution as it can stain clothing. ● Prepare a small cap tightly packed with baking soda. ● Place a paper plate in the center of each group station. ● Make sure each group has enough of three colors of clay. Part 1: How does an erupting volcano affect Earth’s surface? 1. Place a small cup (packed with baking soda) in the center of the paper plate. 2. Fill a pipette/dropper full with colored vinegar. 3. Quickly squeeze vinegar into the cup. 4. Observe the lava flow. When the flow stops, use your pencil to outline the flow on the plate. Use a paper towel to absorb the lava. 5. Mold one color of clay into the shape created by the lava flow. 6. Draw your volcano in your Explore Student Journal. 7. Replace cup in the original location. Repeat steps 3-6 for each color of clay provided. Be sure to cover the total area of the lava flow with clay on the mountain and plate. (Four or more layers is ideal.) Probing/Eliciting Questions: 1. How do volcanoes change the earth’s surface? 2. Do they change it slowly or quickly? Explain Station 3 and 4: Landslide Preparation ● Prepare a tub of 3 parts sand to 1 part pebbles and water. This mixture needs to be able to pack tightly (sand may be reused from the Engage activity). ● Poke small holes in the lids of the water bottles. ● Place materials in the center of each group station. ● If you want to reuse the sand mixture after the lesson, spread out the sand on newspaper or in a large shallow pan and allow the remaining water to evaporate. When sand is dry, use a colander or large mesh screen to separate the pebbles from the sand. Part 2: How do landslides change the land? 1. Measure 100 mL of the sand/pebbles mixture into the beaker. 2. Trace the circle container in the center of the paper plate. Draw trees, roads, homes, and buildings around the circle. Put the paper plate in the pie pan. 3. Pack the pre-made mixture into the small plastic container. Make sure the mixture is tightly packed. 4. Put the paper plate on top of the container. Pick up and flip the paper plate and container over to make the mountain (like making a sand castle.) Put on the table. 5. Draw your mountain in your Explore Student Journal. 6. Use the water bottle to drizzle water on top of the mountain for 3 seconds. 7. Draw the mountain in your Explore Student Journal. 8. Use the water bottle to cause a heavy rain on the mountain for 3-5 seconds. 9. Draw your mountain in the Explore Student Journal. Probing/Eliciting Questions: 1. What forces cause landslides? 2. Do they tear down, build up or both? Explain Stations 5 and 6: Earthquakes Procedure: Make the model a. Give each student about a square foot of wax paper and a large scoop of frosting. Instruct students to spread frosting into a layer about half a cm thick. b. Tell students that the frosting in this model represents the asthenosphere, the viscous layer on which Earth's plates ride. The plates in this model are represented by fruit roll up (oceanic crust which is thin and dense) and graham crackers (continental crust which is thick but less dense). Notice how the frosting is exposed and pushed up where the plates are separated? This is analogous to how magma comes to the surface where real plates are moving apart at divergent plate boundaries. Most divergent plates boundaries are located within oceanic crust. When plates begin to pull apart at continents, rift valleys are made, like the great rift valley in Africa, which can become the bottom of the sea floor if the plates continue to pull apart. 1. Continental-oceanic collision a. Instruct students to remove one of the fruit roll ups from the frosting. (They can eat it if they wish!) b. Tell students to place one of the graham cracker halves lightly onto the frosting asthenosphere next to the remaining fruit roll up piece. The graham cracker represents continental crust, which is thicker and less dense than oceanic crust (fruit roll up). It floats high on the asthenosphere so don't push it down. c. Gently push the continent (graham cracker) Divergent plate boundary a. Instruct students to place the two squares of fruit roll up (oceanic plates) onto the frosting right next to each other. b. Press down slowly on the fruit roll ups (because they are dense and will sink a bit into the asthenosphere) as you slowly push them apart about half a cm. d. ham cracker) towards the ocean plate (fruit roll up) until the two overlap and the graham cracker is on top. The oceanic plate is subducted below the continental one. 2. Continent-continent collision a. Tell students that they will next model what happens when two continents collide. Have them remove both the cracker and fruit roll up from the frosting asthenosphere. (Students can eat or discard the fruit roll up.) b. Place one edge of both crackers into the glass of water for just a few seconds. c. Place the crackers onto the frosting with wet edges next to each other. d. Slowly push the graham crackers towards each other. e. Notice how the wet edges crumple? This is how mountains are made at convergent plate boundaries! When continents move towards each other there is nowhere for the rock to go but up! 3. Transform plate boundaries a. Pick the two crackers up off the frosting and turn them around so that two dry edges are next to each other. b. Push one cracker past the other to simulate a transform plate boundary like the San Andreas fault! 4. Final step: eat all remaining model materials (except, of course, wax paper and plastic utensils!) Probing/Eliciting Questions: 1. What happens when two plates come together (converge)? 2. What happens when two plates separate (diverge)? 3. What happens when two plates slide against each other? EXPLANATION ● Students will explain their findings from the Explore activity (lab stations) while completing their K/W/L Probing/Eliciting Questions: 1. What did you learn about volcanoes, earthquakes, and landslides? 2. What are you still curious about? ELABORATION ● Card Sort Activity · EVALUATION (All) ● 3-2-1 Activity Probing/Eliciting Questions: 1. What are three things you learned today? 2. What are two questions you still have? 3. What is your opinion of this lesson?
