Metals Lab * Striking it Rich
Chemistry of Fire Lab
Chemistry of Fire – Using a Bunsen Burner
Introduction
Problem:
What is the most efficient flame for a Bunsen burner?
How is a Bunsen burner used to heat various substances?
The Bunsen burner was developed by Robert Bunsen during the 1800s and has become the most common source of heat in the chemistry laboratory. Natural gas enters the burner near the base, rises through a barrel, mixes with air, and burns. By proper adjustments the most efficient flame can be obtained.
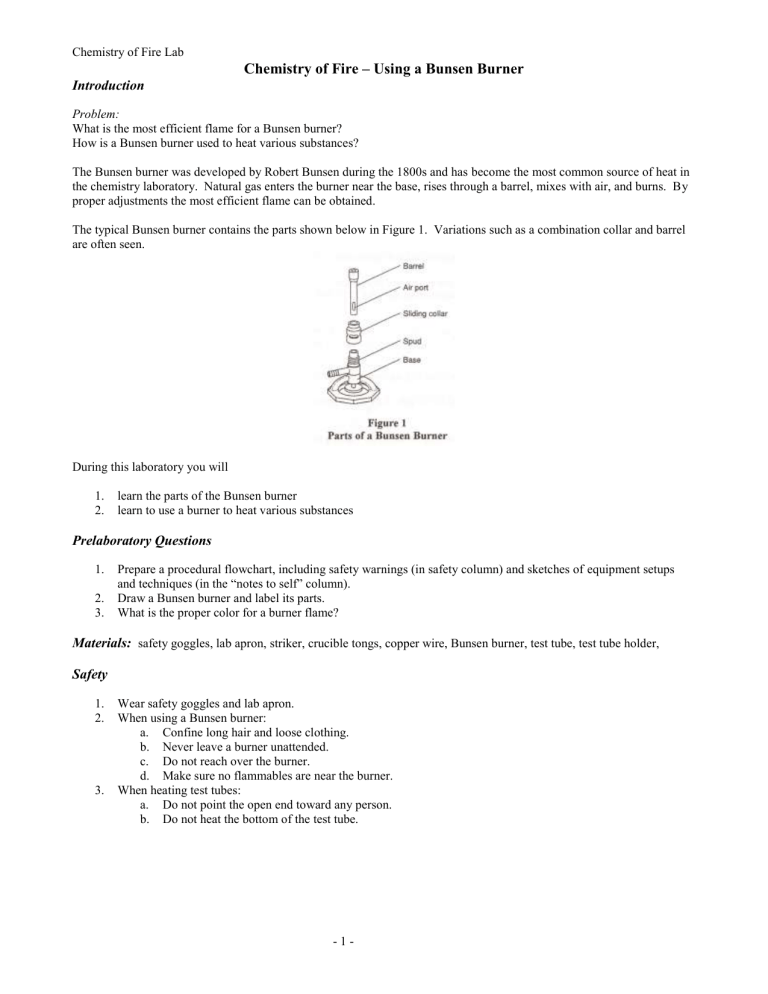
The typical Bunsen burner contains the parts shown below in Figure 1. Variations such as a combination collar and barrel are often seen.
During this laboratory you will
1.
learn the parts of the Bunsen burner
2.
learn to use a burner to heat various substances
Prelaboratory Questions
1.
Prepare a procedural flowchart, including safety warnings (in safety column) and sketches of equipment setups and techniques (in the “notes to self” column).
2.
Draw a Bunsen burner and label its parts.
3.
What is the proper color for a burner flame?
Materials:
safety goggles, lab apron, striker, crucible tongs, copper wire, Bunsen burner, test tube, test tube holder,
Safety
1.
Wear safety goggles and lab apron.
2.
When using a Bunsen burner: a.
Confine long hair and loose clothing. b.
Never leave a burner unattended. c.
Do not reach over the burner. d.
Make sure no flammables are near the burner.
3.
When heating test tubes: a.
Do not point the open end toward any person. b.
Do not heat the bottom of the test tube.
- 1 -
Chemistry of Fire Lab
Procedures
1. Look at your burner and identify each of the parts shown in Figure 1 above.
Setting the flame
2. Be sure the hose is securely fastened to both the burner and the gas outlet. Alert your instructor if you find cracks in the
hose.
3. Practice using the striker before turning on the gas.
4. Turn on the gas to the maximum open position and light the burner using the striker.
If the burner won’t light, try partly shutting the air ports until the burner lights.
5. Adjust the flame by turning the barrel (or opening the air ports).
a. If the flame is a yellow color, use the barrel and air ports to adjust it until it is completely blue and shows an inner
cone as illustrated below in Figure 2.
b. If the flame is blue without the inner cone, adjust the barrel or air ports until an inner cone is visible. The ideal position is right on the brink of the flame going out. If you cannot get an inner cone, work with a flame that is as close as possible to having an inner cone. It will still be plenty hot!
The hottest part of the flame
6. Use tongs to hold a piece of copper wire and insert it into the flame just above the top of the barrel.
7. Slowly lift the wire up through the flame. Observe and record the color of the copper wire at various heights.
The wire is hottest when it glows red. Record the position of the hottest part of the flame.
8. Remove the wire from the flame and allow it to cool on the bench.
Heating a test tube
9. Half fill a test tube with tap water. Apply heat to the side of the test tube as show below in Figure 3.
Notice that the top of the test tube is at an angle and pointed away from all people in the area.
10. If heat is applied directly to the test tube, the contents will shoot out of the tube or “bump”. A slow smooth movement
of the tube in and out of the flame should be used to heat the contents evenly. Once the water is boiling, remove the
test tube from the flame, discard the water into the sink and set the tube and holder aside to cool, in a test tube rack.
- 2 -
Chemistry of Fire Lab
Cleaning Up
1. Place any broken glass in the labeled container for broken glass.
2. Carefully clean your glassware and return all of your equipment to its proper location.
3. Wash your hands before leaving the laboratory.
Analysis and Conclusions
(to be completed in your lab notebook)
1. What are the advantages of using a blue flame instead of a yellow one for heating objects in the laboratory?
2. Where is the hottest part of the blue flame?
3. When heating a liquid in a test tube where should the test tube be placed relative to the flame? Why?
Adapted from Zumdahl, World of Chemistry, 2002
- 3 -
