Drafting and Sewing a Maxi Skirt
advertisement
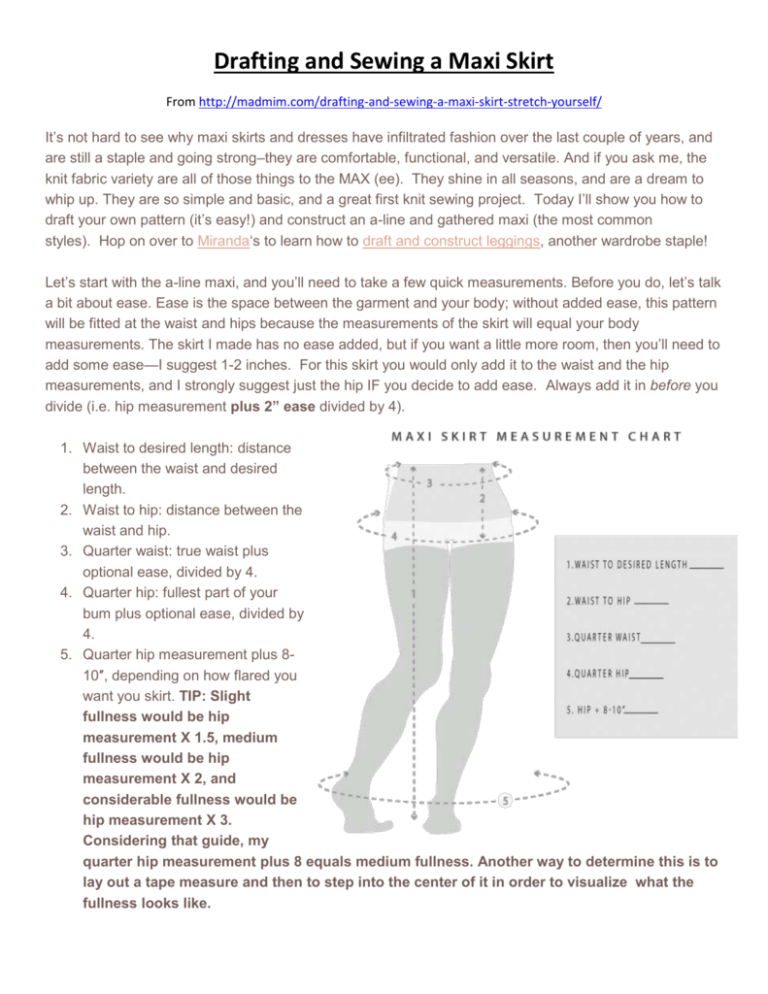
Drafting and Sewing a Maxi Skirt From http://madmim.com/drafting-and-sewing-a-maxi-skirt-stretch-yourself/ It’s not hard to see why maxi skirts and dresses have infiltrated fashion over the last couple of years, and are still a staple and going strong–they are comfortable, functional, and versatile. And if you ask me, the knit fabric variety are all of those things to the MAX (ee). They shine in all seasons, and are a dream to whip up. They are so simple and basic, and a great first knit sewing project. Today I’ll show you how to draft your own pattern (it’s easy!) and construct an a-line and gathered maxi (the most common styles). Hop on over to Miranda‘s to learn how to draft and construct leggings, another wardrobe staple! Let’s start with the a-line maxi, and you’ll need to take a few quick measurements. Before you do, let’s talk a bit about ease. Ease is the space between the garment and your body; without added ease, this pattern will be fitted at the waist and hips because the measurements of the skirt will equal your body measurements. The skirt I made has no ease added, but if you want a little more room, then you’ll need to add some ease—I suggest 1-2 inches. For this skirt you would only add it to the waist and the hip measurements, and I strongly suggest just the hip IF you decide to add ease. Always add it in before you divide (i.e. hip measurement plus 2” ease divided by 4). 1. Waist to desired length: distance between the waist and desired length. 2. Waist to hip: distance between the waist and hip. 3. Quarter waist: true waist plus optional ease, divided by 4. 4. Quarter hip: fullest part of your bum plus optional ease, divided by 4. 5. Quarter hip measurement plus 810″, depending on how flared you want you skirt. TIP: Slight fullness would be hip measurement X 1.5, medium fullness would be hip measurement X 2, and considerable fullness would be hip measurement X 3. Considering that guide, my quarter hip measurement plus 8 equals medium fullness. Another way to determine this is to lay out a tape measure and then to step into the center of it in order to visualize what the fullness looks like. A-Line Maxi Skirt Draft the Pattern: Cut a piece of paper that is plenty longer than your waist to desired length measurement (give yourself at least 6”). One edge needs to be completely straight, as it will become your center front and fold line. 1. Starting a couple of inches from the top, measure down the length of number 1 and mark. This is your Center Front as well as as the length of your maxi skirt. 2. Starting back at the top again and measure down the length of number 2 and mark. This will be your hip point. 3. Once again from the top, measure out perpendicularly your quarter waist (number 3). 4. At your previously marked hip point, measure out perpendicularly your quarter hip (number 4). 5. To finish plotting, start at the bottom of the CF line and measure out perpendicularly the quarter width of your bottom hem (number 5). 6. Now to connect the dots by starting a 1/2 down from your CF line, and drawing a gentle curve that ends at the point of line 3. 7. From there you’ll continue down with another gentle curve to the end point of line 4. 8. Complete your side seam by continuing with an almost straight line (very slightly curved towards the top) until your reach about 3/4′s of an inch above line 5. 9. Finish the pattern by drawing another very gentle curve to meet with the CF point. Add a 1/4″ seam allowance everywhere except the bottom hem where you’ll add 5/8″ for turning (more or less depending on your planned hemming). Cut and construct: 1. Cut 2 (front and back skirt pieces) from fabric, making sure that your width has the greatest degree of stretch. 2. Serge/sew the side seams together. Check out Miranda’s construction a knit tee post for tips on construction stitches for both a sewing machine and serger. 3. Cut a rectangle of fabric for the waistband that has a width that is yourwaist measurement minus 2″ (negative ease for a snug fit), and a length that is your desired waistband thickness times 2 and plus 1/4″ seam allowance. Fold in half widthwise, right sides together, and serge/sew side seam. Just a note, I made both of my bands smaller because I planned on belting my skirts. For a true yoga waistband you’ll want a length of about 10 inches, which folded over will be about a 5 inch band that hug your hips. 4. Fold in half lengthwise now WST, encasing the seam allowance within the band. Be sure to try your band on at this point to ensure a nice snug fit (take note that it will likely stretch out a bit during sewing). 5. Fit the waistband over the right side of your skirt, pin–matching side seams, and serge/sew. Now flip up the band, finish the bottom hem, and you’re ready to rock. Gathered Maxi Skirt Cut and construct: 1. Cut a large rectangle that has the width of your waist measurement times 1.5, and is your desired length long plus a 5/8″ for turning. Fold it in half widthwise, and serge/sew the side seam. 2. Gather the top edge using your preferred gathering method. I like to zig zag over cording or string, and then cinch/gather by pulling the string tight. This is SO much easier than two rows of basting threads, and it produces nice, even gathers. I also love to gather using the serger, it’s also much faster and accurate then the double row basting method. Gather it to your waist circumference (doesn’t have to be exact yet). 3. Cut another rectangle that is the width of your waist circumference minus 2″, and the length of your desired waistband thickness times 2 plus a 1/4″ seam allowance. Fold in half widthwise and RST, and sew/serge. Then fold again lengthwise, encasing the side seam within the waistband. Try out and check fit; remember that it will likely stretch a small amount during sewing, so you want it fairly snug. 4. Gather your skirt top to match the circumference of your waistband and pin matching side seams, raw edges and make sure it’s RST. 5. Serge/sew. If you used the cord gathering method I suggest first basting, then removing the cord before you serge/sew. Flip waistband up, hem bottom edge and wear!
