Accelerated Reader
advertisement
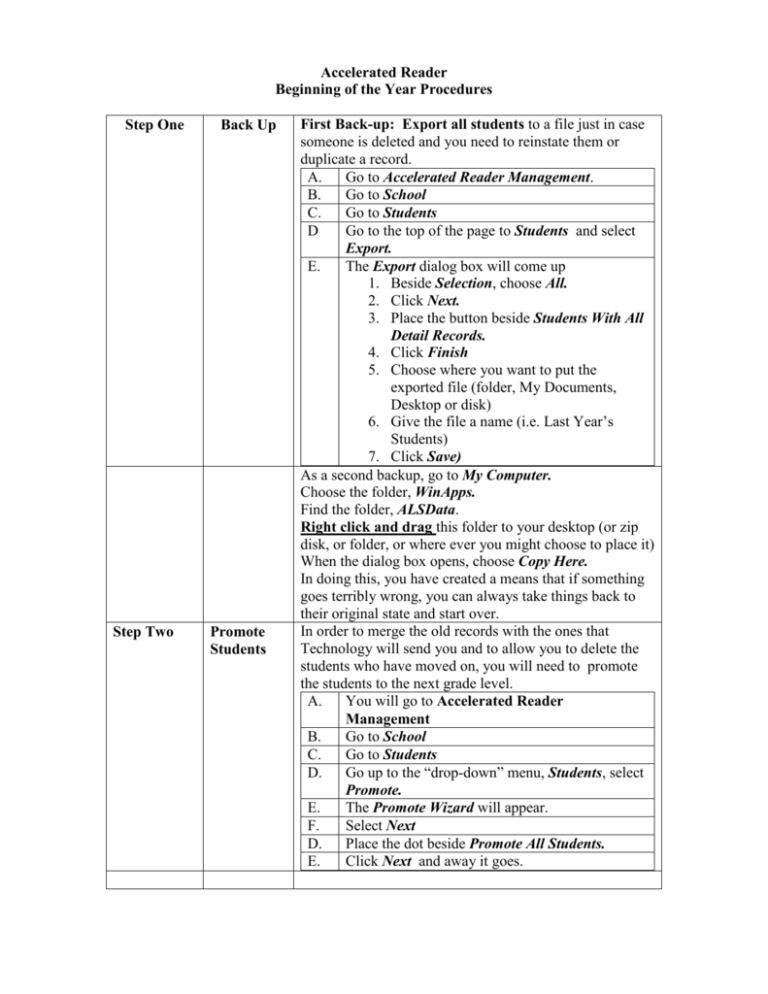
Accelerated Reader Beginning of the Year Procedures Step One Step Two Back Up Promote Students First Back-up: Export all students to a file just in case someone is deleted and you need to reinstate them or duplicate a record. A. Go to Accelerated Reader Management. B. Go to School C. Go to Students D Go to the top of the page to Students and select Export. E. The Export dialog box will come up 1. Beside Selection, choose All. 2. Click Next. 3. Place the button beside Students With All Detail Records. 4. Click Finish 5. Choose where you want to put the exported file (folder, My Documents, Desktop or disk) 6. Give the file a name (i.e. Last Year’s Students) 7. Click Save) As a second backup, go to My Computer. Choose the folder, WinApps. Find the folder, ALSData. Right click and drag this folder to your desktop (or zip disk, or folder, or where ever you might choose to place it) When the dialog box opens, choose Copy Here. In doing this, you have created a means that if something goes terribly wrong, you can always take things back to their original state and start over. In order to merge the old records with the ones that Technology will send you and to allow you to delete the students who have moved on, you will need to promote the students to the next grade level. A. You will go to Accelerated Reader Management B. Go to School C. Go to Students D. Go up to the “drop-down” menu, Students, select Promote. E. The Promote Wizard will appear. F. Select Next D. Place the dot beside Promote All Students. E. Click Next and away it goes. Step Three Unenroll Before you can delete any old records, the students must be unenrolled from all Renaissance Programs (AR, STAR Reading and STAR Math). You must go into each program in much the same way. A. Go to the Management Program B. Go to Classes (In Accelerated Reader, you will have to choose to go to School > Classes ) (In the STAR products’ Management Programs, you do not have two different options, they automatically open in School.) C. In the window that has the list of classes (teachers), click on the first teacher. Hold down the shift key and scroll down until you see the last teacher and click. This will have selected all teachers. D. Step Four Delete the graduated class In the window that has the list of enrolled students, click on the name of the first student. Hold down the shift key and scroll down until you see the last student and click. This will have selected all students. In the blue column to the left, click on the Uneroll button. When the window comes up that asks if you wish to “unenroll the selected students from their classes” click yes. And Away it goes! Remember you will have to do this in all Renaissance Programs. They share the student database and unenrolling in one program does not unenroll them in all programs!! In elementary school you will need to delete the 6th graders (last year’s 5th graders) In middle school, you will need to delete the 9th graders (last year’s 8th graders) Prior to deleting those students, export them as just one more backup and also as a file that can be emailed to feeder schools so the students’ reading records can be continued. This also gives you a backup of records in the case of a retainee needing to be brought back into your database. A. B. C. D Go to Accelerated Reader Management. Go to School Go to Students Go to the top of the page to Students and select Export. E. The Export dialog box will come up 1. Click on the gray tab labeled Grade. 2. All students will be in grade level order. 3. Type 6 (or 9 or the grade level that you want to export) and the Quick Find window opens. 4. Click on the first student in that particular grade level 5. Hold down the shift key and scroll to the last student in that grade level. 6. Click Next. 7. Place the button beside Students With All Detail Records. 8. Click Finish 9. Choose where you want to put the exported file (folder, My Documents, Desktop or disk) 10. Give the file a name (i.e. Last Year’s Fifth Grade Students) 11. Click Save Now that you have exported the students to a file, we need to delete these students from the database. A You are in Accelerated Reader Managemet B Go to School C Go to Students D. Click on the gray tab at the top labeled Grade. This will organize all students numerically by grade level E. Type the number of the grade level you wish to delete. This will bring up the Quick Find window and will take you to the first student in that grade level F. click on the name of the first student. G. Hold down the shift key and scroll down the page to last student you wish to delete. Click on the name. All students you wish to delete will be highlighted H. In the blue column to the left, click on delete. I. The “Are You Sure” window will appear. Click on Yes (even if you are not, be assured that you are backed up!) and students are being deleted Step Five Import New Students Step Six Set Up Classes Enroll Students Step Seven Go to the email from Technology. Open the message (not the file). On the file icon, right click and select Save As When the Save As window opens, use the drop down menu to direct the file to be saved in a location of your choice (desktop, disk, zip disk, etc) A Go to AR Management B Go to School C Go to Students D. Go up to the menu bar and from the drop-down menu Students select Import E From the Import window, choose the location in which you save the file from Technology F. Click on the file and select Open G. The Import Student wizard opens. I. Click under Selection – All J. Leave the class selection screen set to Do Not Enroll Students at This Time. K. The next screen is a double check of what you have chosen. Click Finish. L. If the system thinks that there is already a student by the name of ……, it will show you a screen that compares the two records. You will now choose the option that allows you to merge the records and all of the following. M. After you have imported the new records, you will have to now set up your classes – teacher by teacher. It is best if each teacher has their own specific password.
