Introduction - Union College
advertisement
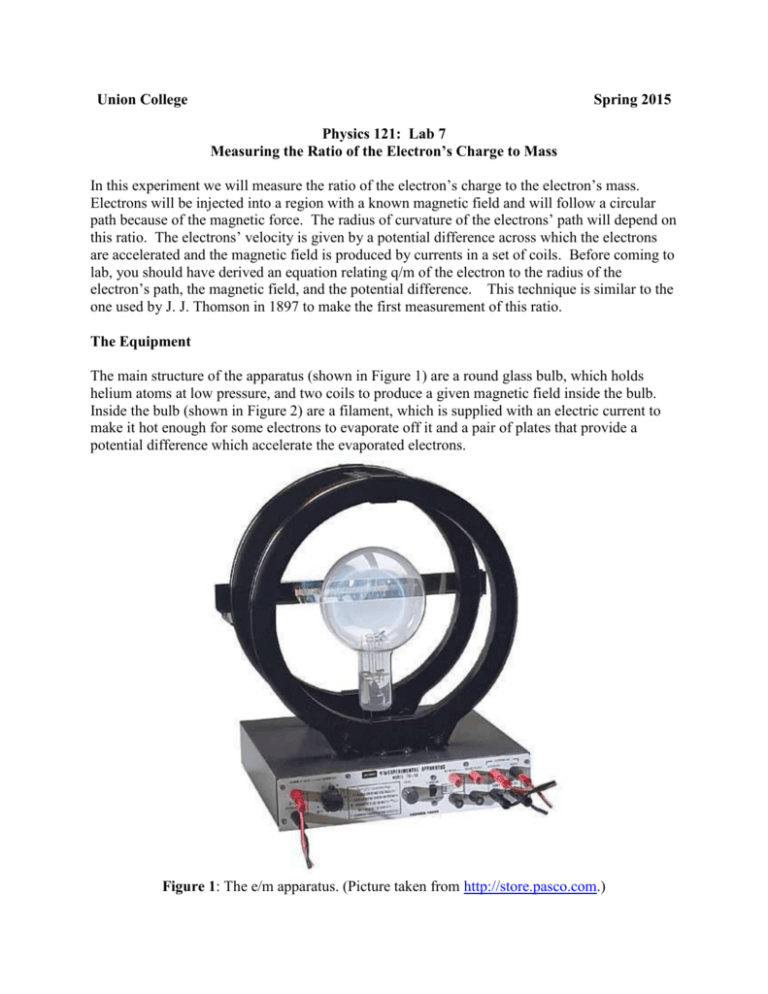
Union College Spring 2015 Physics 121: Lab 7 Measuring the Ratio of the Electron’s Charge to Mass In this experiment we will measure the ratio of the electron’s charge to the electron’s mass. Electrons will be injected into a region with a known magnetic field and will follow a circular path because of the magnetic force. The radius of curvature of the electrons’ path will depend on this ratio. The electrons’ velocity is given by a potential difference across which the electrons are accelerated and the magnetic field is produced by currents in a set of coils. Before coming to lab, you should have derived an equation relating q/m of the electron to the radius of the electron’s path, the magnetic field, and the potential difference. This technique is similar to the one used by J. J. Thomson in 1897 to make the first measurement of this ratio. The Equipment The main structure of the apparatus (shown in Figure 1) are a round glass bulb, which holds helium atoms at low pressure, and two coils to produce a given magnetic field inside the bulb. Inside the bulb (shown in Figure 2) are a filament, which is supplied with an electric current to make it hot enough for some electrons to evaporate off it and a pair of plates that provide a potential difference which accelerate the evaporated electrons. Figure 1: The e/m apparatus. (Picture taken from http://store.pasco.com.) Figure 2: Electronic components inside the bulb (Picture taken from http://store.pasco.com.) The accelerated electrons pass through a slit in the anode and form a beam of electrons which travel in the magnetic field of the coils. The helium atoms in the space between the coils are excited by collisions with the electrons and then these excited atoms emit photons as they instantly return to lower energy levels. As a result you will literally see the path of the electron beam. The two coils on either side of the bulb have the same number of windings, the same radius, and are separated by a distance equal to the radius of the coils. This configuration, called “Helmholtz coils” (after the German Scientist Hermann von Helmholtz; see http://scienceworld.wolfram.com/biography/Helmholtz.html), produces a magnetic field that is roughly uniform in the region inside the bulb. With a reasonable current the strength of the magnetic field is large enough to bend the electron beam into a full circle. The Circuit Set-Up Figure 3: Electrical set-up of Circuits and Meters. Take the time to identify all the pieces of the apparatus and make sure that all the wires and meters are connected as indicated in Figure 3 and explained below. Power Supply #1 – This DC power supply produces the current through the Helmholtz coils. The magnitude of the current through the coils is displayed on the ammeter. Use this current to calculate the magnetic field. (IMPORTANT: be sure to avoid using the milli-amp scale on the multimeter.) Power Supplies #2/3 – AC and DC supplies provided by a single device (PASCO SF-9585A). The AC connection causes the current to flow in the filament to evaporate some electrons. The DC connection provides the accelerating voltage, Vacc, for the anode, which should be read from the voltmeter. Procedure 1. Set the (AC) filament heating voltage to 6v and then turn on power supply #2/3. Leave it at that setting for the entirety of the experiment—NOTE: the voltage to the heater of the electron gun should NEVER exceed 6.3 V – higher voltages will burn out the filament and destroy the e/m tube. It will take a few minutes for the filament to heat up sufficiently. 2. While the filament is heating, turn up the voltage on the DC side to 150 V. Once the filament is sufficiently heated, you will see the glowing helium atoms trace the electron beam emerging from the “electron gun.” Use a permanent magnet to bend the electron beam to confirm that it is indeed a beam of charged particles. 3. Turn on power supply #1 and watch the electron beam change as you slowly increase it. Turn up the voltage until the electron beam makes a complete circle. This should be in the range of 6 to 9 V and the current should be between 1 and 2 A. Also keep an eye on the ammeter and take care that the current does not exceed 2 A. You should also continually monitor the current through the coils throughout the experiment to adjust for drift when necessary. 4. Make sure that the plane of the circle is parallel to the planes of the coils. If this is not so, GENTLY rotate the bulb so that it becomes parallel, taking care not to remove the tube from its socket. 5. Compare the circular electron beam with the mirrored ruler behind the glass bulb. Adjust the current in the coils until the circle is the size such that the ruler crosses through the middle of the circle. Practice reading the radius of the electron beam. To avoid parallax errors, move your head to visually line up one edge of the circular electron beam with its image in the mirror and note its position on the ruler. Move your head to repeat with the other side of the electron beam and average the two measurements. The zero-point on the ruler will not necessarily be lined up with the center of the circle, but by averaging the measurements on both sides, you will be correcting for any displacement of the zero point. 6. Record the magnitude of the current, I, the voltage of anode, Vacc, and the radius of the beam, r, in an Excel spreadsheet. 7. Vary the Vacc by 25 v and change the current to keep the circle about the same size (so that the center of the circle is always in line with the ruler). Measure r. Record your new values of Vacc, I, and r. 8. Repeat this process, varying Vacc in steps of 25 v, adjusting I to keep r roughly constant, for a total of 10 good measurements. 9. Estimate the uncertainties in these measurements and record in your data table. Analysis 1. For each data set, calculate the magnetic field from the current through the Helmholtz Coils. Consider the equation for B on the axis of a coil of wire with current I that you derived for the Introduction. The Helmholtz Coils involve two sets of coils, each with N turns—convince yourself that the B from all these turns and both sets of coils are all equal in magnitude and direction. The equation for the total magnetic field in the center, then, is: B o 8 N o I N 2R 2 I . 2 3 / 2 4 ( R / 2) 2 R 2 R 125 The coils in this experiment have N=130 turns and a radius of R=15 cm. 2. Make a plot with 2(Vacc) on the y-axis and (Br)2 on the x-axis. Consider your derived equation for e/m and note that this plot should produce a straight-line. What should the slope of this line be? 3. Do a linear regression to obtain a measure of the slope with uncertainty. 4. Calculate a value, with uncertainty, for the ratio e/m. 5. Note that the above instructions did not make any mention of the Earth’s magnetic field, which clearly must have contributed to the magnetic field inside the glass bulb. Is this a significant source of systematic error? It would be systematic and not random, since it would always produce an error in the same direction. Compare the strength of the Earth’s magnetic field (3x10⁻⁵ T) to the values in your data table produced by the Helmholtz Coils, and determine the percent error that ignoring this effect causes. Comment in your lab report. Report: Write an Abstract and Results Section.
