The Charge to Mass Ratio of the Electron
advertisement
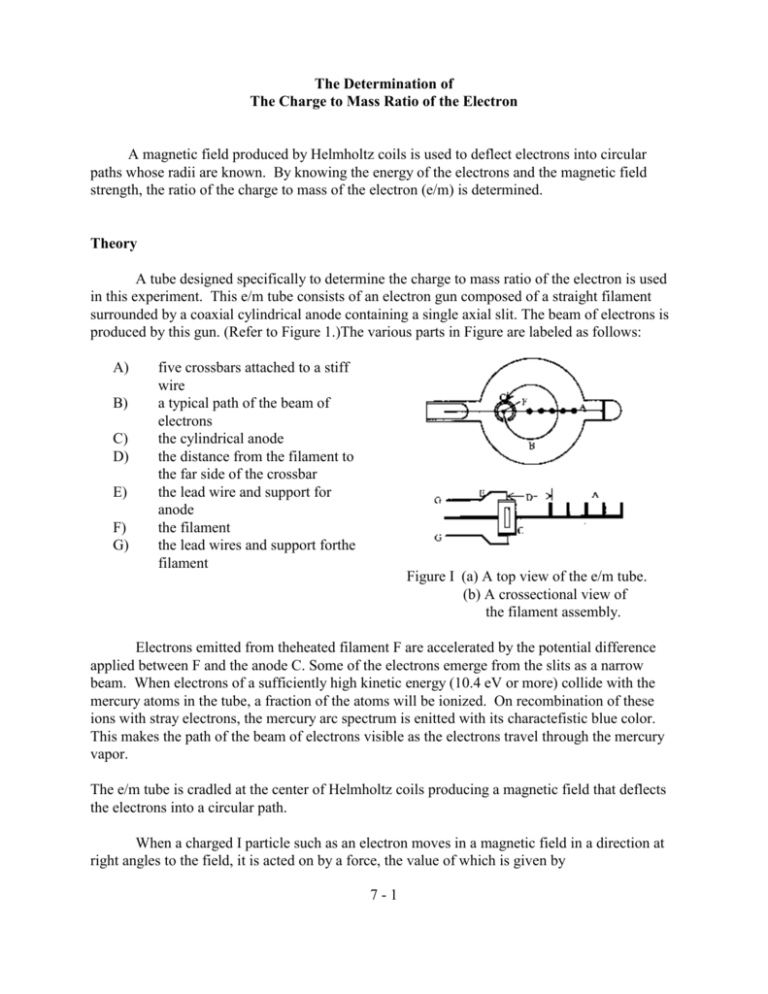
The Determination of The Charge to Mass Ratio of the Electron A magnetic field produced by Helmholtz coils is used to deflect electrons into circular paths whose radii are known. By knowing the energy of the electrons and the magnetic field strength, the ratio of the charge to mass of the electron (e/m) is determined. Theory A tube designed specifically to determine the charge to mass ratio of the electron is used in this experiment. This e/m tube consists of an electron gun composed of a straight filament surrounded by a coaxial cylindrical anode containing a single axial slit. The beam of electrons is produced by this gun. (Refer to Figure 1.)The various parts in Figure are labeled as follows: A) B) C) D) E) F) G) five crossbars attached to a stiff wire a typical path of the beam of electrons the cylindrical anode the distance from the filament to the far side of the crossbar the lead wire and support for anode the filament the lead wires and support forthe filament Figure I (a) A top view of the e/m tube. (b) A crossectional view of the filament assembly. Electrons emitted from theheated filament F are accelerated by the potential difference applied between F and the anode C. Some of the electrons emerge from the slits as a narrow beam. When electrons of a sufficiently high kinetic energy (10.4 eV or more) collide with the mercury atoms in the tube, a fraction of the atoms will be ionized. On recombination of these ions with stray electrons, the mercury arc spectrum is enitted with its charactefistic blue color. This makes the path of the beam of electrons visible as the electrons travel through the mercury vapor. The e/m tube is cradled at the center of Helmholtz coils producing a magnetic field that deflects the electrons into a circular path. When a charged I particle such as an electron moves in a magnetic field in a direction at right angles to the field, it is acted on by a force, the value of which is given by 7-1 F = qvB, (1) where B is the magnetic field strength, q is the charge on the particle (in this case q = e because the particle is an electron), and v is the velocity of the particle. This force causes the electron to move in a circular path in a plane perpendicular to the magnetic field. The radius of this circle is such that the required centfipetal force is furnished by the force exerted on the electron by the magnetic field. Therefore, mv 2 (2) evB , r where m is the mass of the electron and r is the radius of its circular path. If the velocity of the electron is due to its being accelerated through a potential difference V, then it has a kine.tic energy of 1 mv 2 eV . (3) 2 Substituting the value of v from (3) into (2) e 2V 2 2. m B r (4) Thus, when the accelerating voltage, the field strength, and the radius of the circular path described by the electron are known, then the value of elm can be computed. The magnetic field B that causes the electron to move in a circular path is produced by Helmholtz coils and has a value of 8 NI B o , (5) 125a where N is the number of tums of wire on each coil, I is the current through the coils, a is the mean radius of the coils, and m. is the permeability of free space. Substituting (5) into (4) gives e 3.91a 2 V . m o2 N 2 I 2 r 2 (6) Equation (6) is the working equation for the apparatus used. The quantity within the first set of parentheses is constant for any given pair of Helmholtz coils. (For the Helmholtz coils with which we are working, the number of turns of wire N = 130 and the mean radius of the coils a is about 0.15 meters, but you should measure it.) The value of r, the radius of the circle in which the electron beam travels, can be varied by changing either the accelerating voltage or the Helmholtz coil field current “I”, which is used to deflect the electrons. 7-2 Apparatus o e/m vacuum tube, with the outside edge of the crossbars located at the following distances from the filament, which correspond to the diameters of the paths: crossbar o o o 1 2 3 4 5 6 7 0.050 ± 0.001 meters 0.060 ± 0.001 0.070 ± 0.001 0.080 ± 0.001 0.090 ± 0.001 0.100 ± 0.001 0.110 ± 0.001 Helmholtz coils, 130 tums of wire on each coil and a mean radius of 0.15 ±0.01 m 3 DC power supplies o magnetic dip needle 3 digi.tal voltmeters o leads Procedure 1) To minimize the effect of the Earth’s magnetic field, orient the Helmholtz coils parallel ot the north-south direction. 2) Turn on the power switch. The unit will perform a 30-sec self-test. When the self-test is complete, the display will stabilize and show “000”. A 5-10 minute warm-up time is recommended before taking measurements. 3) During the warm-up period, measure the diameter of the Helmholtz coils. Since they are not perfectly circular, measure both inside and outside diameters on several axes to get a good average. Also measure the separation between the coils which is supposed to equal the radius of the coils. The slight differences in the measured coil radii will give you a good idea of the number of significant digits of this measurement. 4) Turn the Voltage Adjust control up to 200 V and observe the bottom of the electron gun. The bluish beam will be traveling straight down. 5) Turn the Current Adjust control up and observe the circular deflection of the beam. Increase the current to the Helmholtz coils until the electron beam describes a circle. The diameter of the beam can be measured using the internal fluorescent scale inside the tube. Make fine adjustments to the field current until the outside edge of the electron beam is tangent to the outside edge of one of the crossbars. 6) For the 200 V accelerating voltage, measure the coil current values required to bend the beam into as many of the eight available radii as possible. Because the beam spreads out, 7-3 take separate readings for the inside and the outside of the beam at each radius. This will give a rough idea of the uncertainty of the measurements. 7) Repeat the experiment for accelerating voltages of 300 V and 400 V. Arrange all this in a neat data table. If time permits repeat for voltages 250 V and 350 V. Analysis Calculate the charge-to-mass ratio for all the data values that you have. It will save time if you create a data table in an EXCELL spreadsheet and program other columns to calculate values. In this experiment we will use statistical methods to determine uncertainties. Calculate separate values for each crossbar intersection with the beam (inner and outer) and one average and standard deviation for each different accelerating voltage. In a table, list the individual values of e/m, the average values and standard deviation for each voltage, the theoretical value, and the percentage error between the average value and the theoretical value. Finally calculate a grand average for all your measurements. Draw an error-bar graph displaying your results. Conclusions Answer the basic question: Did the calculated mean value agree with the known value of the charge-to-mass ratio to within a standard deviation of the mean? Explain what factor(s) caused the greatest error in your determination of the charge to mass ratio of the electron and why. Questions 1) Start with the magnetic field produced by a circular loop, and derive the expression for the magnetic field produced by Helmholtz coils (5). Also derive the final working equation (6). 2) Explain how electrons being ejected in slightly different directions by the accelerating apparatus can cause the beam to spread as observed. 3) It can be argued that the better results are obtained when using the outer edge of the beam to determine the radius of the electron-beam path. Explain why this would be so. Do your results favor this argument? 4) Explain the meaning of a standard deviation. 5) Did you notice any systematic differences in the results for the different radii? Would you expect any? How would you explain these differences? 6) Did you notice any systematic differences in the results for the different accelerating voltages? Would you expect any? How would you explain these differences? 7-4
