Titration to find vitamin c amount
Chemistry 11 Santa Monica College
Vitamin-C Analysis
Note: You will need to bring a powdered or liquid drink, health product, fruit samples, or other commercial sample to lab for vitamin-C analysis. You will need enough to make 500 mL of sample for use in 3-5 titrations. Be sure the product you select actually contains vitamin-C (as listed on the label or in a text or website) and be sure to save the label or reference for comparison to your final results. Be careful to only select products where the actual vitamin-C content in mg or percent of RDA (recommended daily allowance) is listed. The best samples are lightly colored and/or easily pulverized.
Objectives:
• To standardize a KIO
3
solution using a redox titration.
• To analyze an unknown and commercial product for vitamin-C content via titration.
• To compare your results for the commercial product with those published on the label.
Background:
The two reactions we will use in this experiment are:
(1) KIO
3
(aq) + 6 H +
(aq) + 5 I (aq) Æ 3 I
2
(aq) + 3 H
2
O (l) + K +
(aq) generation of I
2
(2) C
6
H
8
O
6
(aq) + I
Vitamin-C
(ascorbic acid)
(ascorbic acid, C
6
H
8
O
6
2
(aq) Æ C
6
H
6
O
6
(aq) + 2 I- (aq) + 2 H
Reaction one generates aqueous iodine, I
2
+
(aq) oxidation of vitamin-C
(aq) . This is then used to oxidize vitamin-C
) in reaction two. Both of these reactions require acidic conditions and so dilute hydrochloric acid, HCl (aq) , will be added to the reaction mixture. Reaction one also requires a source of dissolved iodide ions, I ⎯ (aq) . This will be provided by adding solid potassium iodide, KI (s) , to the reaction mixture.
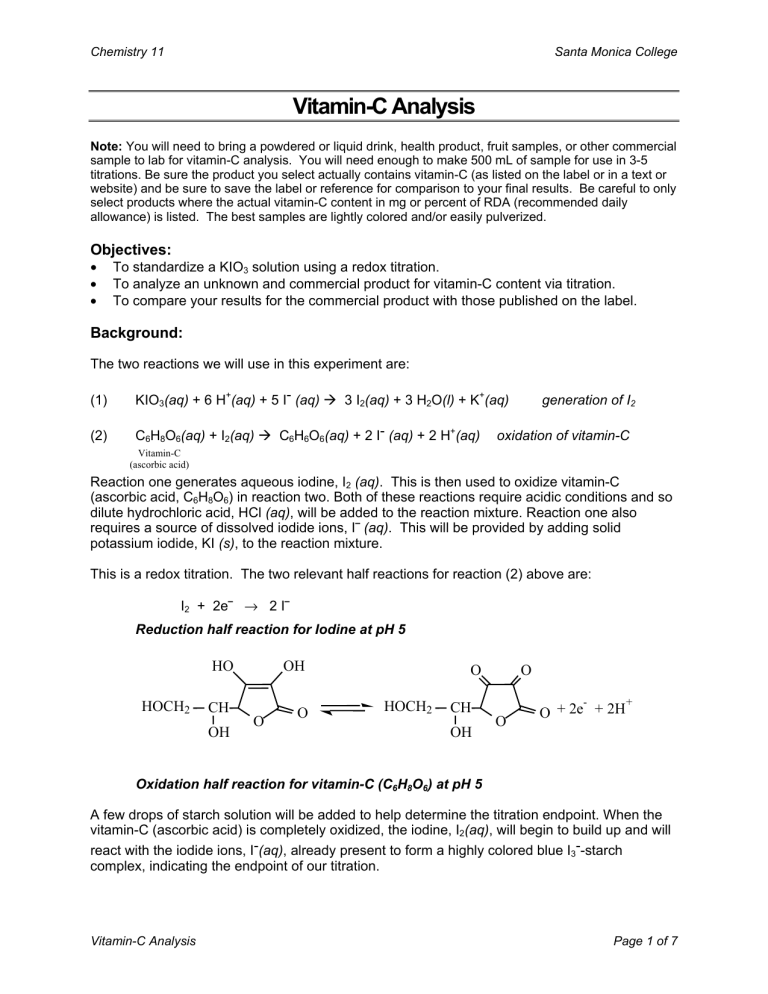
This is a redox titration. The two relevant half reactions for reaction (2) above are:
I
2
+ 2e ⎯ → 2 I ⎯
Reduction half reaction for Iodine at pH 5
HO OH
O O
HOCH
2
CH
OH
O
O
HOCH
2
CH
OH
O
O
+ 2e
-
+ 2H
+
Oxidation half reaction for vitamin-C (C
6
H
8
O
6
) at pH 5
A few drops of starch solution will be added to help determine the titration endpoint. When the vitamin-C (ascorbic acid) is completely oxidized, the iodine, I
2 react with the iodide ions, I(aq)
(aq) , will begin to build up and will
, already present to form a highly colored blue I complex, indicating the endpoint of our titration.
3
--starch
Vitamin-C Analysis Page 1 of 7
Chemistry 11 Santa Monica College
Vitamin-C: An Important Chemical Substance
Vitamin-C, known chemically as ascorbic acid , is an important component of a healthy diet. The history of vitamin-C revolves around the history of the human disease scurvy, probably the first human illness to be recognized as a deficiency disease. Its symptoms include exhaustion, massive hemorrhaging of flesh and gums, general weakness and diarrhea. Resultant death was common. Scurvy is a disease unique to guinea pigs, various primates, and humans. All other animal species have an enzyme which catalyzes the oxidation of Lgluconactone to L-ascorbic acid, allowing them to synthesize vitamin-C in amounts adequate for metabolic needs.
HOCH
2
H
C
OH
H
HO
O
OH
O
L
-Ascorbic Acid -- Vitamin-C
As early as 1536, Jacques Cartier, a French explorer, reported the miraculous curative effects of infusions of pine bark and needles used by Native Americans. These items are now known to be good sources of ascorbic acid. However, some 400 years were to pass before vitamin-C was isolated, characterized, and synthesized. In the late 1700's, the British Navy ordered the use of limes on ships to prevent scurvy. This practice was for many years considered to be quackery by the merchant marines, and the Navy sailors became known as “Limeys”. At that time scurvy aboard sailing vessels was a serious problem with often up to 50% of the crew dying from scurvy on long voyages.
The RDA ( Recommended Daily Allowance ) for vitamin-C put forward by the Food and Nutrition Board of the National Research Counsel is 60 mg/day for adults. It is recommended that pregnant women consume an additional 20 mg/day. Lactating women are encouraged to take an additional 40 mg/day in order to assure an adequate supply of vitamin-C in breast milk. Medical research shows that 10 mg/day of vitamin-C will prevent scurvy in adults. There has been much controversy over speculation that vitamin-C intake should be much higher than the RDA for the prevention of colds and flu. Linus Pauling, winner of both a Nobel Prize in Chemistry and the Nobel Peace Prize, has argued in his book, Vitamin-C and the Common Cold , that humans should be consuming around 500 mg of vitamin-C a day (considered by many doctors to be an excessive amount) to help ward off the common cold and prevent cancer.
Vitamin-C is a six carbon chain, closely related chemically to glucose. It was first isolated in 1928 by the
Hungarian-born scientist Szent-Gyorgi and structurally characterized by Haworth in 1933. In 1934,
Rechstein worked out a simple, inexpensive, four-step process for synthesizing ascorbic acid from glucose. This method has been used for commercial synthesis of vitamin-C. Vitamin-C occurs naturally primarily in fresh fruits and vegetables.
Table 1: Vitamin-C content of some foodstuffs
Vitamin-C (mg/100g) Foods
100 – 350
25 – 100
Chili peppers, sweet peppers, parsley, and turnip greens
Citrus juices (oranges, lemons, etc.), tomato juice, mustard greens, spinach, brussels sprouts
10 – 25 Green beans and peas, sweet corn, asparagus, pineapple, cranberries, cucumbers, lettuce
< 10 Eggs, milk, carrots, beets, cooked meat
From Roberts, Hollenberg, and Postman, General Chemistry in the Laboratory.
Vitamin-C Analysis Page 2 of 7
Chemistry 11 Santa Monica College
Procedure:
Work in groups of three, dividing the work into three parts (standardization, unknown analysis, and food products) among your group members and then compare data if you are to finish in one period. Work carefully: your grade for this experiment depends on the accuracy and precision of each of your final results.
Materials and Equipment:
You will need the following additional equipment for this experiment:
3 Burets
1 Mortar and pestle
1 Buret stand
SAFETY: Avoid contact with iodine solutions, as they will stain your skin. Wear safety glasses at all times during the experiment.
WASTE DISPOSAL: You may pour the blue colored titrated solutions into the sink. However, all unused KIO
3
(after finishing parts I-III) must go in a waste container for disposal. This applies to all three parts of the experiment.
Proper Titration Techniques:
Using a Buret
Proper use of a buret is critical to performing accurate titrations. Your instructor will demonstrate the techniques described here.
1. Rinsing: Always rinse a buret (including the tip) before filling it with a new solution. You should rinse the buret first with deionized water, and then twice with approximately
10-mL aliquots of the solution you will be using in the buret. Be sure to swirl the solution to rinse all surfaces. If you are using an acid or base solution be careful to avoid spilling the solution on hands or clothing.
2. Filling: Mount the buret on a buret stand. Be sure that the tip fits snuggly into the buret and is pressed all the way in. If the tip is excessively loose, exchange it for a tighter fitting one. Using a funnel rinsed in the same manner as the buret, fill the buret with the titrant to just below the 0.00 mL mark. There is no need to fill the buret to exactly 0.00 mL since you will use the difference between the ending and starting volumes to determine the amount delivered.
When the buret is full, remove the funnel as drops remaining in or around the funnel can creep down and alter your measured volume. If you overfill the buret, drain a small amount into an empty beaker. Do not re-use this
"extra" solution as it may have been contaminated by the beaker or diluted slightly by any water present in the beaker. Always pour fresh solution into the buret.
3. Removing Air Bubbles: Often air bubbles will be trapped in the tip of a newly filled buret. These can be difficult to see and troublesome as they alter the measured volume when they escape. To remove air bubbles hold the buret over an open beaker and open the stopcock fully to allow solution to flow out of the buret. Your instructor will demonstrate this technique. Refill the buret as necessary.
Vitamin-C Analysis Page 3 of 7
Chemistry 11 Santa Monica College
4. Reading the Buret: You should always read the volume in a buret from the bottom of the meniscus viewed at eye level (see Figure 1). A black or white card held up behind the buret helps with making this reading. Burets are accurate to ±0.02 mL and all readings should be recorded to two decimal places. Be sure to record both the starting and ending volumes when performing a titration.
The difference is the volume delivered.
4
5
4.62 mL; Eye level
Figure 1. Reading a Buret
Good Titration Techniques
Throughout your scientific careers you will probably be expected to perform titrations; it is important that you learn proper technique. In performing a titration generally an indicator that changes color is added to a solution to be titrated (although modern instruments can now perform titrations automatically by spectroscopically monitoring the absorbance). Add titrant from the buret dropwise , swirling between drops to determine if a color change has occurred.
Only if you know the approximate end-point of a titration should you add titrant faster, but when you come within a few milliliters of the endpoint you should begin to slow down and add titrant dropwise.
As you become proficient in performing titrations you will get a "feeling" for how much to open the stopcock to deliver just one drop of titrant. Some people become so proficient that they can titrate virtually "automatically" by allowing the titrant to drip out of the buret dropwise while keeping a hand on the stopcock, and swirling the solution with the other hand. If you do this, be sure that the rate at which drops are dispensed is slow enough that you can stop the flow before the next drop forms! Overshooting an end-point by even one drop is often cause for having to repeat an entire titration. Generally, this will cost you more time than you will gain from a slightly faster droping rate.
Refill the buret between titrations so you won’t go below the last mark. If a titration requires more than the full volume of the buret, you should either use a larger buret or a more concentrated titrant. Refilling the buret in the middle of a trial introduces more error than is generally acceptable for analytical work.
Set-up and Preparation of Equipment:
1. Clean and rinse a large 600-mL beaker using deionized water. Label this beaker “standard
KIO
3
solution.”
2. From the large stock bottles of ~0.01 M KIO should be enough KIO
3
3
obtain about 600 mL of KIO
3
solution. This
for your group for all three parts of the experiment including rinsings.
The reason for collecting one beaker of stock is there is no guarantee that different batches of KIO
3
from the stockroom will have the same exact molarity. By having one beaker of stock you ensure that all your trials come from the same solution. (If you run out of stock or spill this solution accidentally you will need to repeat part I on the new solution).
Vitamin-C Analysis Page 4 of 7
Chemistry 11 Santa Monica College
3. Clean and rinse three burets once with deionized water and then twice with small (5-10 ml) aliquots of standard KIO
3
from your large beaker. Pour the rinsings into a waste beaker.
4. Fill each of the burets (one for each part of the experiment) with KIO
3
from your beaker.
Remove any air bubbles from the tips. The starting volumes in each of the burets should be between 0.00 mL and 2.00 mL. If you use a funnel to fill the burets be sure it is cleaned and rinsed in the same way as the burets and removed from the buret before you make any readings to avoid dripping from the funnel into the buret.
Each of the following parts should be performed simultaneously by different members of your group. You do not have enough time to do these sequentially and finish in one lab period.
Part I: Standardization of your KIO
3
solution
The KIO
3
solution has an approximate concentration of about ~0.01 M. You will need to determine exactly what the molarity is to three significant figures. Your final calculated results for each trial of this experiment should differ by less than ± 0.0005 M. Any trials outside this range should be repeated. You will need to calculate in advance how many grams of pure vitamin-C powder (ascorbic acid, C
6
H
8
O
6
) you will need to do this standardization (this is part of your prelaboratory exercise). Remember that your buret holds a maximum of 50.00 mL of solution and ideally you would like to use between 25-35 mL of solution for each titration
(enough to get an accurate measurement, but not more than the buret holds).
1. Calculate the approximate mass of ascorbic acid you will need and have your instructor initial your calculations on the data sheet.
2. Weigh out approximately this amount of ascorbic acid directly into a 250-mL Erlenmeyer flask. Do not use another container to transfer the ascorbic acid as any loss would result in a serious systematic error. Record the mass added in each trial to three decimal places in your data table. It is not necessary that you weigh out the exact mass you calculated, so long as you record the actual mass of ascorbic acid added in each trial for your final calculations.
3. Dissolve the solid ascorbic acid in 50-100 mL of deionized water in an Erlenmeyer flask.
4. Add approximately 0.5-0.6 g of KI, 5-6 mL of 1 M HCl, and 3-4 drops of 0.5% starch solution to the flask. Swirl to thoroughly mix reagents.
5. Begin your titration. As the KIO
3
solution is added, you will see a dark blue (or sometimes yellow) color start to form as the endpoint is approached. While adding the KIO
3
swirl the flask to remove the color. The endpoint occurs when the dark blue color does not fade after
20 seconds of swirling.
6. Calculate the molarity of this sample. Repeat the procedure until you have three trials where your final calculated molarities differ by less than ± 0.0005 M.
Part II: Vitamin-C Unknown (internal control standard)
1. Obtain two vitamin-C tablets containing an unknown quantity of vitamin-C from your instructor.
2. Weigh each tablet and determine the average mass of a single tablet.
Vitamin-C Analysis Page 5 of 7
Chemistry 11 Santa Monica College
3. Grind the tablets into a fine powder using a mortar and pestle.
4. Weigh out approximately 0.20-0.25 grams of the powdered unknown directly into a 250-mL
Erlenmeyer flask. Do not use another container to transfer the sample as any loss would result in a serious systematic error. Record the mass added in each trial to three decimal places in your data table.
5. Dissolve the sample in about 100 mL of deionized water and swirl well. Note that not all of the tablet may dissolve as commercial vitamin pills often use calcium carbonate (which is insoluble in water) as a solid binder.
6. Add approximately 0.5-0.6 g of KI, 5-6 mL of 1 M HCl, and 2-3 drops of 0.5% starch solution to the flask before beginning your titration. Swirl to mix.
7. Begin your titration. As the KIO
3
solution is added, you will see a dark blue (or sometimes yellow) color start to form as the endpoint is approached. While adding the KIO
3
swirl the flask to remove the color. The endpoint occurs when the dark blue color does not fade after
20 seconds of swirling.
8. Perform two more trials. If the first titration requires less than 20 mL of KIO
3 mass of unknown slightly in subsequent trials.
, increase the
9. Calculate milligrams of ascorbic acid per gram of sample and using the average mass of a tablet, determine the number of milligrams of vitamin-C contained in each tablet. Be sure to use the average molarity for KIO significantly from your average.
3
determined in Part I for these calculations. Your results should be accurate to at least three significant figures. Repeat any trials that seem to differ
Part III: Fruit juices, foods, health-products, and powdered drink mixes
Solids samples:
1.
Pulverize solid samples (such as vitamin pills, cereals, etc.) with a mortar and pestle.
Powdered samples (such as drink mixes) may be used directly.
2.
Weigh out enough powdered sample, so that there will be about 100 mg of ascorbic acid
(according to the percentage of the RDA or mg/serving listed by the manufacturer) in each trial.
3. Add the sample to a 250-mL Erlenmeyer flask containing 50-100 mL of water. (Note: If your sample is highly colored, you might want to dissolve the KI in the water before adding the mix, so that you can be sure it dissolves).
4. Add approximately 0.5-0.6 g of KI, 5-6 mL of 1 M HCl, and 3-4 drops of 0.5% starch solution to the flask. Swirl to thoroughly mix reagents.
5. Begin your titration. As the KIO
3
solution is added, you will see a dark blue (or sometimes yellow or black depending on the color of your sample) color start to form as the endpoint is approached. While adding the KIO
3
swirl the flask to remove the color. The endpoint occurs when the dark color does not fade after 20 seconds of swirling.
6. Perform two more trials. If the first titration requires less than 20 mL of KIO
3 mass of unknown slightly in subsequent trials.
, increase the
Vitamin-C Analysis Page 6 of 7
Chemistry 11 Santa Monica College
7. Calculate the milligrams of ascorbic acid per gram of sample. Be sure to use the average molarity determined for the KIO
3
in Part I for these calculations. Your results should be accurate to at least three significant figures. Repeat any trials that seem to differ significantly from your average.
Liquid samples:
1. If you are using a pulpy juice, strain out the majority of the pulp using a cloth or filter.
2. Using a graduated cylinder, measure out at least 100 mL of your liquid sample. Record the volume to three significant figures (you will calculate the mass of ascorbic acid per milliliter of juice).
3. Add this liquid to an Erlenmeyer flask.
4. Add approximately 0.5-0.6 g of KI, 5-6 mL of 1 M HCl, and 3-4 drops of 0.5% starch solution to the flask. Swirl to thoroughly mix reagents.
5. Begin your titration. As the KIO
3
solution is added, you will see a dark blue (or sometimes yellow or black depending on the color of your sample) color start to form as the endpoint is approached. While adding the KIO
3
swirl the flask to remove the color. The endpoint occurs when the dark color does not fade after 20 seconds of swirling. With juices it sometimes takes a little longer for the blue color to fade, in which case the endpoint is where the color is permanent.
6. Perform two more trials. If the first titration requires less than 20 mL of KIO
3 volume of unknown slightly in subsequent trials.
, increase the
7. Calculate the milligrams of ascorbic acid per milliliter of juice. Be sure to use the average molarity determined for the KIO
3
in Part I for these calculations. Your results should be accurate to at least three significant figures. Repeat any trials that seem to differ significantly from your average.
Vitamin-C Analysis Page 7 of 7
