Trouble Shooting
advertisement

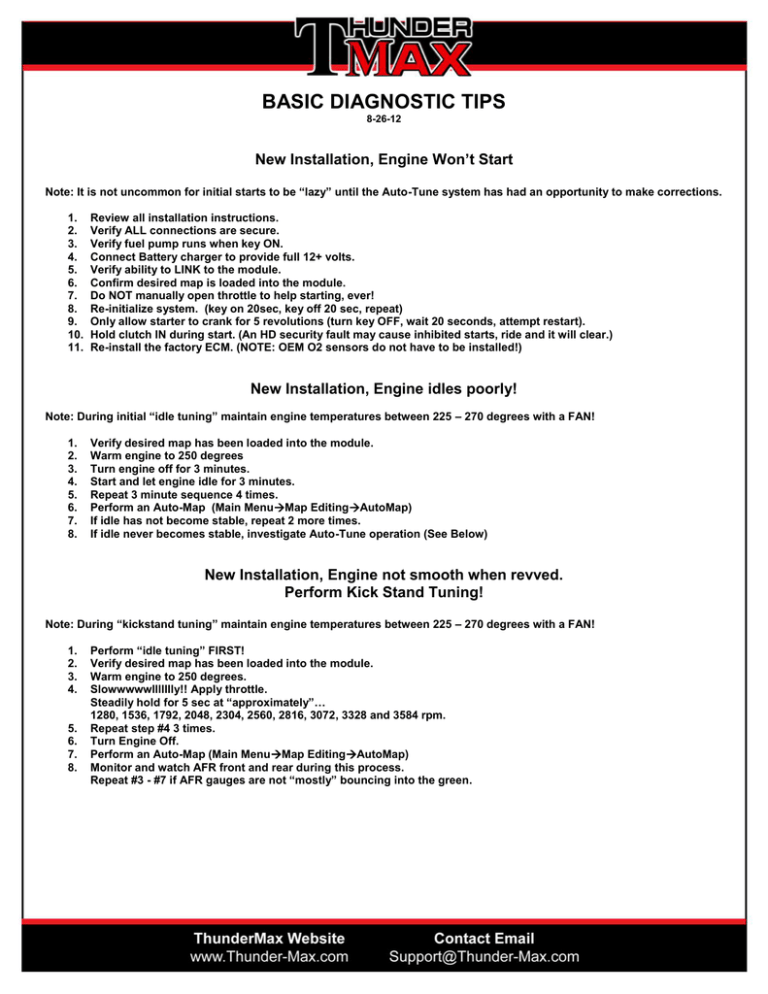
BASIC DIAGNOSTIC TIPS 8-26-12 New Installation, Engine Won’t Start Note: It is not uncommon for initial starts to be “lazy” until the Auto-Tune system has had an opportunity to make corrections. 1. 2. 3. 4. 5. 6. 7. 8. 9. 10. 11. Review all installation instructions. Verify ALL connections are secure. Verify fuel pump runs when key ON. Connect Battery charger to provide full 12+ volts. Verify ability to LINK to the module. Confirm desired map is loaded into the module. Do NOT manually open throttle to help starting, ever! Re-initialize system. (key on 20sec, key off 20 sec, repeat) Only allow starter to crank for 5 revolutions (turn key OFF, wait 20 seconds, attempt restart). Hold clutch IN during start. (An HD security fault may cause inhibited starts, ride and it will clear.) Re-install the factory ECM. (NOTE: OEM O2 sensors do not have to be installed!) New Installation, Engine idles poorly! Note: During initial “idle tuning” maintain engine temperatures between 225 – 270 degrees with a FAN! 1. 2. 3. 4. 5. 6. 7. 8. Verify desired map has been loaded into the module. Warm engine to 250 degrees Turn engine off for 3 minutes. Start and let engine idle for 3 minutes. Repeat 3 minute sequence 4 times. Perform an Auto-Map (Main MenuMap EditingAutoMap) If idle has not become stable, repeat 2 more times. If idle never becomes stable, investigate Auto-Tune operation (See Below) New Installation, Engine not smooth when revved. Perform Kick Stand Tuning! Note: During “kickstand tuning” maintain engine temperatures between 225 – 270 degrees with a FAN! 1. 2. 3. 4. 5. 6. 7. 8. Perform “idle tuning” FIRST! Verify desired map has been loaded into the module. Warm engine to 250 degrees. Slowwwwwllllllly!! Apply throttle. Steadily hold for 5 sec at “approximately”… 1280, 1536, 1792, 2048, 2304, 2560, 2816, 3072, 3328 and 3584 rpm. Repeat step #4 3 times. Turn Engine Off. Perform an Auto-Map (Main MenuMap EditingAutoMap) Monitor and watch AFR front and rear during this process. Repeat #3 - #7 if AFR gauges are not “mostly” bouncing into the green. Are My O2 Sensors Working? To verify correct operation of the O2 sensors, perform the following steps. 1. 2. 3. 4. 5. 6. 7. Link to the module. Select monitoring. Locate the Front AFR, Rear AFR and Target AFR monitor gauges (multi-colored windows). Start the engine. Verify regularly changing values are displayed in the Front and Rear AFR gauges. Verify normal values (see below note) in the range of 11-14 are shown. As the engine warms, verify that Front and Rear AFR values, seem to follow the AFR Target value. Normal AFR Values: The AFR Target is the “desired” AFR value which the Auto-Tune will attempt to match. How closely the AFR values follow the AFR Target depends on the “Auto-Tune State” of the module. A new installation may vary considerably until the Auto-Tune module completes its adjustments. An existing installation should now be displaying AFR values close (mostly in the green) to the AFR Target value. The AFR Target value constantly changes relative to engine temperature, throttle position and rpms. My O2 Sensors are NOT WORKING! 1. 2. 3. 4. 5. 6. 7. 8. The Data Port is not plugged in (Power for the Auto-Tune module) Damaged wiring on the closed loop module harness Damaged wiring or connector on the oxygen sensor Oxygen sensor is unplugged Oxygen sensor is damaged or dirty Oxygen sensor connections are reversed. Octane boosters have been used. (Additives damage O2 sensors). OEM sensors are PLUGGED IN. (OEM sensors MUST be unplugged). Still Problems, What Now? Correct Map Loaded? After selection of a map from the Map Database, the map must be LOADED into the module. Link and select Main MenuMap EditingWrite Module Maps and Settings Did issues exist before the ThunderMax installation? The ThunderMax will greatly improve your engines operation. The ThunderMax Module cannot “fix” faults located elsewhere in the motorcycle. Can I Clean My Oxygen Sensors? You can clean the sensors with a product like CRC brand "QD electronic cleaner" (Permatex® part# 24378) then reinstall sensors and re-test. Engine Ran Great but Starting to Run Poorly Old, spoiled or bad gas - drain and replace Low octane fuel – refill with highest Octane ALWAYS!!!!! Fuel pressure low – Check Fuel Pressure Fuel filter plugged – Service fuel filter every 25,000 miles Electrical connections or corrosion – Service all connections Throttle Position Sensor Faulty - Replace TPS IAC motor Faulty – Replace IAC motor. Head Temperature Sensor Faulty – Replace sensor Cracks in exhaust system – inspect Intake air leaks – inspect Dirty throttle body - clean Electrical short - inspect all wiring for abrasion or heat damage. Precautions Never directly wash the ECM, connectors or fuse compartments with water! Do not use fuel octane boosters. Sources for more information In addition for issues unrelated to the engine management system we receive calls about other electronic or electrical issues ® on motorcycles which ThunderMax has no association with. You will need the Harley-Davidson Electrical Diagnostic Manual to sort out these types of problems with your motorcycle. These manuals are model-specific and contain valuable information in troubleshooting electrical issues with your motorcycle. The troubleshooting charts that follow are set up to aid the technician in solving issues that you may be experiencing. If the problem is not related to the ECM, you will need to refer to the service and diagnostic manuals for the specific model in question. We receive calls about faulty security systems, lights, radios and CB’s which ThunderMax has no association with on your motorcycle.


