Sweep Motor - Lobster Sports
advertisement
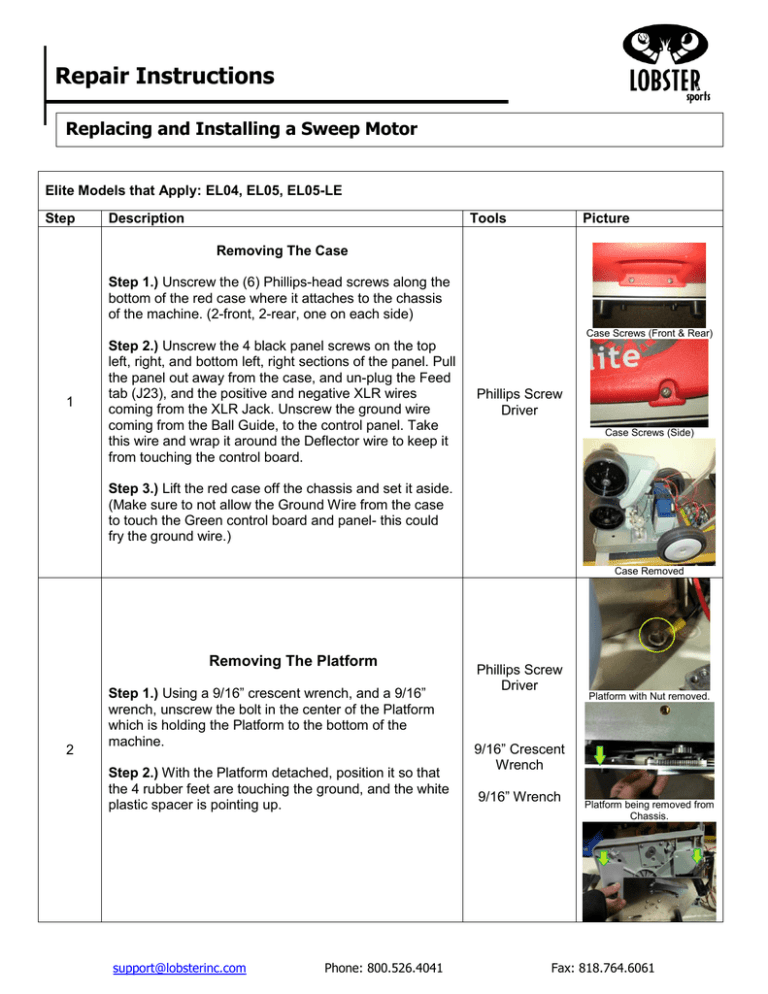
Repair Instructions Replacing and Installing a Sweep Motor Elite Models that Apply: EL04, EL05, EL05-LE Step Description Tools Picture Removing The Case Step 1.) Unscrew the (6) Phillips-head screws along the bottom of the red case where it attaches to the chassis of the machine. (2-front, 2-rear, one on each side) Case Screws (Front & Rear) 1 Step 2.) Unscrew the 4 black panel screws on the top left, right, and bottom left, right sections of the panel. Pull the panel out away from the case, and un-plug the Feed tab (J23), and the positive and negative XLR wires coming from the XLR Jack. Unscrew the ground wire coming from the Ball Guide, to the control panel. Take this wire and wrap it around the Deflector wire to keep it from touching the control board. Phillips Screw Driver Case Screws (Side) Step 3.) Lift the red case off the chassis and set it aside. (Make sure to not allow the Ground Wire from the case to touch the Green control board and panel- this could fry the ground wire.) Case Removed Removing The Platform 2 Step 1.) Using a 9/16” crescent wrench, and a 9/16” wrench, unscrew the bolt in the center of the Platform which is holding the Platform to the bottom of the machine. Step 2.) With the Platform detached, position it so that the 4 rubber feet are touching the ground, and the white plastic spacer is pointing up. support@lobsterinc.com Phone: 800.526.4041 Phillips Screw Driver Platform with Nut removed. 9/16” Crescent Wrench 9/16” Wrench Platform being removed from Chassis. Fax: 818.764.6061 Repair Instructions Replacing and Installing a Sweep Motor Platform Being rested feet down- with magnet facing up. Removing and Replacing the Sweep Motor Step 1.) Unplug the quick-disconnect snap-in sensor wire from the Sweep Pos plug on the wire harness. Step 2.) Unscrew the 4 screws holding the sweep motor to the chassis base. 3 Sweep Motor Screws. Step 3.) Place the new sweep motor in so that the gear at the bottom of the motor is closer to the chassis side. Fasten the motor to the chassis using the 4 screws. Step 4.) Connect the snap-in sensor coming from the Sweep Motor into the Sweep Pos plug on the wire harness. (Please see diagram below). Sweep Motor being removed. Snap-in Sensor Wire connected to Sweep Pos (Red, Black and Orange.) Re-attaching the Platform the Chassis Step 1.) Carefully line up the platform with the Chassis, so that the Rack Gear teeth, fit in-between the Spur Gear teeth. (See picture below). 4 Rack Gear teeth lining up with Spur Gear teeth. Step 2.) Push the ½ inch platform bolt thru the bottom of the platform, so that the threaded edge is popping out of the top/middle of the chassis. Step 3.) Put the Battery Negative Ground Loop over the threads of the ½ inch platform bolt, and cap it off with the bolt. Step 4.) Tighten the nut and yoke bolt until the nut can be turned by your thumb and index finger. *If the platform bolt is tightened too much, this can support@lobsterinc.com Phone: 800.526.4041 The threading is pointed out in blue, and the Battery negative Ground Loop is orange. Fax: 818.764.6061 Repair Instructions Replacing and Installing a Sweep Motor cause a Feedback or Overcurrent Sweep Motor Error. Re-attaching The Case Case Removed Step 1.) Lift the red case and lower until it is covering the whole Chassis of the machine. 5 Step 2.) Screw the (6) Philips-head screws along the bottom of the red case where it attaches to the chassis of the machine. (2-front, 2-rear, one on each side) Case Screws (Front & Rear) Case Screws (Side) How to Order Elite Replacement Parts Elite Parts Website: http://www.lobstersports.com Email: sales@lobstersports.com Phone: 800.526.4041 Fax: 818.764.6061 We accept Visa, MasterCard or Discover & PayPal support@lobsterinc.com Phone: 800.526.4041 For Elite 1- Elite 5LE: For Elite Freedom: Fax: 818.764.6061
