weber carburetor troubleshooting guide
advertisement
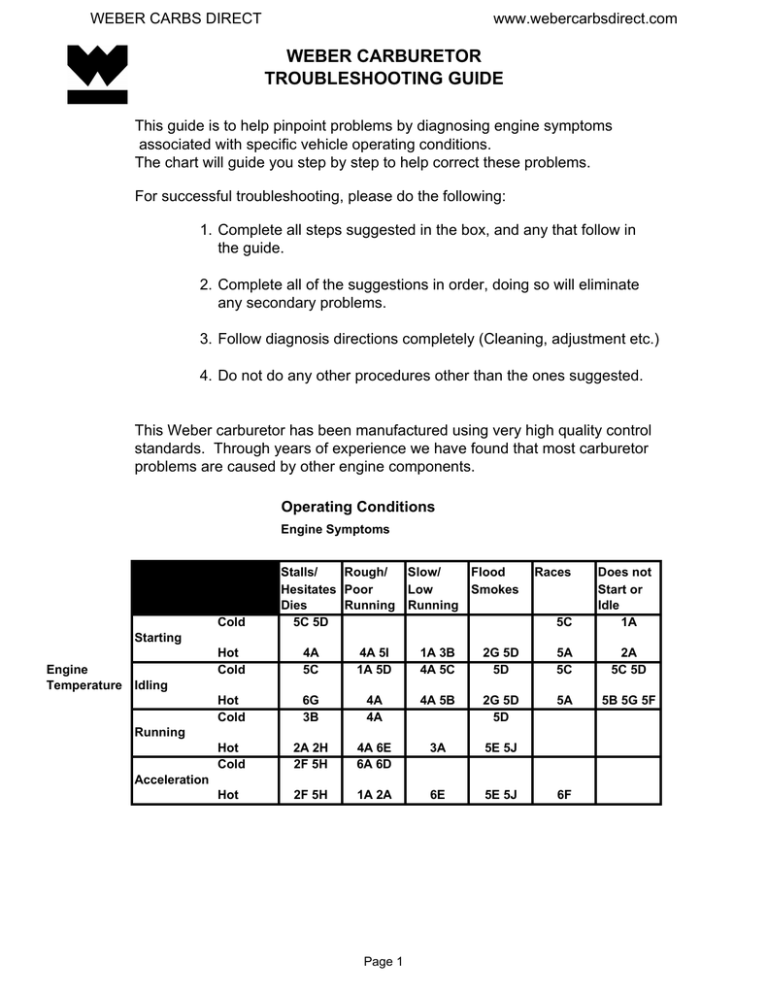
WEBER CARBS DIRECT www.webercarbsdirect.com WEBER CARBURETOR TROUBLESHOOTING GUIDE This guide is to help pinpoint problems by diagnosing engine symptoms associated with specific vehicle operating conditions. The chart will guide you step by step to help correct these problems. For successful troubleshooting, please do the following: 1. Complete all steps suggested in the box, and any that follow in the guide. 2. Complete all of the suggestions in order, doing so will eliminate any secondary problems. 3. Follow diagnosis directions completely (Cleaning, adjustment etc.) 4. Do not do any other procedures other than the ones suggested. This Weber carburetor has been manufactured using very high quality control standards. Through years of experience we have found that most carburetor problems are caused by other engine components. Operating Conditions Engine Symptoms Cold Stalls/ Rough/ Hesitates Poor Dies Running 5C 5D Slow/ Low Running Flood Smokes Races 5C Does not Start or Idle 1A Starting Engine Temperature Idling Hot Cold 4A 5C 4A 5I 1A 5D 1A 3B 4A 5C 2G 5D 5D 5A 5C 2A 5C 5D Hot Cold 6G 3B 4A 4A 4A 5B 2G 5D 5D 5A 5B 5G 5F Hot Cold 2A 2H 2F 5H 4A 6E 6A 6D 3A 5E 5J Hot 2F 5H 1A 2A 6E 5E 5J Running Acceleration Page 1 6F WEBER CARBS DIRECT www.webercarbsdirect.com WEBER CARBURETOR TROUBLESHOOTING GUIDE FOR YOUR SAFETY Remember ! A Clean engine will make all work easier, accurate, and safer. ALWAYS: NEVER: Use new hose clamps on fuel hoses. Allow any dirt in the carburetor. Replace any cracked or missing hoses. (fuel, vacuum or coolant) Run the engine without proper filtration (Air and Fuel Filters). Label any hose or wire before removing. Allow fuel to leak or spill Use an insulated connector for any wire. Damage any gasket surfaces Over tighten Jets or levers. 1. ELECTRICAL SYSTEM To make sure that the ignition system is working correctly do steps 1 A - 1C with the ignition on. IMPORTANT NOTE Make sure that the battery is fully charged with no corrosion present on the terminals. A. Test the fuse for the ignition/charging circuit: If you do not have 12 volts at either side if the fuse, replace fuse. B. Check static ignition timing: Make sure that you do not have excessive free play at the distributor shaft. 2. C. See if the distributor is 180 degrees out of time: Do a comparison to the cam timing or by reversing opposite pairs of ignition wires at the distributor cap. FUEL DELIVERY To make sure that the quality and supply of fuel to the carburetor is correct, please so steps 2A - 2I . In our experience we have seen that fuel contaminated with water, dirt or rust is the major cause of carburetor problems. Use fuel as fresh as possible. IMPORTANT NOTE On vehicles equipped with electric fuel pumps. Most are not powered with out the engine running or starter engaged. A. Test the fuel flow at the carburetor by disconnecting the fuel supply hose and directing the fuel flow into a small dry, clean can when the fuel pump is activated. IMPORTANT NOTE DO NOT ALLOW ANY CHANCE OF A SPARK DISCONNECT THE PRIMARY WIRE(S) )usually a small 16 Gauge wire) THAT CONNECTS THE GROUND (-) SIDE TERMINAL OF THE COIL TO THE DISTRIBUTOR ( OR SPARK BOX, IF SOLID STATE IGNITION). If fuel flow is adequate go to step 2 E If fuel flow is not adequate go to step 2B Page 2 WEBER CARBS DIRECT www.webercarbsdirect.com WEBER CARBURETOR TROUBLESHOOTING GUIDE B. Test the fuel flow at the fuel filter and then at the Fuel Pump: If fuel flow is not adequate go to step 2C. C. Check to see if the fuel tank is empty or if the lines are blocked. They maybe blocked by dirt, ice, or other contaminants. If you have fuel in the tank and the lines are not blocked go to 2D. D. If the vehicle is equipped with an electric fuel pump, test the pump by applying 12 volts and a ground to the pump. If you have a mechanical pump, crank the engine over. If you do not have any fuel flow. Replace the pump. E. Check to see if the fuel is old or bad. ( If vehicle has been out of service for an extended period chances are that the fuel is bad.) If the fuel does not smell right: Try some fresh fuel a few drops at a time in the Carburetor inlet. IMPORTANT NOTE AVOID FUEL CONTACT WITH SKIN F. Check to see if the fuel is contaminated with rust or water: To check remove and empty out fuel filter (from the inlet side) into a clean, dry can , or if your vehicle has a drain plug on the fuel tank, empty some fuel from the tank into a clean, dry can. Remember Water and Fuel do not mix. G. Test the fuel pressure output with a fuel pressure gauge. If the fuel pressure exceeds 3.5 psi, install a fuel pressure regulator. H. See if the Fuel Return and the Fuel supply line are reversed. On some Weber carburetors that have a fuel return, remove the fitting one at a time from the carb. The Fuel return is restricted and the fuel inlet is totally open. I. Make sure that none of the fuel lines are crimped or kinked. 3. ENGINE To make sure that engine is mechanically sound. Please do steps 3a - 3C A. Do a compression check on all of the cylinders. Compression should be over 125 psi per cylinder, and with in 10% of each other. B. See if the intake manifold bolts or loose or missing. C. If you have a heated intake. Make sure that the heat source is connected. On most vehicles it is heated by water. Check with your Shop manual for the heat source on your intake. 4. VACUUM SYSTEM To make sure that you do not have any vacuum leaks, check all vacuum operated devices, and connections to the intake manifold. Use the suggested tests to check. IMPORTANT NOTE THE VACUUM DEVICES ARE CONTROLS AND VALVES THAT REQUIRE Page 3 WEBER CARBS DIRECT www.webercarbsdirect.com WEBER CARBURETOR TROUBLESHOOTING GUIDE SEALED VACUUM CONNECTIONS TO PROPERLY OPERATE. A. Testing the vacuum system with a handheld vacuum pump is very helpful in finding leaking hoses and devices in the system away from the carburetor. (Vacuum testers have an attached vacuum gauge to measure vacuum) Start at the carburetor and work your way toward the engine, remove vacuum hoses one at a time. Be careful not to mix up any hoses. Plug the source of the vacuum and connect the vacuum pump to the source and test for any malfunctions in the system. TO TEST OTHER VACUUM CONTROLLED DEVICES: Distributor Advance Distributor Retard EGR Valve Deceleration Valve Canister Purge look for a change in the engine timing. Test with a timing light. Stalling will be normal when tested. engine will idle faster when tested. If the engine speed fluctuates with the hose disconnected, canister is fuel of fuel due to a problem in the tank vent or the fuel tank is overfilled. Go to 4 B B. Using the method of pinching off hoses is helpful when you have hoses that are leaking, such as air cleaner hoses and other devices. Install the air inlet duct or air cleaner. Start the engine and let it run at idle. One by one pinch off vacuum hoses with pliers and listen for a change in engine RPM. Recheck any suspected problems with the Vacuum pump. TO TEST : Hoses Choke stove air door ( thermostatic air cleaner) Power Brake Booster Heater Controls, in all positions Cruise Control Air Conditioning fast idle , ignition on A/C on Headlight Doors Vacuum Reservoirs and amplifiers PCV Valve (idle should drop 50 RPM) Go To 4 C C. Using Carburetor Cleaner to check for leaks. This will help you find defective gaskets and hidden leaks. IMPORTANT NOTE AVOID SPRAYING YOUR SELF READ ALL CAUTION LABELS AND WASH AFTER USING Remove air inlet duct or air cleaner and plug any vacuum sources removed. With the engine idling, spray carburetor cleaner into the air inlet of the carburetor to determine the effect of running. Wait until the engine returns to the previous idle. Spray carburetor cleaner on the outside of the carburetor and intake manifold. If you have a vacuum leak the idle speed should have changed. TO TEST : Some vacuum leakage at the throttle shaft is normal. Intake manifold. All gaskets and seals. Fittings and plugs. Page 4 WEBER CARBS DIRECT www.webercarbsdirect.com WEBER CARBURETOR TROUBLESHOOTING GUIDE 5 CARBURETOR Do the following steps only after you have completed 1A, 2A, 3A and 4A. This will help you save time and avoid creating any secondary problems. In our experiences most problems initially thought to be carburetor problems are those caused by other engine components. A. Testing the choke and the throttle linkage: Check that you have free movement at the carburetor with an assistant operating the gas pedal. In our experiences over tightened throttle shafts contribute to many carburetor problems. B. Testing the Idle Speed Adjustment: With the engine at normal operating temperature, adjust to manufacturers specs: turn adjustment screw in (clockwise) to raise the speed and out (counterclockwise) to lower). C. Testing the Fast Idle Adjustment: It may be necessary to perform this test first thing in the morning or after the vehicle has been allowed to cool down. With the engine cold, press the gas pedal to the floor once and release. Start Vehicle. Engine speed should be 2000 RPM - 2500 RPM after about 10 seconds. Turn engine off. To adjust turn fast idle screw in to increase fast idle speed and out to decrease. Do not disturb the carburetor linkage during this adjustment. Without touching the gas pedal start engine again check engine RPM. If you have to readjust use the procedure above . D. Testing the Automatic Choke adjustment. The choke is preset at the factory but in some cases it may be necessary to readjust. The choke assembly must be cool ( below 68 F 20C) before attempting to make any adjustments. First fully rotate the throttle lever and release; Check for smooth operation; the choke plate should be all the way closed. Make a reference mark on the carburetor and the choke where the two faces meet. Loosen the three 7mm hex head screws one full turn. While holding the throttle about one third open, adjust the closing tension on the choke plates just fully close; then slightly increase the tension on the spring by continuing to rotate the thermostat 1/8" measured in the outer diameter of the thermostat. Tighten the three 7mm hex head screws without distorting the retainer ring; fast idle speed my need to be readjusted. If the choke plates do not fully open after running the engine for three minutes go to step 5E E. Testing the choke thermostat assembly The electric choke terminal must have a key hot 12 volt source. The carburetor is grounded to the engine by a metal to metal connection. If the vehicle was originally equipped with an electric choke and or an idle solenoid use that wire. If you do not have a wire present , splice into the wire leading from the ignition switch to the coil or ballast resistor. Water chokes must have a free flow of engine coolant. F. Testing the idle cut-off solenoid (if equipped) With the solenoid on the carburetor and ignition on and engine off, disconnect the wire from the solenoid and listen for a click; then with the engine idling, disconnect the wire leading to the solenoid. The engine should stop. If the engine does not stop the solenoid is likely defective. Page 5 WEBER CARBS DIRECT www.webercarbsdirect.com WEBER CARBURETOR TROUBLESHOOTING GUIDE G. Testing the idle mixture adjustment: Adjust with the engine at idle speed; turn the mixture adjustment screw in (clockwise) by quarter turns until the engine speed drops; turn out (counter clockwise) while counting quarter turns until the idle rises and again drops noticeably; turn in again to middle setting. If RPM does not change go to 5H H. Cleaning the idle circuit Locate and remove the primary idle jet holder (this is also the idle solenoid if so equipped). Remove the jet from the holder, hold up to a light and check for roundness of the cavity. Remove the idle mixture screw from the the carburetor, blow clean compressed air through the two open passages. Replace the jet in the holder and install back in the carburetor along with the idle mixture screw. I. Make sure that all of the vacuum lines are installed to the correct signal source. Install a vacuum pump with a gauge. Start engine and operate throttle. If vacuum is present at idle it is a manifold vacuum source. If vacuum is present at partial throttle it is a ported vacuum source. If vacuum is present at a high rpm it is a venturi vacuum source. Refer to your shop manual or any labels under the hood that show vacuum hose routing. J. Set the Float Level Float level problems are very rare with New Weber Carburetors. Refer to a Weber Shop manual or contact your Weber Dealer for specifications or instructions. Also check for dirt or other foreign matter in the needle and seat. 6. PERSISTENT PROBLEMS The following problems are not listed in the guide because they are unique, difficult to diagnose and are beyond the scope of the guide. We have listed them because of past experiences. A. Replace spark plugs; use only new spark plugs with the correct heat range. B. Make sure that the ground strap is properly connected. It is necessary that the engine is grounded to the chassis and battery. C. Double check or have any work coincidental to the problem such as body work or engine repairs, a tune up , installation of an alarm, stereo or emissions inspection. D. Check for any damage to the exhaust system or an internally collapsed muffler. E. Check your sparkplugs. Most Shop manuals have a chart in color showing what the spark plugs should look like. Rejetting of the carb may be necessary. F. See if the Transmission is slipping. This applies to both automatic and standard. G. Make sure that the fuel tank vent hose is not plugged at the canister. H. Some Vehicles , including Nissans, have two wires that go to the electric choke. One is a ground wire and does not have to be connected. I. Some original Electric Fuel pumps pressure exceeds 3.5 psi. Check with a pressure gauge or look in shop manual. A pressure regulator may be necessary. J. On some water cooled VW's , vibrations caused by worn motor mounts may cause the carburetor top to fracture. K. When the throttle return spring is located on the same side as the throttle lever, check to make sure that the first spring coil does not get trapped between the lever and the carburetor. This will cause binding. L. On progressive carbs incorrect installation of the throttle lever can cause Page 6 WEBER CARBS DIRECT www.webercarbsdirect.com WEBER CARBURETOR TROUBLESHOOTING GUIDE both throttle plates to open at the same time. This is wrong. The progressive is designed that the primary barrel opens up before the secondary. M. On Multiple carburetor applications it is required that all of the carburetors be synchronized. N. If you experience intermittent problems. Any diagnosis should be carried out when the problem occurs. Be prepared carry any necessary tools. O. Go over the troubleshooting guide and see if any steps were missed or not understood. WEBER CARBS DIRECT www.webercarbsdirect.com WEBER CARBURETOR TROUBLESHOOTING GUIDE 32/36 DFEV CARBURETOR Electric Choke Fuel Inlet Choke Pull off Accelerator Pump Vacuum Advance Port Idle Mixture Screw Choke Pull off Fast Idle Screw Idle Speed Screw Throttle Lever 32/36 DGEV CARBURETOR Fast Idle Screw Fuel Inlet Fuel Filter Inspection Plug Primary Idle Screw Choke Pull Off Electric Choke Throttle Lever Accelerator pump Vacuum Advance Port Idle Mixture Screw Additional Ported Vacuum Source Page 8
