Building Control Guidance Note 7
advertisement
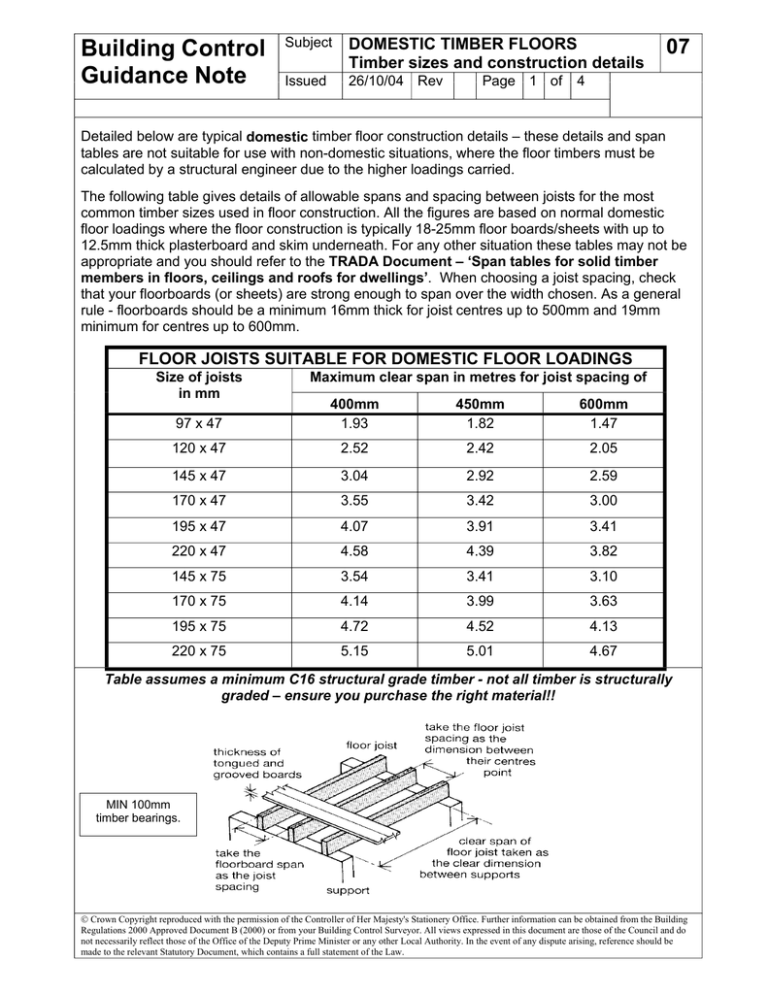
Building Control Guidance Note Subject DOMESTIC TIMBER FLOORS Timber sizes and construction details Issued 26/10/04 Rev Page 1 of 07 4 Detailed below are typical domestic timber floor construction details – these details and span tables are not suitable for use with non-domestic situations, where the floor timbers must be calculated by a structural engineer due to the higher loadings carried. The following table gives details of allowable spans and spacing between joists for the most common timber sizes used in floor construction. All the figures are based on normal domestic floor loadings where the floor construction is typically 18-25mm floor boards/sheets with up to 12.5mm thick plasterboard and skim underneath. For any other situation these tables may not be appropriate and you should refer to the TRADA Document – ‘Span tables for solid timber members in floors, ceilings and roofs for dwellings’. When choosing a joist spacing, check that your floorboards (or sheets) are strong enough to span over the width chosen. As a general rule - floorboards should be a minimum 16mm thick for joist centres up to 500mm and 19mm minimum for centres up to 600mm. FLOOR JOISTS SUITABLE FOR DOMESTIC FLOOR LOADINGS Size of joists in mm Maximum clear span in metres for joist spacing of 97 x 47 400mm 1.93 450mm 1.82 600mm 1.47 120 x 47 2.52 2.42 2.05 145 x 47 3.04 2.92 2.59 170 x 47 3.55 3.42 3.00 195 x 47 4.07 3.91 3.41 220 x 47 4.58 4.39 3.82 145 x 75 3.54 3.41 3.10 170 x 75 4.14 3.99 3.63 195 x 75 4.72 4.52 4.13 220 x 75 5.15 5.01 4.67 Table assumes a minimum C16 structural grade timber - not all timber is structurally graded – ensure you purchase the right material!! MIN 100mm timber bearings. © Crown Copyright reproduced with the permission of the Controller of Her Majesty's Stationery Office. Further information can be obtained from the Building Regulations 2000 Approved Document B (2000) or from your Building Control Surveyor. All views expressed in this document are those of the Council and do not necessarily reflect those of the Office of the Deputy Prime Minister or any other Local Authority. In the event of any dispute arising, reference should be made to the relevant Statutory Document, which contains a full statement of the Law. Building Control Guidance Note Subject DOMESTIC TIMBER FLOORS Timber sizes and construction details 07 Issued 26/10/04 4 Revision Page 2 of When constructing timber floors you should also bear in mind the following points:1. Floors are used to give lateral restraint to walls, and where the joists run parallel to the wall, straps need to be installed as shown in the detail below. Normally these straps have to be positioned every 2m along the wall, but up to 3m is acceptable where this is to allow the formation of a stairwell or similar floor opening - provided additional straps are fixed each side of the opening. The galvanised mild steel straps must have a minimum cross sectional area of 30 x 5mm 2. Around floor openings such as stairs, it will be necessary to install larger or double/ triple timber trimmers bolted together to carry the floor joists (see guide leaflet 6 for information). With all joined timbers supported by fully nailed proprietary joist hangers. 3. Floor joists must also be doubled up and bolted together under timber partition walls, and in bathrooms due to the weight of a filled bath additional joists must be provided under the bath. 4. Where the joists span over 2.5m, strutting is required to prevent joists twisting when loaded. For spans of between 2.5 and 4.5 m one row of strutting is needed, at the mid span position. For spans in excess of 4.5 m two rows of strutting will be required, positioned at the one third and two third span positions. Solid strutting should be at least 38 mm thick timber extending to at least three quarters the joist depth e.g. 200 x 50mm joists would need at least 150 x 38mm timber used as strutting. Herringbone strutting if you are not using the proprietary galvanised steel systems, should be at least 38 x 38mm timber but can only be used where the spacing between the joists is less than three times the depth of the joist e.g. for a 150 x 50 joist, herringbone strutting can only be used up to a spacing of 450mm. Herringbone strutting using Min 38 x 38mm section timber Solid (staggered) strutting Using 38mm (minimum) thickness timber Building Control Guidance Note Subject DOMESTIC TIMBER FLOORS Timber sizes and construction details 07 Issued 26/10/04 4 Revision Page 3 of Supporting joists on external and party walls: It is now a requirement to limit air leakage from the inside of buildings – one main area where this situation can be improved is to effectively seal the gaps around floor joists where they bear into the walls. Also the new sound insulation regulations restrict the building-in of joists into party walls between dwellings, as they encourage sound transmission between properties. Therefore depending on the floor joists positions you must follow either of the details below: (except to party walls where building-in is not acceptable). Use Joist Hangers Only proprietary joist hangers must be used complying with BS 6178 Part 1 1999 or BS EN 845-1 and these must be installed in strict accordance with the manufacturer’s recommendations. Always check the actual requirements for the product you are using, but typical general rules will include – • The hangers must be of the correct type for the strength of the blockwork being used. With the back plate of the hangers must be in contact with the face of the blockwork for the whole height of the hanger, and the hanger must be vertical. • Joists must be accurately cut to length – the maximum overall tolerance is 6mm. • Do not load joists until at least 3 courses have been built over the flange and the mortar has set. • Remember where the wall supporting the joists is over 3m long, special “restraint” type hangers (to BS 5628: Part 1) are required at a maximum of 2m centres, to provide lateral restraint to the wall itself. Building-in the Joists Building-in joists will be acceptable provided that – • The wall itself does not need to meet the requirements of E1 (sound insulation between dwellings i.e. party walls). It is unlikely the walls with built-in joists would pass the required sound tests. • The joist is accurately cut to length so that while it does not extend into the cavity, it is fully supported by the full width of the leaf into which it is built. • The masonry is accurately cut to allow an even mortar joint (of between 10mm and 15mm) all the way around the sides and tops of the joist. The mortar joint is to be struck or recessed, to allow the later installation of a good bead of silicon mastic between the blockwork and the joist. The silicon mastic bead must be sufficiently generous to cope with any anticipated shrinkage in both the masonry and the timber. • The blockwork supporting the joists is accurately built to level (using cut blocks required). Ideally packers should not be used, but slate packers will be accepted provided they are accurately cut to the same width of the joist, have a total thickness of not more than 15mm and are recessed to the same depth as the mortar joint to receive the silicon mastic bead. • The silicon mastic bead must be installed after both the joists and the masonry are reasonably dry. Ideally this should be done after the roof has been installed. However, please note that – • The use of expanding foam products is not acceptable as an alternative to silicon mastic. • Special arrangements will need to be agreed when using laminated or timber engineered joists, as they do not have “square” ends. Generally, loose fitting packer pieces fixed in place with silicon mastic can be used to “square” up the ends, but please agree this with your Building Control Surveyor in advance. It is recommended that you notify your Building Control Surveyor once the silicon mastic has been installed, so that we can confirm this is satisfactory being covered up. NOTCHING AND DRILLING Notching and drilling of joists should not exceed the limits indicated below: Note if notches on top of joist are limited to the area between 0.1 and 0.2 of span, the maximum notch depth may be increased to 0.15 x joist depth. 0.25 x span D Rules are for joist depth upto 250mm, for deeper joist assume D = 250 0.07 x span Notches cut only in this shaded area Max notch depth – D/8 Maximum hole diameter – D/4 Keep holes apart by at least 3 times the hole diameter Keep holes and notches at least 100mm apart horizontally. Holes drilled only in this shaded area on joist centre-line 0.25 x span 0.4 x span
