1 A F
advertisement
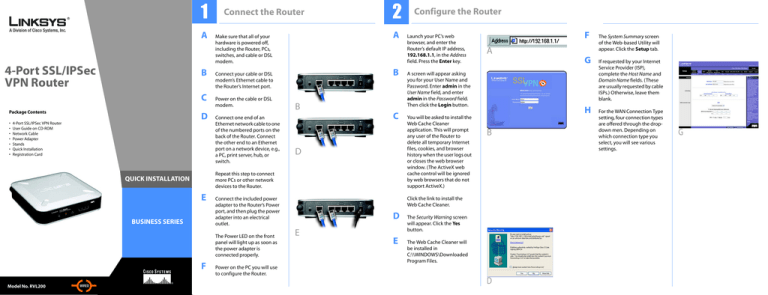
1 A 4-Port SSL/IPSec VPN Router B C Package Contents • • • • • • • D 4-Port SSL/IPSec VPN Router User Guide on CD-ROM Network Cable Power Adapter Stands Quick Installation Registration Card Connect the Router E BUSINESS SERIES Connect one end of an Ethernet network cable to one of the numbered ports on the back of the Router. Connect the other end to an Ethernet port on a network device, e.g., a PC, print server, hub, or switch. B C D F Configure the Router Launch your PC’s web browser, and enter the Router’s default IP address, 192.168.1.1, in the Address field. Press the Enter key. F A G A screen will appear asking you for your User Name and Password. Enter admin in the User Name field, and enter admin in the Password field. Then click the Login button. You will be asked to install the Web Cache Cleaner application. This will prompt any user of the Router to delete all temporary Internet files, cookies, and browser history when the user logs out or closes the web browser window. (The ActiveX web cache control will be ignored by web browsers that do not support ActiveX.) H B Click the link to install the Web Cache Cleaner. Connect the included power adapter to the Router’s Power port, and then plug the power adapter into an electrical outlet. The Power LED on the front panel will light up as soon as the power adapter is connected properly. WIRED B Connect your cable or DSL modem’s Ethernet cable to the Router’s Internet port. Repeat this step to connect more PCs or other network devices to the Router. QUICK INSTALLATION Model No. Model No. Model No.RVL200 A Make sure that all of your hardware is powered off, including the Router, PCs, switches, and cable or DSL modem. Power on the cable or DSL modem. 2 D E E The Security Warning screen will appear. Click the Yes button. The Web Cache Cleaner will be installed in C:\\WINDOWS\Downloaded Program Files. Power on the PC you will use to configure the Router. D The System Summary screen of the Web-based Utility will appear. Click the Setup tab. If requested by your Internet Service Provider (ISP), complete the Host Name and Domain Name fields. (These are usually requested by cable ISPs.) Otherwise, leave them blank. For the WAN Connection Type setting, four connection types are offered through the dropdown men. Depending on which connection type you select, you will see various settings. G 3 Obtain an IP Automatically 1 2 3 If your ISP automatically assigns an IP address, select Obtain an IP automatically. (Most cable modem subscribers use this connection type.) Your ISP will assign these values. 1 Obtain an IP automatically If you select Use the Following DNS Server Addresses, enter your DNS server IP address(es). (Enter at least one.) 2 3 Click Save Settings, and go to Step I. Static IP 1 2 3 4 If you use a permanent IP address, select Static IP. Enter your settings in the Specify WAN IP Address, Subnet Mask, Default Gateway Address, and DNS Server fields (at least one DNS Server IP address is required). Check your service installation receipt for this information; otherwise, request these settings from your ISP. Click Save Settings, and go to Step I. Static IP Some DSL-based ISPs use Point-to-Point Protocol over Ethernet (PPPoE) to establish Internet connections. If your ISP says that you are connecting through PPPoE or if you normally enter a user name and password to access the Internet, select PPPoE. Enter your User Name and Password. The maximum number of characters is 60. Select Keep Alive if you always want to be connected to your ISP, or select Connect on Demand if you are charged for the time that you are connected to your ISP. Click Save Settings, and go to Step I. Before you configure the Router for SSL VPN tunnels, change the Router’s password and remote management settings. PPTP PPPoE PPPoE Point to Point Tunneling Protocol (PPTP) is a service used in Europe and Israel only. If you are using a PPTP connection, check with your ISP for the necessary setup information. When you are finished, click Save Settings. I J K If you haven’t already done so, click Save Settings. Then close the web browser. A PPTP B C D E Restart or power on your PCs so they can obtain the Router’s new settings. To test the Router’s settings, open your web browser from any computer. In the browser’s Address field, enter www.linksys.com/registration and press the Enter key. F G H Congratulations! The installation of the 4-Port SSL/IPSec VPN Router is complete. When you or another user logs out of the Web-based Utility, you will see a Warning screen. It will ask you to confirm that you want the Web Cache Cleaner to delete the History Item for the Router. Click the Yes button. Prepare for SSL VPN Use I History Item Access the Web-based Utility (described in Step 2). Click the Setup tab. Click the Password tab. In the Old Password field, enter admin (the default). In the New Password field, enter a new password for the Router. Your password must have 15 or fewer characters and cannot contain any spaces. Click Save Settings. Click the Firewall tab. Click Enable for the Remote Management setting. Enter the port number for remote access. The default port is 80. Click Save Settings. NOTE: For information about more advanced settings, including the SSL or IPSec VPN configuration, refer to the User Guide on the CD-ROM. For additional information or troubleshooting help, refer to the User Guide on the Setup CD-ROM. You can also call or e-mail for further support. 24-hour Technical Support 800-326-7114 (toll-free from US or Canada) E-mail Support support@linksys.com Website http://www.linksys.com or http://support.linksys.com RMA (Return Merchandise Authorization) http://www.linksys.com/support FTP Site ftp://ftp.linksys.com Sales Information 800-546-5797 (800-LINKSYS) Linksys is a registered trademark or trademark of Cisco Systems, Inc. and/or its affiliates in the U.S. and certain other countries. Copyright © 2006 Cisco Systems, Inc. All rights reserved. RVL200-QI-60516NC JL

