WARNING Installation Instructions – EON General Wiring Diagram •
advertisement
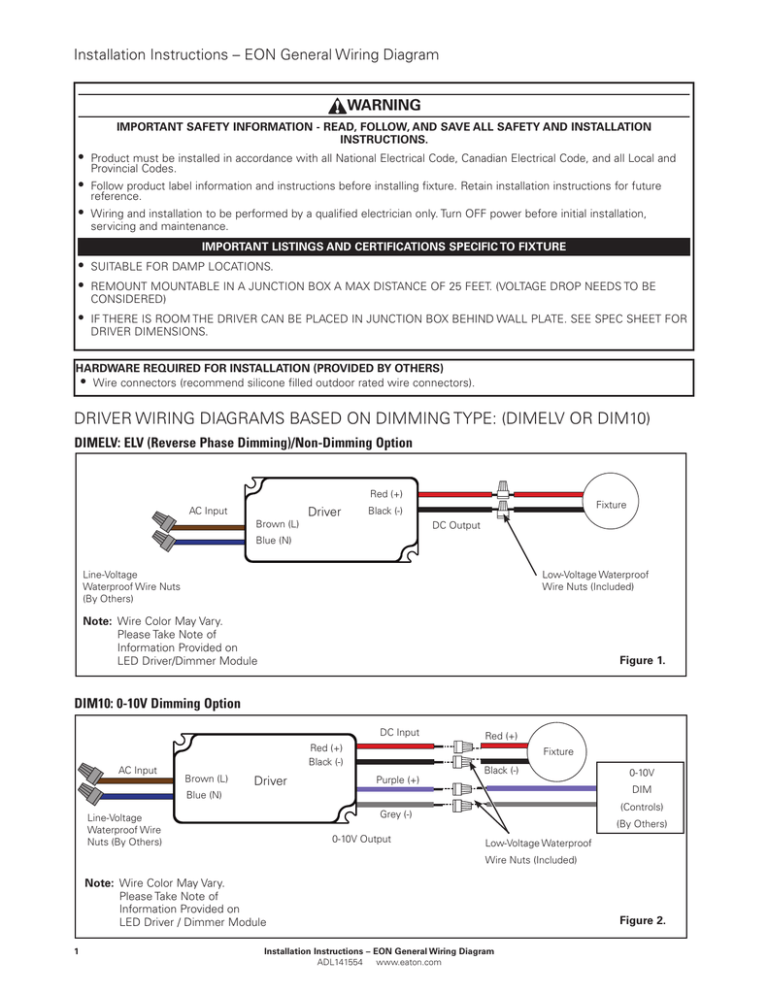
Installation Instructions – EON General Wiring Diagram WARNING IMPORTANT SAFETY INFORMATION - READ, FOLLOW, AND SAVE ALL SAFETY AND INSTALLATION INSTRUCTIONS. • Product must be installed in accordance with all National Electrical Code, Canadian Electrical Code, and all Local and Provincial Codes. • Follow product label information and instructions before installing fixture. Retain installation instructions for future reference. • Wiring and installation to be performed by a qualified electrician only. Turn OFF power before initial installation, servicing and maintenance. IMPORTANT LISTINGS AND CERTIFICATIONS SPECIFIC TO FIXTURE • SUITABLE FOR DAMP LOCATIONS. • REMOUNT MOUNTABLE IN A JUNCTION BOX A MAX DISTANCE OF 25 FEET. (VOLTAGE DROP NEEDS TO BE CONSIDERED) • IF THERE IS ROOM THE DRIVER CAN BE PLACED IN JUNCTION BOX BEHIND WALL PLATE. SEE SPEC SHEET FOR DRIVER DIMENSIONS. HARDWARE REQUIRED FOR INSTALLATION (PROVIDED BY OTHERS) • Wire connectors (recommend silicone filled outdoor rated wire connectors). DRIVER WIRING DIAGRAMS BASED ON DIMMING TYPE: (DIMELV OR DIM10) DIMELV: ELV (Reverse Phase Dimming)/Non-Dimming Option Red (+) AC Input Brown (L) Driver Fixture Black (-) DC Output Blue (N) Line-Voltage Waterproof Wire Nuts (By Others) Low-Voltage Waterproof Wire Nuts (Included) NNote: Wire Color May Vary. Please Take Note of Information Provided on LED Driver/Dimmer Module Figure 1. DIM10: 0-10V Dimming Option DC Input AC Input Red (+) Black (-) Brown (L) Driver Red (+) Fixture Purple (+) Black (-) DIM Blue (N) (Controls) Grey (-) Line-Voltage Waterproof Wire Nuts (By Others) 0-10V Output 0-10V (By Others) Low-Voltage Waterproof Wire Nuts (Included) NNote: Wire Color May Vary. Please Take Note of Information Provided on LED Driver / Dimmer Module 1 Installation Instructions – EON General Wiring Diagram ADL141554 www.eaton.com Figure 2.
