Commander (FEPR) Globe Replacement for 54 Watt Lamps
advertisement
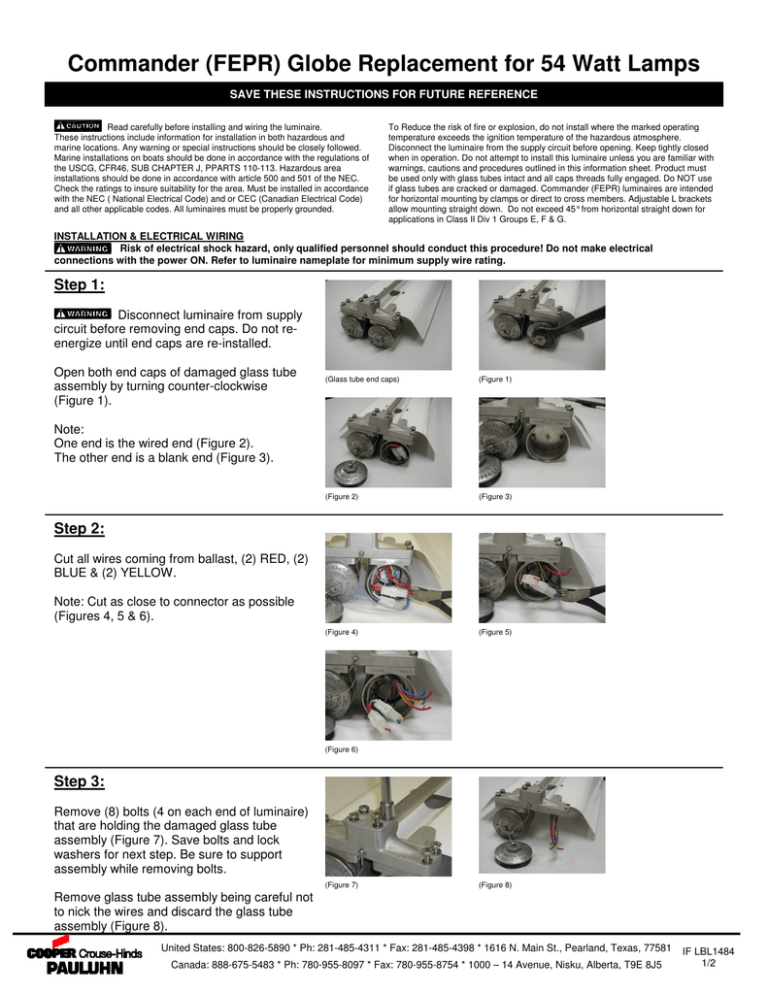
Commander (FEPR) Globe Replacement for 54 Watt Lamps SAVE THESE INSTRUCTIONS FOR FUTURE REFERENCE Read carefully before installing and wiring the luminaire. These instructions include information for installation in both hazardous and marine locations. Any warning or special instructions should be closely followed. Marine installations on boats should be done in accordance with the regulations of the USCG, CFR46, SUB CHAPTER J, PPARTS 110-113. Hazardous area installations should be done in accordance with article 500 and 501 of the NEC. Check the ratings to insure suitability for the area. Must be installed in accordance with the NEC ( National Electrical Code) and or CEC (Canadian Electrical Code) and all other applicable codes. All luminaires must be properly grounded. To Reduce the risk of fire or explosion, do not install where the marked operating temperature exceeds the ignition temperature of the hazardous atmosphere. Disconnect the luminaire from the supply circuit before opening. Keep tightly closed when in operation. Do not attempt to install this luminaire unless you are familiar with warnings, cautions and procedures outlined in this information sheet. Product must be used only with glass tubes intact and all caps threads fully engaged. Do NOT use if glass tubes are cracked or damaged. Commander (FEPR) luminaires are intended for horizontal mounting by clamps or direct to cross members. Adjustable L brackets allow mounting straight down. Do not exceed 45° from horizontal straight down for applications in Class II Div 1 Groups E, F & G. INSTALLATION & ELECTRICAL WIRING Risk of electrical shock hazard, only qualified personnel should conduct this procedure! Do not make electrical connections with the power ON. Refer to luminaire nameplate for minimum supply wire rating. Step 1: Disconnect luminaire from supply circuit before removing end caps. Do not reenergize until end caps are re-installed. Open both end caps of damaged glass tube assembly by turning counter-clockwise (Figure 1). (Glass tube end caps) (Figure 1) (Figure 2) (Figure 3) (Figure 4) (Figure 5) Note: One end is the wired end (Figure 2). The other end is a blank end (Figure 3). Step 2: Cut all wires coming from ballast, (2) RED, (2) BLUE & (2) YELLOW. Note: Cut as close to connector as possible (Figures 4, 5 & 6). (Figure 6) Step 3: Remove (8) bolts (4 on each end of luminaire) that are holding the damaged glass tube assembly (Figure 7). Save bolts and lock washers for next step. Be sure to support assembly while removing bolts. Remove glass tube assembly being careful not to nick the wires and discard the glass tube assembly (Figure 8). (Figure 7) (Figure 8) United States: 800-826-5890 * Ph: 281-485-4311 * Fax: 281-485-4398 * 1616 N. Main St., Pearland, Texas, 77581 Canada: 888-675-5483 * Ph: 780-955-8097 * Fax: 780-955-8754 * 1000 – 14 Avenue, Nisku, Alberta, T9E 8J5 IF LBL1484 1/2 Step 4: Feed wires from ballast through hole in new glass tube assembly being careful not to nick the wires (Figure 9). Pull wires through and position glass tube assembly for attachment with bolts and lock washers (Figure 10). (Figure 9) (Figure 10) Step 5: All machines surfaces of luminaire/globe must be clean and free of any debris or dirt. Insert bolts and lock washers and tighten new glass tube assembly to minimum 10 ft*lbs. (Figure 11). (Figure 11) Step 6: Strip wires approx. 3/8” (Figure 12). (Figure 12) Step 7: Connect the wires by matching the colors. Insert stripped wires into splice connectors and crimp wires together (Figure 13). (Figure 13) Step 8: Push connected wires back into glass tube assembly (Figures 14 & 15). (Figure 14) (Figure 15) Step 9: Replace both end caps, one on each end of new glass tube assembly by turning clockwise (Figure 16). When replacing end caps, make sure that there are no protruding wires that can be pinched. (Figure 16) Step 10: Install and wire luminaire per Installation Instructions LBL1477. United States: 800-826-5890 * Ph: 281-485-4311 * Fax: 281-485-4398 * 1616 N. Main St., Pearland, Texas, 77581 Canada: 888-675-5483 * Ph: 780-955-8097 * Fax: 780-955-8754 * 1000 – 14 Avenue, Nisku, Alberta, T9E 8J5 IF LBL1484 2/2
