INSTALLATION PROCEDURES For ConTech Lighting LED Undercabinet Lighting Series: LPU
advertisement
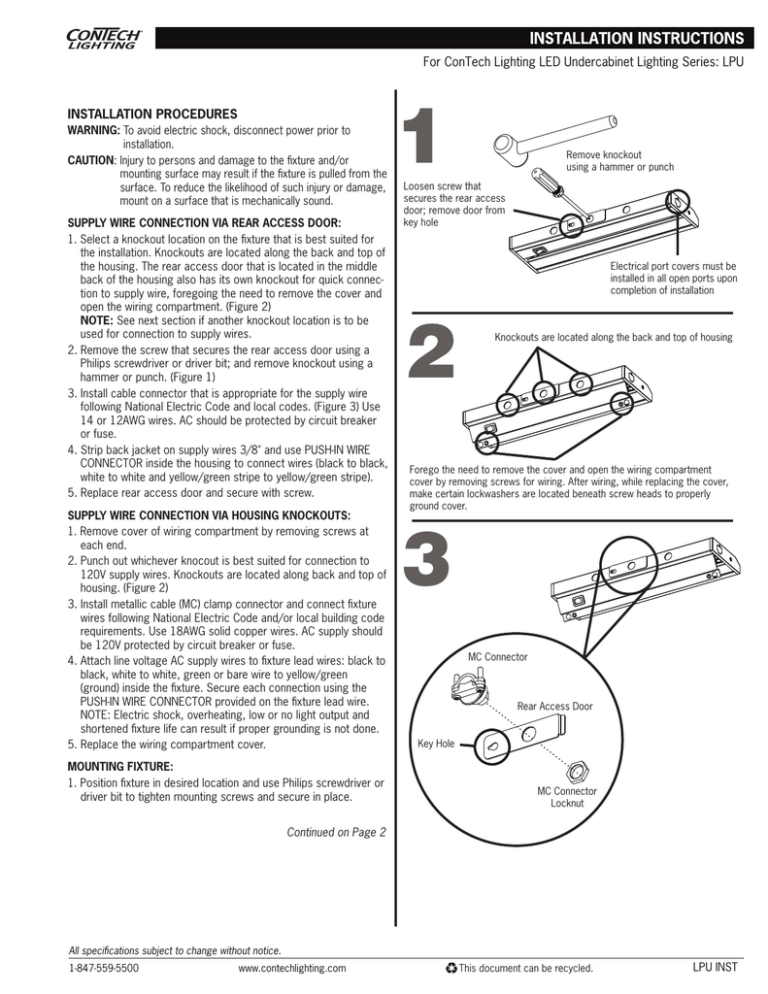
For ConTech Lighting LED Undercabinet Lighting Series: LPU INSTALLATION PROCEDURES WARNING: To avoid electric shock, disconnect power prior to installation. CAUTION: Injury to persons and damage to the fixture and/or mounting surface may result if the fixture is pulled from the surface. To reduce the likelihood of such injury or damage, mount on a surface that is mechanically sound. SUPPLY WIRE CONNECTION VIA REAR ACCESS DOOR: 1. Select a knockout location on the fixture that is best suited for the installation. Knockouts are located along the back and top of the housing. The rear access door that is located in the middle back of the housing also has its own knockout for quick connection to supply wire, foregoing the need to remove the cover and open the wiring compartment. (Figure 2) NOTE: See next section if another knockout location is to be used for connection to supply wires. 2. Remove the screw that secures the rear access door using a Philips screwdriver or driver bit; and remove knockout using a hammer or punch. (Figure 1) 3. Install cable connector that is appropriate for the supply wire following National Electric Code and local codes. (Figure 3) Use 14 or 12AWG wires. AC should be protected by circuit breaker or fuse. 4. Strip back jacket on supply wires 3/8" and use PUSH-IN WIRE CONNECTOR inside the housing to connect wires (black to black, white to white and yellow/green stripe to yellow/green stripe). 5. Replace rear access door and secure with screw. SUPPLY WIRE CONNECTION VIA HOUSING KNOCKOUTS: 1. Remove cover of wiring compartment by removing screws at each end. 2. Punch out whichever knocout is best suited for connection to 120V supply wires. Knockouts are located along back and top of housing. (Figure 2) 3. Install metallic cable (MC) clamp connector and connect fixture wires following National Electric Code and/or local building code requirements. Use 18AWG solid copper wires. AC supply should be 120V protected by circuit breaker or fuse. 4. Attach line voltage AC supply wires to fixture lead wires: black to black, white to white, green or bare wire to yellow/green (ground) inside the fixture. Secure each connection using the PUSH-IN WIRE CONNECTOR provided on the fixture lead wire. NOTE: Electric shock, overheating, low or no light output and shortened fixture life can result if proper grounding is not done. 5. Replace the wiring compartment cover. MOUNTING FIXTURE: 1. Position fixture in desired location and use Philips screwdriver or driver bit to tighten mounting screws and secure in place. Remove knockout using a hammer or punch Loosen screw that secures the rear access door; remove door from key hole Electrical port covers must be installed in all open ports upon completion of installation Knockouts are located along the back and top of housing Forego the need to remove the cover and open the wiring compartment cover by removing screws for wiring. After wiring, while replacing the cover, make certain lockwashers are located beneath screw heads to properly ground cover. 3 MC Connector Rear Access Door Key Hole MC Connector Locknut Continued on Page 2 All specifications subject to change without notice. 1-847-559-5500 www.contechlighting.com This document can be recycled. LPU INST For ConTech Lighting LED Undercabinet Lighting Series: LPU IMPORTANT SAFETY INSTRUCTIONS: • Read all the instructions before installation. Save instructions for later use. • Turn off power at fuse or circuit breaker box before installation or before doing any maintenance work. • Do not exceed the nominal supply voltage or amperage rating. • Do not install any lampholder closer than 6” from any curtain or similar combustible material. • Warning: Risk of burns. Lamps are extremely hot when lit. Allow lamps to cool down in temperature before handling. • Product must be mounted in locations and at heights and in a manner consistent with its intended use, and in compliance with National Electrical Code and local codes. Use of accessory equipment is not recommended. • Installing contrary to instructions may cause unsafe conditions. • Warning: Risk of fire. Most dwellings built before 1985 have supply wire rated at 60°C. Consult a qualified electrician before installation. • To avoid hazards to children, account for all parts and properly dispose of all packing materials. • Call the Technical Support department at ConTech Lighting with any installation questions: 847.559.5500. 4 5 Fixture can be connected in a series using end-to-end connector supplied with fixture All specifications subject to change without notice. 1-847-559-5500 www.contechlighting.com This document can be recycled. LPU INST

