read and save these instructions installation
advertisement

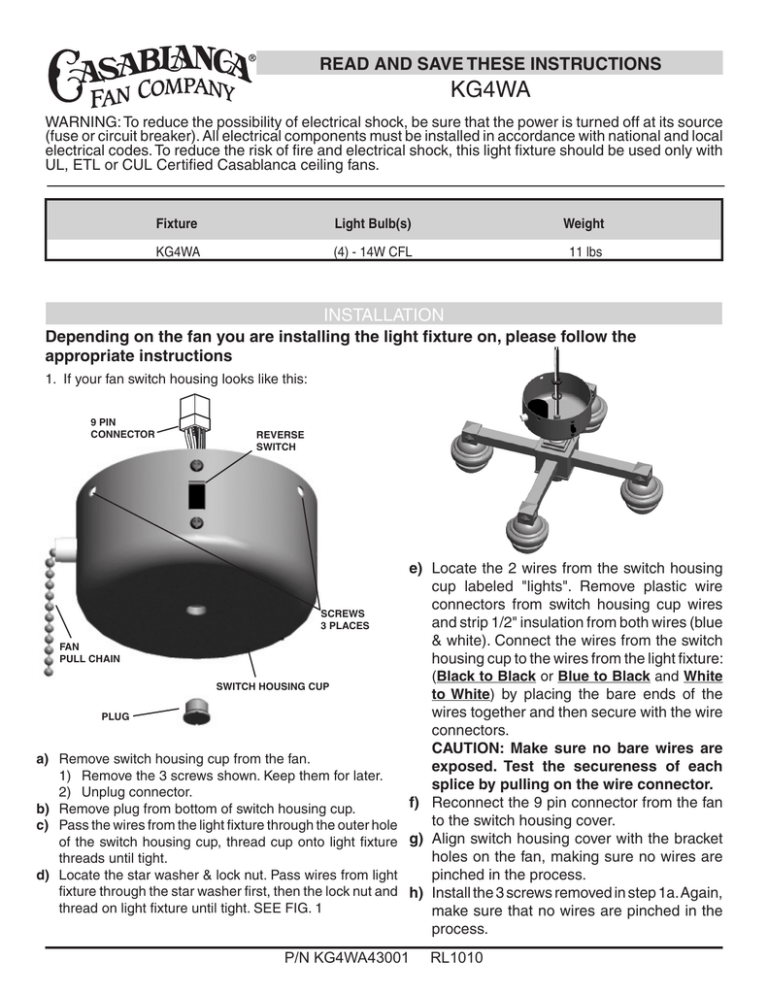
READ AND SAVE THESE INSTRUCTIONS KG4WA WARNING: To reduce the possibility of electrical shock, be sure that the power is turned off at its source (fuse or circuit breaker). All electrical components must be installed in accordance with national and local electrical codes. To reduce the risk of fire and electrical shock, this light fixture should be used only with UL, ETL or CUL Certified Casablanca ceiling fans. Fixture Light Bulb(s) Weight KG4WA (4) - 14W CFL 11 lbs INSTALLATION Depending on the fan you are installing the light fixture on, please follow the appropriate instructions 1. If your fan switch housing looks like this: 9 PIN CONNECTOR REVERSE SWITCH SCREWS 3 PLACES FAN PULL CHAIN SWITCH HOUSING CUP PLUG a) Remove switch housing cup from the fan. 1) Remove the 3 screws shown. Keep them for later. 2) Unplug connector. b) Remove plug from bottom of switch housing cup. c) Pass the wires from the light fixture through the outer hole of the switch housing cup, thread cup onto light fixture threads until tight. d) Locate the star washer & lock nut. Pass wires from light fixture through the star washer first, then the lock nut and thread on light fixture until tight. SEE FIG. 1 e) Locate the 2 wires from the switch housing cup labeled "lights". Remove plastic wire connectors from switch housing cup wires and strip 1/2" insulation from both wires (blue & white). Connect the wires from the switch housing cup to the wires from the light fixture: (Black to Black or Blue to Black and White to White) by placing the bare ends of the wires together and then secure with the wire connectors. CAUTION: Make sure no bare wires are exposed. Test the secureness of each splice by pulling on the wire connector. f) Reconnect the 9 pin connector from the fan to the switch housing cover. g) Align switch housing cover with the bracket holes on the fan, making sure no wires are pinched in the process. h) Install the 3 screws removed in step 1a. Again, make sure that no wires are pinched in the process. P/N KG4WA43001 RL1010 2. If your fan switch housing looks like this: SWITCH HOUSING SWITCH HOUSING CAP a) Remove the switch housing cap by removing the two 8-32 screws. Save these screws for re-attaching cap. b) Remove plug from bottom of switch housing cap. c) Pass the wires from the light fixture through the outer hole of the switch housing cap, thread cap onto light fixture threads until tight. d) Locate the star washer & lock nut. Pass wires from light fixture through the star washer first, then the lock nut and thread on light fixture until tight. SEE FIG. 2 8-32 SCREW CENTER PLUG FIG. 2 e) Locate the 2 wires from the switch housing labeled "lights". Remove plastic wire connectors from switch housing wires and strip 1/2" insulation from both wires (black or blue, and white). f) While holding light fixture up to the fan, attach the wires from the fan switch housing and the wires from the light fixture together. (Black to Black or Blue to Black and White to White) by placing the bare ends of the wires together and then secure the wire connectors. CAUTION: Make sure no bare wires are exposed. Test the secureness of each splice by pulling on the wire connector. g) Re-attach the switch housing cap with light fixture attached to the fan switch housing using the two 8-32 screws removed in step 2a, ensuring guide pins are properly located into switch housing. CAUTION: Make sure no wires are pinched between the cap and the switch housing. Tighten the screws to secure the light fixture to the fan. 3. Install Glass a) b) c) d) e) Remove the four lock rings from the light fixture and set aside. Slide a glass shade onto the fixture and hold firmly. Using one of the glass lock rings removed is a), secure the glass firmly to the light fixture. Repeat for the remaining three glass shades. Ensure that each glass shade is installed firmly by rotating the lock ring clockwise until it is no longer loose. CAUTION: Do not overtighten the lock rings. f) Install the included light bulbs. SEE FIG. 3 Note: Bulbs included with this product will not dim. If this light kit is installed on a fan with a light dimming function, then bulbs that are capable of dimming need to be purchased separately. c) Connect pull chain extension to light pull chain. FIG. 3 2


