Motors and Generators Lab - University of Michigan SharePoint Portal
advertisement
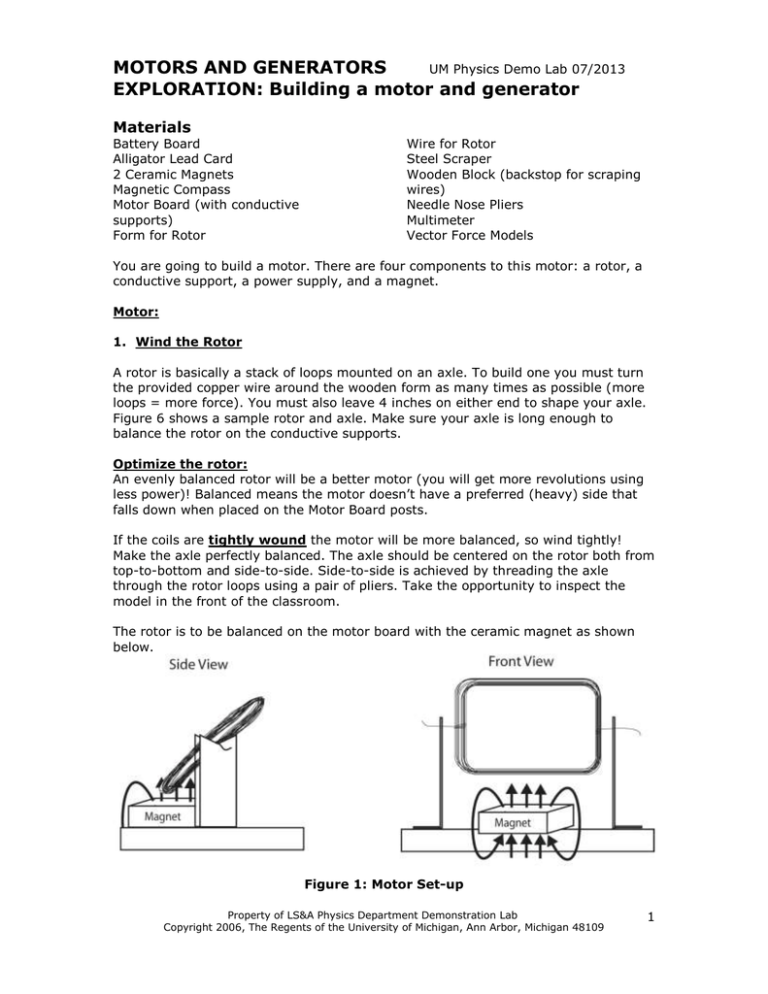
MOTORS AND GENERATORS UM Physics Demo Lab 07/2013 EXPLORATION: Building a motor and generator Materials Battery Board Alligator Lead Card 2 Ceramic Magnets Magnetic Compass Motor Board (with conductive supports) Form for Rotor Wire for Rotor Steel Scraper Wooden Block (backstop for scraping wires) Needle Nose Pliers Multimeter Vector Force Models You are going to build a motor. There are four components to this motor: a rotor, a conductive support, a power supply, and a magnet. Motor: 1. Wind the Rotor A rotor is basically a stack of loops mounted on an axle. To build one you must turn the provided copper wire around the wooden form as many times as possible (more loops = more force). You must also leave 4 inches on either end to shape your axle. Figure 6 shows a sample rotor and axle. Make sure your axle is long enough to balance the rotor on the conductive supports. Optimize the rotor: An evenly balanced rotor will be a better motor (you will get more revolutions using less power)! Balanced means the motor doesn’t have a preferred (heavy) side that falls down when placed on the Motor Board posts. If the coils are tightly wound the motor will be more balanced, so wind tightly! Make the axle perfectly balanced. The axle should be centered on the rotor both from top-to-bottom and side-to-side. Side-to-side is achieved by threading the axle through the rotor loops using a pair of pliers. Take the opportunity to inspect the model in the front of the classroom. The rotor is to be balanced on the motor board with the ceramic magnet as shown below. Figure 1: Motor Set-up Property of LS&A Physics Department Demonstration Lab Copyright 2006, The Regents of the University of Michigan, Ann Arbor, Michigan 48109 1 2. Scrape the Ends of the Axle The rotor needs one final refinement to be functional: the rotating axel must be made to function as a rotary switch called a commutator. The copper wire comes insulated with a layer of enamel. Removing the insulation from one half of the wire will permit current to flow half the time. You must remove the insulation from the SAME side of each axel for the motor to run properly. Hold the coil with the loop vertical and the axel on the wood block. Use the steel scraper to scrape away the insulation on half of the axel. Repeat this for both axels and be sure to scrape the same half of the wire on both axels! Your instructor will demonstrate this for the class. Ask for clarification if you are still not sure how to accomplish this. 3. Assemble the Motor Board Mount the rotor on the motor board according to the diagram in figure 1. Omit the magnet for now. 4. Test the Switch and Run the Motor Wire the cells on the battery board to produce 6V. Connect the 6V battery in series with a light bulb and then across the motor board. Clip the alligator leads to the motor support posts, not directly to the axle, so the axle can spin freely. There will be electrical contact between the supports and the sanded portion of the wire as the rotor spins. You are now ready to test your motor. A. Predict what the light bulb will do if you rotate the rotor of the motor. B. Now test your prediction. Describe the behavior of the light bulb as you gently spin the rotor. If your rotor switch is not working reliably, you may need to carefully scrape some additional insulation to improve its operation. Ask your instructor to help you with this. C. Remove the light bulb from the circuit so that the 6V battery is connected directly across the motor. Add the magnet to your motor as shown in Figure 1 and slowly turn the rotor. Note the direction that the magnet “kicks” the rotor and gently spin the rotor in that direction. Does your motor run?! Property of LS&A Physics Department Demonstration Lab Copyright 2006, The Regents of the University of Michigan, Ann Arbor, Michigan 48109 2 You can optimize your motor by adjusting the position of the magnet. Move the magnet around to see which locations produce the most revolutions per minute. Draw a diagram of the optimal magnet placement. There are variables in the set-up you just built that control the direction the motor spins (clockwise or counter-clockwise). Use the magnetic compass to determine the orientation of the magnetic field (north or south pole facing upward) and note how this and the direction of the current affect the motor’s rotation. You can reverse the direction of the current by exchanging the (+) and (-) directions to the battery. Describe two ways you can change the di rection the motor rotates. Record your findings below. Property of LS&A Physics Department Demonstration Lab Copyright 2006, The Regents of the University of Michigan, Ann Arbor, Michigan 48109 3 Generator 1. Start with your assembled motor. You will not be powering the motor with batteries, so disconnect the power leads so the motor is without power and stationary. Set the multimeter to V (DC voltage reader) and have one group member measure the voltage across the motor supports, one lead on each post. Use alligator leads to connect the posts to the multimeter to ensure good connections. Record the voltage of the stationary coil first. While the multimeter is on the posts, have another group member spin the motor by flicking it with their finger; the faster the spin, the better. Observe the voltage of the spinning motor and record. Stationary Coil Voltage: __________________ Rotating Coil Voltage: ____________________ Discuss what you have observed with your group members and repeat the experiment as necessary until you are sure of your conclusions. Record and explain your observations below. Property of LS&A Physics Department Demonstration Lab Copyright 2006, The Regents of the University of Michigan, Ann Arbor, Michigan 48109 4 2. Two Magnets As with the motor, there are variables you can change. Stack a second magnet onto the first one. Offset the magnets slightly so the rotor doesn’t hit them. Measure the stationary and rotating voltages again. Stationary Coil Voltage: . Rotating Coil Voltage: . Figure 2: Two magnet set-up Discuss in your group what you have observed and repeat the experiment if desired. Record your observations below. Property of LS&A Physics Department Demonstration Lab Copyright 2006, The Regents of the University of Michigan, Ann Arbor, Michigan 48109 5 Challenge Work Hydroelectric power extracts energy from falling water to produce electrical energy. Gravitational potential energy is converted to kinetic energy as the water falls and some of this energy is then converted to electrical energy as the falling water turns the shaft of an electrical generator. What is the ultimate source of this energy? (Hint: What process “pumps” the water back uphill so it can fall again? What energy source powers this process?) Property of LS&A Physics Department Demonstration Lab Copyright 2006, The Regents of the University of Michigan, Ann Arbor, Michigan 48109 6 APPLICATION: GENERATORS Materials Hand Generator Yellow LED Capacitor Multimeter Battery board The hand generator is an engineered version of the motor/generator you built. It also has a commutator, magnet, and coil. When it is rotated, a current is sent through the two leads. Make sure the generator leads are attached correctly (as labeled with a red paint pen). 1. Attach the hand generator to the multimeter and set the multimeter to V. Rotate the generator in the direction of the arrow drawn on the generator. First, rotate the generator quickly and record the voltage you observe below. Second, rotate the generator slowly and record the voltage below. Hand Generator Voltage – Fast Rotation: Hand Generator Voltage – Slow Rotation: . . Discuss in your group your findings in terms of what you have learned about generators and record your conclusions below. 2. Attach the leads of the generator to the yellow LED. Attach the painted red lead to the painted red contact on the LED. Rotate the generator in the direction of the arrow, record your observations below. Property of LS&A Physics Department Demonstration Lab Copyright 2006, The Regents of the University of Michigan, Ann Arbor, Michigan 48109 7 3. Attach the leads of the generator to the capacitor. Attach the painted red lead to the painted red contact on the capacitor. Rotate the generator twenty times in the direction of the arrow. Stop rotating the generator, release the handle and count the number of rotations. Did you recover all your rotations? Record your observations. 4. Attach the leads to the LED again, but this time in reverse. Rotate the generator in the direction of the arrow. Discuss your observations with your group and record your conclusions. 5. Attach the generator leads to a light bulb on the battery board. Rotate the generator. Reverse the leads and rotate the generator again. Discuss your observations with your group. Does the behavior of the incandescent bulb agree with your conclusions about the LED? Property of LS&A Physics Department Demonstration Lab Copyright 2006, The Regents of the University of Michigan, Ann Arbor, Michigan 48109 8 Summary 1. Motors use the magnetic force on a current-carrying wire to convert electrical energy into mechanical energy. 2. Generators convert mechanical energy into electrical energy. 3. Electric motors also function as generators by converting mechanical energy (work done to rotate the shaft) into electrical energy. 4. Magnetic flux through a surface is defined as the produce of the surface area and the component of magnetic field perpendicular to the surface. Qualitatively this is equivalent to the number of field lines passing through the loop. 5. If the magnetic flux through a coil of wire changes with time it induces voltage around the loop that can drive a current in the wire. Qualitatively, the magnetic flux is the number of field lines passing through the loop. This process is called Faraday Induction or Faraday’s Law and is the process by which virtually all electric power is generated. Final Clean-up Please disconnect all alligator leads and reattach them to the clip card. Return all equipment to the carts. Property of LS&A Physics Department Demonstration Lab Copyright 2006, The Regents of the University of Michigan, Ann Arbor, Michigan 48109 9 Everyday Applications Motors are used everywhere! If it spins electronically (and often if it just moves) a motor is behind it: Blenders, electric screwdrivers, fans, power windows, hard drives, CD players (twice, to spin the disc and to open the tray), food processors, garbage disposal, garage door opener, electric golf cart wheels, vacuum cleaner, washing machine, and more. Almost ALL the electrical power that we use every day is derived from energy sources with the use of a generator. The graph below shows electrical energy sources of the U.S. for the year 2004.1 The only exception is solar energy (under “Other Renewables”) which constitutes less than 2.3%. That means more than 97.7% of energy we use is produced by generators. DOE, "U.S. Electric Power Industry Net Generation," Energy Information Administration, http://www.eia.doe.gov/cneaf/electricity/epa/figes2.html (accessed May 10, 2006). 1 Property of LS&A Physics Department Demonstration Lab Copyright 2006, The Regents of the University of Michigan, Ann Arbor, Michigan 48109 10 Motors An electrical current near a magnet experiences a magnetic force. This effect can be used to convert electrical energy into mechanical energy. Motors convert electrical energy into mechanical energy of rotation. The characteristic feature of a motor is that it rotates. This has extensive applications in our everyday lives—it powers garbage disposals, fans, power windows, CD players, washing machines etc. To understand motors, we must first understand what happens when a magnet exerts a force on a current-carrying wire. Force on a Wire When a current is traveling through a magnetic field, the magnet exerts a force on that wire and moves it in a specific direction. The factors that control the direction of the force are the direction of the magnetic field and the direction of current in the wire. The direction of the resulting force, and hence the direction the wire will move, can be determined using a right hand rule. Direction of Magnet: Physicists have chosen a direction to magnetic field lines: magnetic field lines point from a north pole to a south pole. Direction of a Current: Physicists also have chosen a direction for current (I) flow in a wire. Current travels from positive (+) to negative (-) (from high potential to low potential). Direction of the Magnetic force: The magnetic force acts in a direction perpendicular to both the direction of the magnetic field and the direction of the current flow as shown in Fig. 1. Figure 3: Direction of the Magnetic Field, Current and Magnetic Force The three perpendicular directions are related by the right hand rule. The right hand rule says that if the direction of the fingers is aligned with the current and the magnetic field is perpendicular to the palm, the thumb points the direction of the force. You can see this relationship in the Figure 2. Property of LS&A Physics Department Demonstration Lab Copyright 2006, The Regents of the University of Michigan, Ann Arbor, Michigan 48109 11 Figure 4: Right Hand Rule: Mutually Perpendicular Directions You know you have verified the correct relationship between the current, magnetic force and magnetic filed when you can rotate your fingers (current direction) into the field direction (pointing up out of your palm) and have your thumb point in the direction of the force. Be sure to use your right hand! Rotation How do we convert the magnetic forces acting on the wire into a rotating motor? If we pass the current in two directions, forces are created in two opposite directions. Figure 5: Magnetic Forces on Wires Property of LS&A Physics Department Demonstration Lab Copyright 2006, The Regents of the University of Michigan, Ann Arbor, Michigan 48109 12 If the wires are connected to an axel (rotation axis) parallel to the wires and midway between them, then the forces will cause torques which will rotate them about the axis. Torque is the product of the force exerted at a distance from a rotation axis and the distance from where the force is applied to the axis of rotation. Only the component of force perpendicular to the distance line passing through the axis contributes to the torque. If you exert the same force at a greater distance from the axis, you will exert more torque than if you exerted the force near the axis. This is the reason why long wrenches are used to tighten and loosen bolts and why doorknobs are located on the distant side of the door from the hinges. If an object is free to rotate about the axis, it will rotate under the action of the torque. Now consider how these forces will make the system behave for a loop of current carrying wire on an axle. The two regions of the current carrying wire (with current in opposite direction) elicit forces in opposite directions, each producing a torque which will cause the loop to rotate about the axel as shown in Figure 4. Figure 6: A Rotating apparatus including an axle, magnetic field and current- carrying wires. We can increase the torque by making many overlapping loops with the wire, each of which experiences another copy of the magnetic force. We call this pile of loops a rotor (also called an armature), and the enhanced force from having many loops, high current, or a strong magnet can be powerful enough to run a blender or turn the wheels of electric vehicles. But, there’s a catch… The description above describes the initial forces that start the motor spinning in a perfectly symmetric motor. Once the system rotates 180º the forces reverse direction. This means the rotor first builds angular speed and then loses it until it reverses direction. This creates a situation where the rotor is oscillating rather than spinning and very inefficiently too. There are two ways to solve this problem: 1. Stop the current half the time. 2. Reverse the current every half rotation. For simplicity we will employ the first approach. We will convert the rotating axel of the motor into a simple rotary switch called a commutator. This switch must spin freely so it doesn’t bind (produce lots of friction) as the motor rotates. The motor Property of LS&A Physics Department Demonstration Lab Copyright 2006, The Regents of the University of Michigan, Ann Arbor, Michigan 48109 13 we’re building simply be rests on two conductive supports so that it can freely spin. To only allow current through half the time, the commutator can be polished so that it only makes electrical contact half the time, and is insulated the other half the time. This is very inefficient; the motor only experiences a torque compelling it to spin half the time, but it is very easy to do. You can see how this works in the figure below. Figure 7: Half-Time Commutator Now the rotor will only experience a torque in one angular direction, once every revolution as one side of the loop passes near the magnet. It will therefore spin continuously. ELECTROMAGNETIC INDUCTION Earlier you observed that a magnet near a current-carrying wire produce a force which causes the wire to move. The moving charges in the wire (current) exert a force on the wire in the presence of a magnetic field. You’ve also observed the inverse phenomenon. Moving a wire in the presence of a magnetic field exerts a magnetic force on the charges in the wire and causes them to move producing a current. The phenomenon that powers a motor works in reverse! Some of the mechanical work you do to spin the rotor is being converted to electrical energy. Earlier we observed that electrical energy can be converted into mechanical energy by means of a motor. Now we are observing that mechanical energy can be converted into electrical energy by doing work on the shaft of the motor—the motor becomes a generator if we do work to rotate its shaft. This is the basis of virtually all electrical power generation. The phenomenon is known as electromagnetic induction and is described by Faraday’s Law. Faraday’s Law states that a voltage is induced when a moving wire is in the presence of a magnetic field or when the number of magnetic field lines passing through a loop of wire (called the magnetic flux) changes with time. When you spin the rotor in the presence of a magnetic field, the induced voltage due to the time-changing flux causes a current to flow when the rotor is connected to a completed circuit. Property of LS&A Physics Department Demonstration Lab Copyright 2006, The Regents of the University of Michigan, Ann Arbor, Michigan 48109 14


