Project 1 Report
advertisement
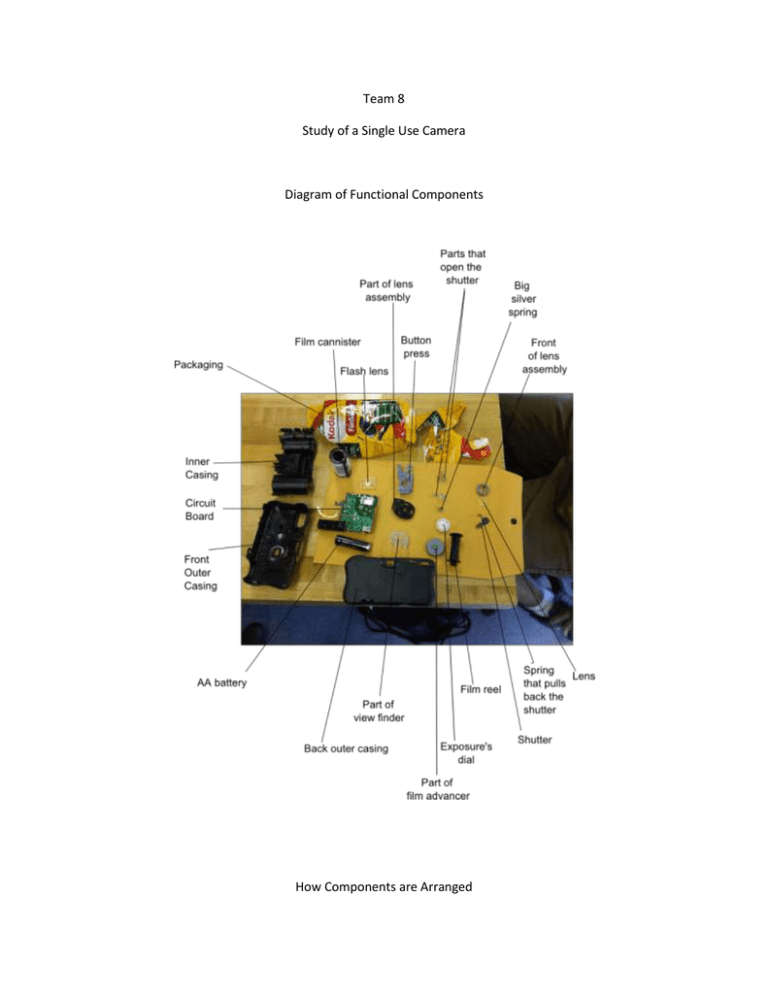
Team 8 Study of a Single Use Camera Diagram of Functional Components How Components are Arranged Two plastic shells make up the outer covering of the camera. These shells contain all the parts that make the camera work. Within the outer shell there is the inner casing with the attached button press. Attached to the back of the inner casing are the film reel and the film canister. Connected to these are the exposure’s dial and the film advancer. Also attached is the silver spring which provides the energy to quickly open the shutter. The lens assembly, which contains the lens, is located on the front side of the inner casing. Also included is the circuit board. Underneath the lens is a shutter which is controlled by a small spring. On the front side of the camera there is the circuit board, battery, and flash lens. The viewfinder is on the back of the container. All of the functional components are contained in the paper and plastic packaging in the above image. How it Works As you wind up the film advancer the film is advanced to the next frame and the silver spring is wound up to prepare for the next shot. The flash is then charged by the AA battery when holding the button on the front shell casing. Once the capacitor is fully charged, the camera is ready to take a picture. When the button press is pressed, the shutter is quickly retracted letting light traveling through the lens to strike the film frame. If the flash is charged, the capacitor will hold the charge until the button press is activated. Once the film is exposed, the shutter returns to its previous position and the camera can be prepared for the next picture Disassembly Procedure 1. 2. 3. 4. Rip packaging off Camera Use a small tool (screwdriver) to push tabs and separate the casings Remove battery Remove Circuit Board. Warning: Do not touch capacitor or metal on circuit board you will be shocked. You must discharge the capacitor with the screwdriver. 5. Remove film canister and film advancer 6. Remove the lens, front of lens assembly, shutter spring, lens assembly, and the shutter 7. Remove the exposure dial, view finders, and shutter openers Assembly Procedure 1. 2. 3. 4. 5. Replace the exposure dial, view finders, and shutter openers Replace the lens, front of lens assembly, shutter spring, lens assembly, and the shutter Replace film canister and film advancer Replace Circuit Board Replace battery. Warning: Do not touch capacitor or metal on circuit board you will be shocked. 6. Assemble the casing by lining up the tabs and pushing the two halves together 7. Place packaging back onto the camera Reused Parts: The listed parts are reused multiple times until they fail. Outer parts are reused less than inner parts. 1. 2. 3. 4. 5. 6. 7. Small spring Big spring Casing (outer piece) Battery Film Reel Lens (outer piece) Circuit Board Non-reused Parts: 1. Packaging 2. Film Canister Recycled Parts: 1. Everything is recycled except the circuit board. Materials: 1. 2. 3. 4. 5. 6. 7. 8. 9. Spring – Steel Casing – ABS Plastic Battery – Metal and Acid Film Reel – Composite Plastics Lens – ABS Plastic Circuit Board – Electronic Components Packaging – Plastic and Aluminum Film Canister – Composite Plastics Shutter – Steel A possible redesign of the disposable camera is a change to the packaging of the camera and a change to the canister that holds the film. The packaging could be made of a type of biodegradable material to reduce waste. Another way to reduce waste is to redesign the film canister. Currently the film canister is not recyclable or reusable. If there was a way to make the canister reusable once the film was extracted, the amount of waste would greatly be reduced. An example of a recyclable material is ABS Plastic similar to the type used in the casings.
