Microsoft® Office® 2007
Step-by-Step for Educators
The Microsoft Office suite can be one of the most useful tools both in and outside of the
classroom. Whether a person is presenting with Microsoft® PowerPoint®, writing with
Microsoft® Word®, or taking notes with Microsoft® OneNote®—Office is an essential part of
teaching and learning. This document covers some helpful Microsoft Office 2007 tips and tricks
for teachers.
The Office 2007 User Interface
In Office 2007, we dramatically improved the user interface after thousands of hours of
customer research and hundreds of designs. Our goal was to make the programs easier to use,
and help you discover new, more efficient ways to get your work done. The result is a very
visual and more dynamic interface.
The Ribbon
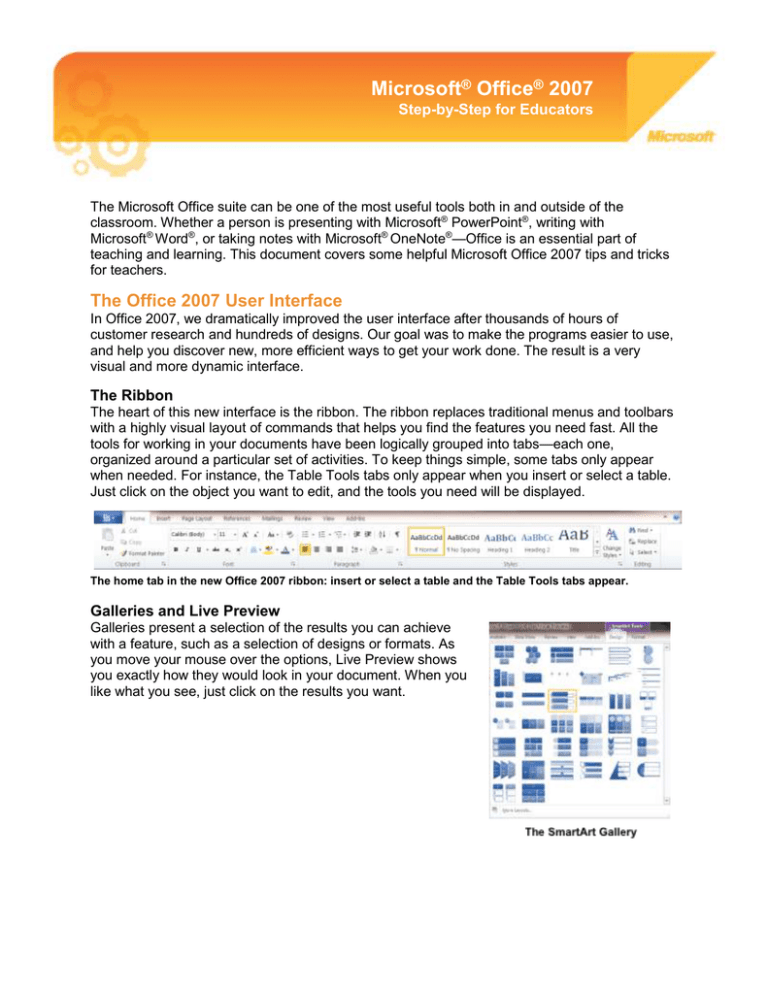
The heart of this new interface is the ribbon. The ribbon replaces traditional menus and toolbars
with a highly visual layout of commands that helps you find the features you need fast. All the
tools for working in your documents have been logically grouped into tabs—each one,
organized around a particular set of activities. To keep things simple, some tabs only appear
when needed. For instance, the Table Tools tabs only appear when you insert or select a table.
Just click on the object you want to edit, and the tools you need will be displayed.
The home tab in the new Office 2007 ribbon: insert or select a table and the Table Tools tabs appear.
Galleries and Live Preview
Galleries present a selection of the results you can achieve
with a feature, such as a selection of designs or formats. As
you move your mouse over the options, Live Preview shows
you exactly how they would look in your document. When you
like what you see, just click on the results you want.
The Office Button
All the functions for working with your document—like opening, saving, printing, and sharing—
are organized into one place.
The Office Button
These features span the Office 2007 programs. Now let’s take a closer look at each program.
OneNote 2007
OneNote is the program in Microsoft Office that brings everything in your teaching world into
one tidy, collaborative space. Think of it as a digital notebook to gather, store and manage
materials for teaching. Capture text, photos, video or audio files, Word documents, maps, Web
articles, and handwritten notes.
Search the Internet from within OneNote
Using the Research feature in OneNote, you and your students can quickly look up words and
phrases in a dictionary, thesaurus or other research source. To use the research feature, on the
Tools menu, click Research. In the Research task pane that is displayed on the right side of
the window, type the term you’re searching for in the Search box, and select the source to use
from the reference list. The results appear in the lower portion of the pane.
Use the research pane to find information on the Internet
Clip and Save Content from Web Pages
You can use OneNote to take a picture of any part of your computer screen and insert the
picture into your notes. Such pictures are called screen clippings, and they can range from a
few pixels to the entire height and width of your screen. Anything in the area that you select
appears in the image and is automatically pasted into your notes and the Clipboard.
To save a screen clipping from a Web page, in OneNote, click the Clip button on the toolbar.
Then switch to the Web page, and use your mouse pointer to drag a rectangle over the area
you want to clip. When you release the mouse, the clipping, together with a hyperlink to the
Web page, is automatically saved to the OneNote page.
Save a screen clipping of a Web page
Add an Audio Note
OneNote 2007 lets your students record audio and video clips as they take notes. To record
audio, you need a microphone. To record video, you need to connect a digital camera capable
of recording movie clips, such as a webcam.
Audio and video recordings you make in OneNote are directly linked to any notes you take
when the recording is made. Whenever you play back the recording, OneNote shows you the
accompanying notes that you took.
To make an audio recording, on the toolbar click the Recording Audio Only button. Use the
mini toolbar that appears to make your recording.
Insert audio recordings with your notes
Note: To record audio or video clips in OneNote, Microsoft DirectX 9.0a or later and Microsoft
Windows Media Player 9 or later are required.
Set Up a Shared Notebook
OneNote lets you store and maintain shared notebooks on a network server or file share, so
that your students can simultaneously access shared notes and contribute to them on an
ongoing basis.
Taking notes as a group is a collaborative process that encourages teamwork. OneNote lets
everyone access a shared set of notes at once, and it automatically synchronizes everyone's
changes to the notebook. The result is a notebook that is always up-to-date and that literally
keeps everyone on the same page.
Setting up a shared notebook is easy. On the File menu, point to New, and then click
Notebook.
The New Notebook Wizard guides you through the steps for creating a shared notebook in a
network location that you and your whole class has access to.
Teach your students to collaborate using shared notebooks
Find Content in OneNote
One of the main advantages of using OneNote instead of traditional notebooks is its ability to
quickly search through all of the information you've collected and retrieve important notes based
on criteria that you specify. Instead of having to flip and skim through paper pages, you can
quickly retrieve anything you've jotted down. OneNote also makes it easy to browse through
your most recent notes and search for spoken words in recorded audio notes.
To search for words in OneNote, even words that are inside graphics, type the search term in
the Search box in the upper right corner of the window and click the Search button. OneNote
highlights the search results where they are found on the pages of the notebook.
If one or more instances of the text are found, the total number of pages appears in the toolbar
area.
Search results are highlighted on pages
Automatic Save
You never need to save your notes. OneNote automatically saves them as you are working and
whenever you close the program or a section.
By default, OneNote automatically backs up your notes at regular intervals. You can change
how often automatic backup files are created, and you can turn the automatic backup feature on
or off at any time.
To set your backup options, on the Tools menu, click Options. In the Options dialog box, in
the Category list, click Backup and select your backup preferences.
Select backup options
Note: The names of backup files include the date they are created. For example, a backup file
for a notebook section called Lectures that is created on January 14, 2010, is automatically
named "Lectures.one (On 1-14-2010).one".
PowerPoint 2007
Apply a Design Theme
In previous versions of PowerPoint, you gave your presentation the look you wanted by applying
a design template. In PowerPoint 2007, you can do the same thing by applying a theme. There
are lots of great looks now available for your presentations.
Open the presentation. On the ribbon’s Design tab, in the Themes group, click More to see
the Themes gallery. Point to the themes to see a preview of how your presentation would look.
You can also click on More Themes in Microsoft Office Online and search for educationspecific templates. Click the thumbnail that you like the best.
View the Theme gallery
Add Visual Impact with SmartArt
PowerPoint gives your students an opportunity to convey their ideas to you and their fellow
students using graphics as well as words. PowerPoint 2007 includes a feature called SmartArt,
which lets you visually represent a variety of concepts and ideas that might not work too well
with just text.
Add a SmartArt graphic to a slide in one of two ways:
1. To insert SmartArt into a new slide, click on the Home tab on the ribbon, and then click
on New Slide. The new slide will provide helpful icons to insert specific types of content.
Click the SmartArt Graphic icon.
Insert
SmartArt
2. To insert SmartArt into an existing slide, click on the Insert tab on the ribbon. In the
Illustrations group, click on SmartArt.
Insert
SmartArt
The SmartArt gallery will be displayed. Choose the option that most closely resembles the
concept you want to convey.
View the SmartArt gallery
Add an Animation
Animations let you add movement and action to your presentations, emphasize important
points, and control the flow of information to your audience.
You can use the built-in animation effects in PowerPoint, or you can create your own custom
effects. First select the text box or object you want to animate. Then, on the Animations tab, in
the Animations group, either click the animation you want to use or click Custom Animation,
to display the Custom Animation task pane.
Add a custom animation
Point to the type of animation you want to apply, and then click the animation. PowerPoint
shows you a preview of the animation you have selected and adds the animation to the Custom
Animation task pane.
In addition to animations, transitions can be inserted to move from one slide to the next when
you show the presentation.
Since the goal is to draw attention to the information you are trying to convey, it’s best to use
animations subtly, rather than draw too much attention to the technology feature.
To apply an animated transition to one or more slides, selected the slides and, on the
Animations tab, in the Transition to This Slide group, point to a transition to see a preview.
Then click the one you like.
View the slide transition gallery
Notice that PowerPoint displays an animated star under the slide number on the Slides tab, for
every slide to which a transition has been applied.
Create an Interactive Story
You or your students can create stories with multiple story endings by using hyperlinks.
Create an interactive story that allows your audience to choose the ending
Create your story pages, or slides. On the slide where your story branches off, add graphic
elements or text boxes to represent different story options (see example above). Select the first
option. On the Insert tab, click Hyperlink. On the left side of the dialog box, select Place in this
Document, and select the destination slide. Then click OK. Repeat for the other story options.
Embed a Movie
You can embed a movie clip (or video) on a slide so that it plays within the presentation. This is
a good way to add lecture notes or comments to a presentation.
To insert a video clip on a slide, first select some text or an object on the slide. On the Insert
ribbon, in the Media Clips group, click Movie and then click Movie from File. Then find the
video file on your computer.
Select a Movie
If you’re going to be presenting on another computer, note that PowerPoint stores the
movie file as a relative path in the presentation. If PowerPoint cannot find the movie file in the
same path, the movie will not be played. Therefore, it’s a good idea to start out by placing
the video file in the same folder as your presentation, and copy the whole folder to the other
computer.
In the message box that is displayed, indicate whether you want the video to play automatically
or when clicked. If you choose the latter, when you view the slideshow the video will start
playing only after you click the movie object in the slide.
Word 2007
Reviewing and Editing
The Review features in Word give teachers a great way to comment on students’ writing and
suggest changes.
Track Changes
You can easily make and view tracked changes and comments while you work in a document.
By default, Microsoft Office Word 2007 uses balloons to display deletions, comments, formatting
changes, and content that has moved. You can change settings so that tracked changes and
comments display the way you want. To show changes inline, in the Tracking group, click
Balloons, and then click Show all revisions inline.
Balloons show formatting changes,
comments, and deletions
1. To track changes, open the document that you want to revise.
2. On the Review tab, in the Tracking group, click the Track Changes image.
3. Make the changes that you want by inserting, deleting, moving, or formatting text or
graphics.
4. To turn off change tracking, on the Review tab, in the Tracking group, click the Track
Changes image.
Comments
To insert a comment (a note or an annotation) in a document, select the text or item that you
want to comment on. Then, on the Review tab, in the Comments group, click New Comment
and type the comment text in the comment balloon. To respond to a comment, click its balloon,
and then click New Comment in the Comments group. Type your response in the new
comment balloon.
Change the Way the Markup is Displayed
You can change the color and other formatting that Word uses to mark changed text and
graphics by clicking the arrow next to Track Changes and then clicking Change Tracking
Options. Note: While you can't assign specific colors for changes made by different reviewers,
each reviewer's changes appear as a different color in the document so that you can track
multiple reviewers.
In the Review tab, in the Tracking group, click Show Markup to turn on and off markup viewing
options such as: comments, ink (if you’re using a Tablet PC), insertions and deletions, and
formatting. You can also choose to see changes and comments from only certain reviewers, or
all reviewers.
Note that the Show Markup feature only hides tracked changes or comments in the document. It
does not eliminate them.
Review Tracked Changes and Comments
Comments need to be deleted and tracked changes need to be either accepted or rejected to
create a publishable version of a document.
1. On the Review tab, in the Changes group, click Next or Previous.
2. Do one of the following:
a. In the Changes group, click Accept.
b. In the Changes group, click Reject.
c. In the Comments group, click Delete.
3. Accept or reject changes and delete comments until there are no more tracked changes
or comments in your document.
To ensure all tracked changes are accepted or rejected and that all comments are deleted, on
the Review tab, in the Tracking group, click Reviewing Pane. The summary section at the top
of the Reviewing Pane displays the exact number of tracked changes and comments that
remain in your document.
To accept all changes at once:
1. On the Review tab, in the Changes group, click Next or Previous.
2. Click the arrow below Accept, and then click Accept All Changes in Document.
Insert and Design Tables
The quickest way to insert a table in a document in Word 2007 is to first click in the document to
indicate where you want the table. Then, on the Insert tab, in the Tables group, click Table,
and drag to indicate the number of columns and rows you want in the table.
Drag to indicate the number of columns and rows
Table Tools will display on the ribbon, which include a Design and Layout tab. Click on the
Design tab. In the Table Styles group, click the More button in the lower right corner to display
the Design gallery. Mouse over the designs to see Live Preview of the designs applied to your
table. Select the design you like and it will automatically be applied.
Select a design from the Design gallery
Headers, Footers, Page Numbers
Headers and footers are areas in the top, bottom, and side of each page in a document. You
can insert or change text or graphics in headers and footers. For example, you can add page
numbers, the time and date, the document title or file name, or the author's name.
To insert a header or footer in a document, on the Insert tab, in the Header & Footer group,
click Header or Footer. (You can also double-click in the header or footer area of your
document to accomplish the same thing.)
Insert a header
Click the header or footer design that you want. The header or footer is inserted on every page
of the document. If necessary, you can format text in the header or footer by selecting the text
and using the formatting options on the mini toolbar.
More Information on Office 2007 for educators
For teachers:
www.microsoft.com/education/Office
For faculty:
www.microsoft.com/officeeducation
© 2009 Microsoft Corporation. All rights reserved.
This document is for informational purposes only. MICROSOFT MAKES NO WARRANTIES, EXPRESS, IMPLIED OR STATUTORY, AS TO THE INFORMATION IN THIS
DOCUMENT.
Microsoft, Windows, SmartArt, Excel, Internet Explorer, OneNote, PowerPoint, SmartScreen, and Windows Live are trademarks of the Microsoft group of companies. The
names of actual companies and products mentioned herein may be the trademarks of their respective owners.

