Creating an Access Database
advertisement
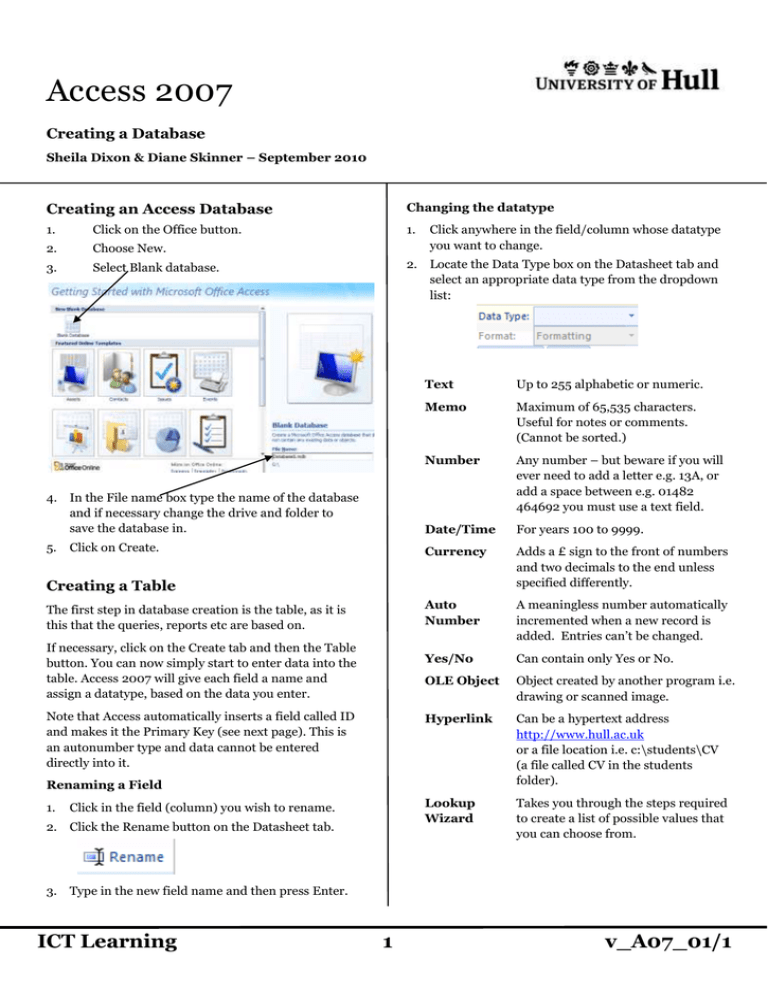
Access 2007 Creating a Database Sheila Dixon & Diane Skinner – September 2010 Creating an Access Database Changing the datatype 1. Click on the Office button. 1. 2. Choose New. 3. Select Blank database. Click anywhere in the field/column whose datatype you want to change. 2. Locate the Data Type box on the Datasheet tab and select an appropriate data type from the dropdown list: Text Up to 255 alphabetic or numeric. Memo Maximum of 65,535 characters. Useful for notes or comments. (Cannot be sorted.) Number 4. In the File name box type the name of the database and if necessary change the drive and folder to save the database in. Any number – but beware if you will ever need to add a letter e.g. 13A, or add a space between e.g. 01482 464692 you must use a text field. Date/Time For years 100 to 9999. 5. Currency Adds a £ sign to the front of numbers and two decimals to the end unless specified differently. Auto Number A meaningless number automatically incremented when a new record is added. Entries can’t be changed. Yes/No Can contain only Yes or No. OLE Object Object created by another program i.e. drawing or scanned image. Hyperlink Can be a hypertext address http://www.hull.ac.uk or a file location i.e. c:\students\CV (a file called CV in the students folder). Lookup Wizard Takes you through the steps required to create a list of possible values that you can choose from. Click on Create. Creating a Table The first step in database creation is the table, as it is this that the queries, reports etc are based on. If necessary, click on the Create tab and then the Table button. You can now simply start to enter data into the table. Access 2007 will give each field a name and assign a datatype, based on the data you enter. Note that Access automatically inserts a field called ID and makes it the Primary Key (see next page). This is an autonumber type and data cannot be entered directly into it. Renaming a Field 1. Click in the field (column) you wish to rename. 2. Click the Rename button on the Datasheet tab. 3. Type in the new field name and then press Enter. ICT Learning 1 v_A07_01/1 Different Table Views Property Types A table can be viewed in any one of 4 ways. The properties available depend on the data type selected. Datasheet view is the default view and is used mainly for entering and viewing data Field Size The default is 255 for text, but can be between 1 and 255. Changing this prevents too much data being entered into a cell. PivotTable view – used to create and view a Pivot Table. The default size for a numeric field is long integer, which will only store whole numbers. To store decimal numbers choose either Single or Double (see help for more information). PivotChart view – used to create and view a Pivot Chart. Design view – used to setup and change the structure of the table. Format Determines how the field contents are displayed. Switching between views Numbers can be: general (as entered), currency, fixed to a number of decimal positions, percentages or scientific. With the table open in Datasheet view, either Click on the arrowhead on the word ‘View’ on the View button on the Home ribbon and select the required view. Date/Time – choose from long, medium and short date and time formats. Or Custom formats – you can create your own format if the one you want isn’t available. Click on one of the buttons found in the bottom right corner of the window. Decimal Places Choose between 0 and 15 decimal places for number and currency data types. Datasheet PivotTable PivotTable Validating Data Design PivotChart PivotTable PivotTable It is important that the data entered is valid. Input Mask Determines how data is entered. For example an input mask of 00/00/0000 would ensure that the full 4 digit year is entered. PivotC hart Default values Cuts down the amount entered Could be Hull for town name or =Date() to automatically time stamp a field. Properties Each field has a number of properties that further define the data that is stored in it. Validation Rule Some validation takes place automatically i.e. you cannot enter text into a numeric field. Use if you want to ensure that the fee entered is within certain limits, for instance less than £1000. To view the properties, you must be in Design view. Validation Text The message that will appear if the rule above is broken. Require Data Entry If it is important that a value is added to each record, i.e. a student name, the required property can be set to Yes. You cannot save a record unless this field contains data. Zero Length Strings A zero length string “” can be used to differentiate between a field with no entry and one for which you have no data (null entries) for instance if a student doesn’t have a telephone you could enter “” which will distinguish it from a missing entry. The bottom part of the screen contains the Properties details of the selected field: ICT Learning 2 v_A07_01/1 Creating a Relationship between tables Lookup Wizard To further validate data you can use the lookup wizard to limit data entry in a field to a typed list or the contents of another table eg sex could be limited to Male or Female or the Degree Titles from a table containing details of the degrees on offer. Once you have created the tables, you need to tell Access how they are related. Looking up Values from a Typed List 3. Select the related field from one of the tables and drag to the related field in the other. 1. 2. Add the tables required and then click on Close. In Table Design view: 1. Click on the Relationships button on the Database Tools ribbon. Add a field name. 2. Select Lookup Wizard as the data type. drag 3. Choose to type in the values. Click on Next. 4. Type the values in the column. Press the tab key to move down a row. 5. Referential Integrity Change the column width if necessary. Click on Next. If you want to ensure that there are no instances of foreign keys that do not relate to a primary key eg a tutor that does not exist has not been assigned to a module, check the Enforce Referential Integrity box. 6. Add a name for the lookup column. 7. Click on Finish. Limiting Entries to Lookup Values In Table Design view: 1. Click on the lookup tab in the field properties at the bottom of the window. Cascade Update/Delete records 2. At the bottom of the page, choose Yes from the Limit to List option. If a record is deleted or updated in one table you can choose for the operation to be cascaded to other related tables. To do this, check the Cascade Update/ Delete boxes. Limit to list 4. Click Create. Primary keys Creating a relationship using the Lookup Wizard When you create a new table, Access automatically inserts a field named ID and makes this the primary key field. You can change this if necessary. To add or remove a primary key: 1. If you want to limit the entries in a field to those in a table e.g. degree titles could be stored in a table. In Table Design view: In Table Design view, click in the relevant field. 1. 2. Click on the Primary key button on the Design ribbon. 2. Select Lookup Wizard as the data type. 3. Choose to lookup the values in a table or query. Click on Next. Creating a composite key It is best practice that every table has a primary key that uniquely identifies a record. There may be no one field that would uniquely identify a record, but the combination of two fields may resolve this. 1. 4. Select the table containing the values from the list displayed. Click on Next. 5. Drag over the field selectors of the fields you wish to make up the key. Highlight the fields to be displayed in the list and click on the arrowhead to add to the selected fields box. 6. Click next. 7. 2. Click on the Primary key button. ICT Learning Add a field name. Change the column width if appropriate. Click on Next. 8. Add a name for the lookup column. Click on Finish. 3 v_A07_01/1

