Installation
Memba Velodoc Outlook Add-In Application
You can download Memba Velodoc Outlook Add-In from many web sites including
http://www.velodoc.com. The download is a Zip archive which contains an automated setup. Extract
the archive and run setup.exe.
Running the setup depends on the following prerequisites:
1.
2.
3.
4.
Windows XP or Windows Vista (Version > 5.1),
Office 2003 or Office 2007,
.NET framework 3.5,
VSTO runtime and Office Primary Interop Assemblies (PIA’s).
The .NET framework, VSTO runtime and Office PIA’s are installed by setup.exe if they have not yet
been installed. In this case you are prompted to accept Microsoft license terms.
Setup.exe also installs Memba Software Update, a scheduled task to check for available updates on
our servers.
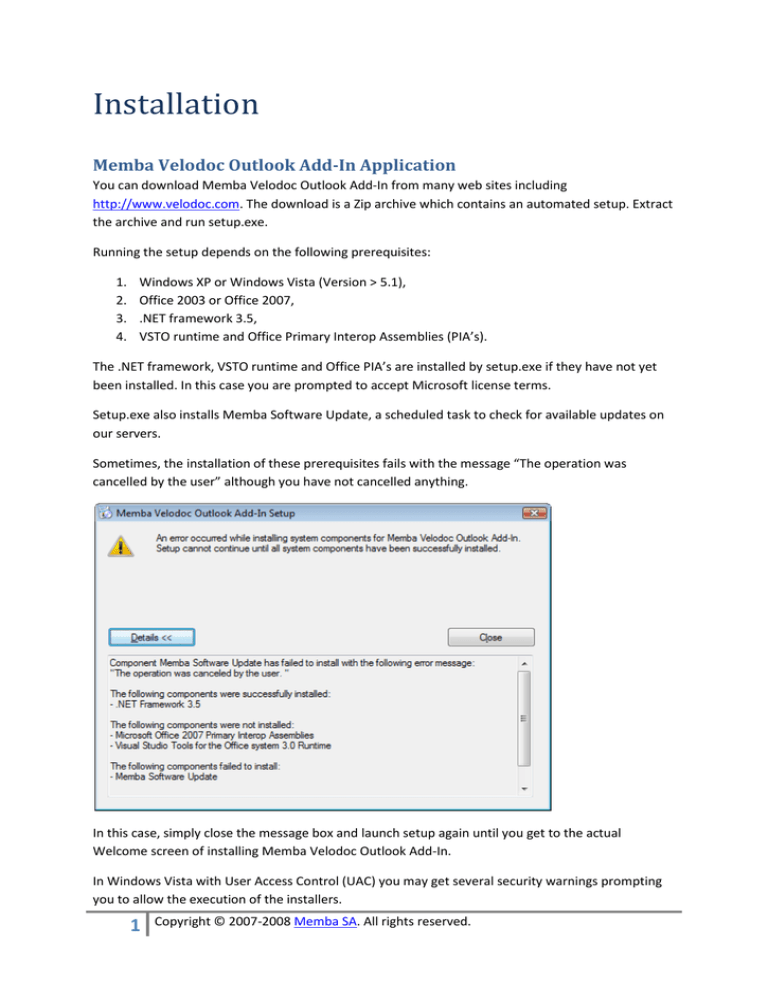
Sometimes, the installation of these prerequisites fails with the message “The operation was
cancelled by the user” although you have not cancelled anything.
In this case, simply close the message box and launch setup again until you get to the actual
Welcome screen of installing Memba Velodoc Outlook Add-In.
In Windows Vista with User Access Control (UAC) you may get several security warnings prompting
you to allow the execution of the installers.
1
Copyright © 2007-2008 Memba SA. All rights reserved.
Once all prerequisites have been installed, the actual Velodoc Add-In setup starts with the following
welcome screen.
After the welcome screen, a prerequisites screen is displayed to tell you about the prerequisites
installed (.NET Framework, …) and what the Velodoc setup will actually modify on your computer.
Then you will be prompted for license information:
2
Copyright © 2007-2008 Memba SA. All rights reserved.
Memba Velodoc Outlook Add-In is open source software which does not mean free software. You
can choose among two licenses:
1. The GPL license which is free but requires that you do not distribute (including access or
display on the Internet) to people outside your organization, without giving Memba credit
and without providing the source code. Since a Velodoc package is a copyrighted file format
covered by the license and since you may send a Velodoc package outside your organization,
the GPL license requires that you also send the source code. Note that developers can freely
use the GPL license for any deployment in their development environment.
2. The Memba EULA which removes any of these constraints and can be purchased for a small
fee per user at http://www.velodoc.com. Please appreciate that purchasing a Memba EULA
rewards our efforts and funds the continued development and support of the software.
Next, you will be prompted for an installation folder. We recommend that you keep the proposed
installation folder which is consistent with all Memba applications.
After you confirm installation on the following screen, the setup displays a progress bar while it
executes and specifically:
1. Copies the application files to %ProgramFiles%\Memba\Velodoc\<VirtualDir> or any
installation directory which you may have specified;
2. Records your license information, if you enter it during the setup process; Note that you can
purchase and enter your license information at a later stage.
3. Creates the registry settings for the add-in relevant to the version of Office which you have
installed;
4. Registers the transfer controller for .NET remoting;
3
Copyright © 2007-2008 Memba SA. All rights reserved.
5. Installs the preview handler if you are running Vista;
6. Configures .NET code access security;
7. Configures Windows firewall.
Once this is completed, you get a readme screen to help you get started, followed by a completion
screen. Click the Close button.
You can now open the Start menu, select All Programs and in the program folder entitled Memba
Velodoc, choose Memba Velodoc Transfer Controller.
This will launch the transfer controller in a tray icon. A double click on the Tray Icon opens the
monitor form of the controller as shown above. IMPORTANT: If you get a Windows Firewall
prompt, make sure you accept to unblock the controller.
Once the setup is complete, you can also open Outlook. Depending on your version of Office, you
may get the following screen. In this case, please click Install.
4
Copyright © 2007-2008 Memba SA. All rights reserved.
Sometimes after you have uninstalled and reinstalled the Outlook Add-In several times, you get the
following error: “Unable to install this application because an application with the same identity is
already installed. To install this application, either modify the manifest version for this application or
uninstall the preexisting application”.
5
Copyright © 2007-2008 Memba SA. All rights reserved.
The only workaround is to uninstall, clear the ClickOnce cache and reinstall. This is achieved using
the Mage.exe tool, which is part of the .NET framework SDK. The command line to clear the
ClickOnce cache is:
C:\Program Files\Microsoft.NET\SDK\v2.0\Bin\Mage.exe -cc
Once install is completed, Outlook 2007 loads and after opening a new message, you should get a
new popup menu in the ribbon:
In Outlook 2003, you get the following command bar:
6
Copyright © 2007-2008 Memba SA. All rights reserved.
Before you can add/edit any package to your emails, you need to configure your accounts.
Account Settings
The Memba Velodoc Outlook Add-In has a plug-in architecture which makes it virtually compatible
with any file transfer server platform. Accounts with server platforms are configured in Account
Settings.
Set a Velodoc Enterprise account
To add a new Velodoc Enterprise account, click the green cross in the toolbar, and in the New
Account dialog box, name your account “My Velodoc Enterprise” or any name you deem more
relevant and select the “Velodoc Enterprise Edition” plug-in.
The host is the fully qualified domain name of the server, for example www.velodoc.net. The Path
is the virtual directory where Velodoc Enterprise Edition is installed. Leave blank if you are using the
Velodoc online service at www.velodoc.net.
The user name and email are the ones you have used to register on the Velodoc web site, as
represented below. You should have received your password in an email notification.
7
Copyright © 2007-2008 Memba SA. All rights reserved.
Click the Test button to confirm that your plug-in settings are valid.
Make sure the name of your Velodoc Enterprise account is displayed in the status bar, which defines
the default account used for transfers and you are ready to go.
Set a Velodoc XP account
To add a new Velodoc XP account, click the green cross in the toolbar, and in the New Account
dialog box, name your account “My Velodoc XP” or any name you deem more relevant and select
the “Velodoc XP (via WCF)” plug-in.
8
Copyright © 2007-2008 Memba SA. All rights reserved.
The host is the fully qualified domain name of the server, for example www.memba.com. Avoid
using IP addresses like we did here otherwise you will trigger the Outlook phishing filter on the
recipients’ mailbox.
The Path is the virtual directory where Velodoc XP is installed. The email should be one of the emails
listed in the UserList key in the application settings section of the web.config file of Velodoc XP
Edition. The security code is also configured at the same location:
Click the Test button to confirm that your plug-in settings are valid.
9
Copyright © 2007-2008 Memba SA. All rights reserved.
Make sure the name of your Velodoc XP account is displayed in the status bar, which defines the
default account used for transfers and you are ready to go.
If you do not have access to a Velodoc XP Server, go to http://www.velodoc.com/en/download.htm
and get Velodoc XP Edition which is also open source software. The download contains details
instructions to install the software.
Set an FTP account
To add a new FTP account, click the green cross in the toolbar, and in the New Account dialog box,
name your account “My FTP Server” or any name you deem more relevant and select the “FTP
Server (Any)” plug-in.
The host is the fully qualified domain name of the server, for example ftp.memba.com. Avoid using
IP addresses like we did here otherwise you will trigger the Outlook phishing filter on the recipients’
mailbox.
The plug-in allows you to configure:
An Upload path to which the user name and password of a windows account apply to let you
upload files;
A download directory, which has anonymous read-only access to let your email contacts
download files. Note that anyone can download these files. To prevent unauthorized users
from reading these files, you can use the Memba Velodoc Outlook Add-in to compress files
with a password. For advanced security, use Memba Velodoc Enterprise Edition or the
Velodoc online service at www.velodoc.net.
Click the Test button to confirm that your plug-in settings are valid.
Make sure the name of your FTP account is displayed in the status bar, which defines the default
account used for transfers and you are ready to go.
10
Copyright © 2007-2008 Memba SA. All rights reserved.
If you do not have access to an FTP Server,, we will now show you how Microsoft FTP Server can be
configured to be used with the Memba Velodoc Outlook Add-In, assuming you have installed the FTP
Service which is part of the IIS setup on Windows. Open the IIS Snap-in in the MMC or simply
execute inetmgr.exe from the run dialog box.
Make sure your FTP site allows anonymous connections.
Define two virtual directories, respectively named Download and Upload or any name that matches
your configuration above and make sure they both point to the same local path. Give Read-Write
access to the Upload directory and Read-Only access to the Download directory.
Now open the local path in Windows Explorer and set windows security to the directory:
11
Copyright © 2007-2008 Memba SA. All rights reserved.
In our case, the Administrators group which includes the Administrator account used for uploading
files has the Modify permission on the directory. Obviously we recommend not using administrator
accounts. Best practice would be to use user accounts and add them to a specific group of FTP users
who have the Modify permission on this directory.
The Users group which includes the IUSR_MACHINENAME anonymous account only has Read
permission on the directory.
Please refer to Microsoft’s documentation for more information on how to configure the IIS FTP
Server.
Set a UNC File Share account
To add a new UNC File Share account, click the green cross in the toolbar, and in the New Account
dialog box, name your account “My UNC File Share” or any name you deem more relevant and select
the “UNC File Share” plug-in.
12
Copyright © 2007-2008 Memba SA. All rights reserved.
The UNC Path is the path to your file share following the UNC convention, for example \\sv-rndev01\downloads. Obviously UNC file shares can only be used on a Local Area Network. Email contacts
outside your organization will not have access to your UNC file shares.
The plug-in allows you to impersonate the access to the UNC file share which is required if (1) the
UNC file share Is not in the same domain and/or your windows account does not have access to the
share and (2) you have not already “remembered” the credentials to access the file share in
Windows.
Click the Test button to confirm that your plug-in settings are valid.
Make sure the name of your UNC File Share account is displayed in the status bar, which defines the
default account used for transfers and you are ready to go.
If you do not have access to a UNC File Share, we will now show you how Microsoft Windows can be
configured to be used with the Memba Velodoc Outlook Add-In.
On the target computer which will be used to share files, select a directory in Windows Explorer and
in the Properties, go to the Sharing tab and select Share this folder. Set the permissions so that the
account (user name and password) you use has read-write access. Your email contacts will need to
have read-write access to this folder too.
13
Copyright © 2007-2008 Memba SA. All rights reserved.
Please refer to Microsoft’s documentation for more information on how to configure UNC file
shares.
Set a Microsoft BITS account
To add a new Microsoft BITS account, click the green cross in the toolbar, and in the New Account
dialog box, name your account “My BITS Server” or any name you deem more relevant and select
the “Microsoft BITS” plug-in.
14
Copyright © 2007-2008 Memba SA. All rights reserved.
The host is the fully qualified domain name of the server, for example bits.memba.com. Avoid using
IP addresses like we did here otherwise you will trigger the Outlook phishing filter on the recipients’
mailbox.
The plug-in allows you to configure:
An Upload path to which the user name and password of a windows account apply to let you
upload files;
A download directory, which has anonymous read-only access to let your email contacts
download files. Note that anyone can download these files. To prevent unauthorized users
from reading these files, you can use the Memba Velodoc Outlook Add-in to compress files
with a password. For advanced security, use Memba Velodoc Enterprise Edition or the
Velodoc online service at www.velodoc.net.
Click the Test button to confirm that your plug-in settings are valid.
Make sure the name of your BITS account is displayed in the status bar, which defines the default
account used for transfers and you are ready to go.
If you do not have access to a BITS Server, we will now show you how IIS can be configured as a BITS
Server to be used with the Memba Velodoc Outlook Add-In assuming you have installed the BITS
Server Extension which is an option of the IIS setup and which is not checked by default.
Open the IIS Snap-in in the MMC or simply execute inetmgr.exe from the run dialog box.
Define two virtual directories, respectively named Download and Upload or any name that matches
your configuration above and make sure they both point to the same local path. Give Write access to
the Upload directory and Read access to the Download directory.
Configure the upload directory according to the following screenshots:
15
Copyright © 2007-2008 Memba SA. All rights reserved.
On the Directory Security tab, click Authentication Methods and disable anonymous access:
On the BITS Server Extension tab, which is only displayed if the BITS Server extension has been
installed, check Allow clients to transfer data to this virtual directory.
16
Copyright © 2007-2008 Memba SA. All rights reserved.
Configure the download directory according to the following screenshots:
On the Directory Security tab, click Authentication Methods and enable anonymous access:
17
Copyright © 2007-2008 Memba SA. All rights reserved.
On the BITS Server Extension tab, which is only displayed if the BITS Server extension has been
installed, check Allow clients to transfer data to this virtual directory.
Please refer to Microsoft’s documentation for more information on how to configure BITS server
extension.
18
Copyright © 2007-2008 Memba SA. All rights reserved.
Set an Amazon S3 account
To add a new Amazon S3 account, click the green cross in the toolbar, and in the New Account dialog
box, name your account “My Amazon S3” or any name you deem more relevant and select the
“Amazon S3” plug-in.
The location is the Amazon data center where your bucket is stored. There are currently two
possible locations: US for the United States of America and EU for Europe.
You need to give a name to your bucket. Your bucket name needs to be able to be used in a FQDN
like <bucket>.s3.amazonaws.com or in a URL like s3.amazonaws.com/<bucket>, so use lower cases
and avoid Unicode characters and punctuation.
You also need your access key id and security access key which you will find in your web services
account management pages.
19
Copyright © 2007-2008 Memba SA. All rights reserved.
Click the Test button to confirm that your plug-in settings are valid.
Make sure the name of your Amazon S3 account is displayed in the status bar, which defines the
default server used for transfers.
If you need an Amazon S3 account go to http://aws.amazon.com/s3 and click Signup for this web
service, then follow the procedure.
Send your first package
To send a package, open a new message in Outlook.
20
Copyright © 2007-2008 Memba SA. All rights reserved.
To send a package, click the package button of a new message in Outlook. This displays the package
editor:
Click the Add files button or drag and drop files. Name your package.
21
Copyright © 2007-2008 Memba SA. All rights reserved.
Eventually click the compression button after the name text box and the password button which is
only enabled when compression is checked.
When compression and password are set, the corresponding icons are added to the status bar. The
open lock means that the package is editable. It is read-only after being sent. You can also change in
the status bar the account used to send the package.
After clicking Save, a new package is attached to your message. You can modify the package either
by double-clicking it in the list of attachments or by clicking the Package button.
22
Copyright © 2007-2008 Memba SA. All rights reserved.
When you click the send button, the package is passed to the transfer controller which uses the
designated account to send it.
If you now look at your message in the sent items, a link to download the add-in and links to
download the files have automatically been added.
23
Copyright © 2007-2008 Memba SA. All rights reserved.
In Outlook 2007 on Windows Vista there is even a preview handler for packages. Preview handlers
are not available in Windows XP and in Outlook 2003.
24
Copyright © 2007-2008 Memba SA. All rights reserved.
If you double-click the package attachment or click the Package button, the package opens in the
package editor.
25
Copyright © 2007-2008 Memba SA. All rights reserved.
Note the lock and the disabled buttons after the package has been sent.
You can right-click a file in the package editor or the preview handler to get a contextual menu with
a download option. If you request a download of the file, some plug-ins like the Velodoc plug-ins use
a registered protocol handler which executes the download in a third-party product like Internet
Explorer, and other plug-ins like the FTP or the BITS plug-ins implement downloads which are passed
to the controller. In the later case, you will be able to monitor the download in the controller.
Development Environment
We now explain how to deploy the source code in a development environment. You can get the
source code at http://www.velodoc.com.
26
Copyright © 2007-2008 Memba SA. All rights reserved.
The prerequisites for opening and modifying the code of the Velodoc Outlook Add-In solution are:
Visual Studio 2008 (including .NET framework 3.5 and Visual Studio Tools for Office);
Office 2003 or Office 2007
The source code is divided into two Visual Studio solutions:
Memba.Transfer.Outlook2003.sln is the solution for a development environment which has
Outlook 2003. It is the master solution which contains all the code including the Outlook
2007 Add-In project and the setup project. IMPORTANT: Never open this solution in an
environment with Outlook 2007 otherwise the Outlook 2003 Add-In project will be upgraded
by Visual Studio.
Memba.Transfer.Outlook2007.sln is the solution you should use in a development
environment which has Outlook 2007. It contains neither the Outlook 2003 add-in project
(otherwise it would be upgraded), nor the setup project (since some code is missing).
This is what you should see when opening the solution in Visual Studio 2008:
You will have to copy the bootstrapper packages from Velodoc Outlook AddIn\Packages to the
appropriate Visual Studio location:
%ProgramFiles%\Microsoft Visual Studio 8\SDK\v2.0\BootStrapper\Packages (VS2005)
%ProgramFiles%\Microsoft SDKs\Windows\v6.0A\Bootstrapper\Packages (VS 2008)
27
Copyright © 2007-2008 Memba SA. All rights reserved.
You will also have to copy the Setup Dialogs from Velodoc Outlook AddIn\Setup Dialogs to the
appropriate Visual Studio location:
%ProgramFiles%\Microsoft Visual Studio 8\Common7\Tools\Deployment\VsdDialogs
(VS 2005)
%ProgramFiles%\Microsoft Visual Studio 9.0\Common7\Tools\Deployment\VsdDialogs
(VS 2008)
After, you will need to restart Visual Studio.
28
Copyright © 2007-2008 Memba SA. All rights reserved.
If you want to modify these dialogs, install the Windows SDK and Orca.msi:
Before running the solution in Visual Studio, you will need to define multiple startup projects in the
solution properties:
In particular, you need to start:
The Outlook 2003 or Outlook 2007 add-in project, and
The Memba Transfer Controller.
Known issues
For a list of known issues, go to http://www.codeplex.com/velodocaddin/Thread/List.aspx.
29
Copyright © 2007-2008 Memba SA. All rights reserved.
Reporting a bug or a suggestion
To report a bug or make a suggestion, post a new discussion thread after searching the list of known
issues and ensuring you are not adding a duplicate.
It is important to report any defect with:
A description of the environment (Windows and Office versions, mail server, firewall, …);
Steps to reproduce the problem;
Copy of the trace (use Systernal’s DebugView):
Note
The level of functionality and security that Memba Velodoc Outlook Add-in provides with 3rd party
platforms like FTP servers and Amazon S3 is basic. For advanced features, go to
http://www.velodoc.com and consider Velodoc Enterprise Edition. Velodoc Enterprise Edition can be
tried online at http://www.velodoc.net.
30
Copyright © 2007-2008 Memba SA. All rights reserved.

