Word 7 Training Tasks
advertisement

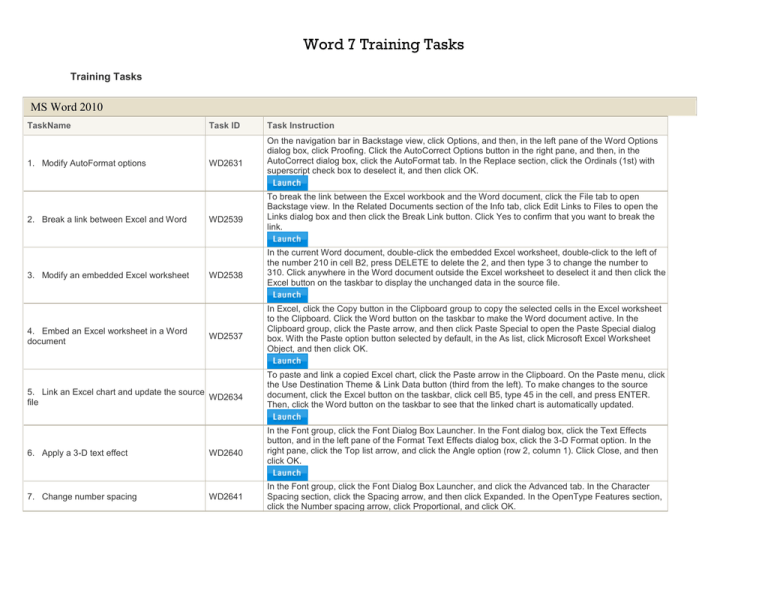
Word 7 Training Tasks Training Tasks MS Word 2010 TaskName 1. Modify AutoFormat options 2. Break a link between Excel and Word 3. Modify an embedded Excel worksheet 4. Embed an Excel worksheet in a Word document Task ID WD2631 WD2539 WD2538 WD2537 5. Link an Excel chart and update the source WD2634 file 6. Apply a 3-D text effect WD2640 7. Change number spacing WD2641 Task Instruction On the navigation bar in Backstage view, click Options, and then, in the left pane of the Word Options dialog box, click Proofing. Click the AutoCorrect Options button in the right pane, and then, in the AutoCorrect dialog box, click the AutoFormat tab. In the Replace section, click the Ordinals (1st) with superscript check box to deselect it, and then click OK. To break the link between the Excel workbook and the Word document, click the File tab to open Backstage view. In the Related Documents section of the Info tab, click Edit Links to Files to open the Links dialog box and then click the Break Link button. Click Yes to confirm that you want to break the link. In the current Word document, double-click the embedded Excel worksheet, double-click to the left of the number 210 in cell B2, press DELETE to delete the 2, and then type 3 to change the number to 310. Click anywhere in the Word document outside the Excel worksheet to deselect it and then click the Excel button on the taskbar to display the unchanged data in the source file. In Excel, click the Copy button in the Clipboard group to copy the selected cells in the Excel worksheet to the Clipboard. Click the Word button on the taskbar to make the Word document active. In the Clipboard group, click the Paste arrow, and then click Paste Special to open the Paste Special dialog box. With the Paste option button selected by default, in the As list, click Microsoft Excel Worksheet Object, and then click OK. To paste and link a copied Excel chart, click the Paste arrow in the Clipboard. On the Paste menu, click the Use Destination Theme & Link Data button (third from the left). To make changes to the source document, click the Excel button on the taskbar, click cell B5, type 45 in the cell, and press ENTER. Then, click the Word button on the taskbar to see that the linked chart is automatically updated. In the Font group, click the Font Dialog Box Launcher. In the Font dialog box, click the Text Effects button, and in the left pane of the Format Text Effects dialog box, click the 3-D Format option. In the right pane, click the Top list arrow, and click the Angle option (row 2, column 1). Click Close, and then click OK. In the Font group, click the Font Dialog Box Launcher, and click the Advanced tab. In the Character Spacing section, click the Spacing arrow, and then click Expanded. In the OpenType Features section, click the Number spacing arrow, click Proportional, and click OK. Word 7 Training Tasks 8. Modify a SmartArt graphic WD2279 9. Insert a screenshot WD2285 10. Insert a screen clipping 11. Create a linked object 12. Embed a PowerPoint slide in a document WD2643 WD2635 WD2636 In the text box at the left of the SmartArt graphic, type Project Leaders. Then, click the SmartArt Tools Design tab on the Ribbon, and in the SmartArt Styles group, click the Change Colors button. In the Colorful section of the Change Colors gallery, click the Colorful Range - Accent Colors 3 to 4 icon (third icon from left). Click the Insert tab on the Ribbon, and in the Illustrations group, click the Screenshot button. Then, in the Available Windows gallery, click the thumbnail of the Word document. In the Illustrations group on the Insert tab, click the Screenshot button, and then click Screen Clipping. When the dimmed screenshot appears, click and drag from the upper-left corner of the red Department of Labor banner to the lower-right corner, just below the second blue line, and then release the mouse button. To create a linked object, click the Object button in the Text group on the Insert tab to open the Object dialog box, and then click the Create from File tab. Click the Browse button, and in the Browse dialog box, click the Sales Statistics.xlsx file. Click the Insert button, click the Link to file check box, and then click OK. To embed a PowerPoint slide in the current document, in the Text group on the Insert tab, click the Object button. In the Object type list box, click the scroll bar, click Microsoft PowerPoint Slide, and click OK. Then, click the title placeholder, and type Safety to replace the placeholder text. In the Themes group on the Design tab, click the Apex theme (fifth from the left), and then click the white area to the right of the slide to deselect it. In the Symbols group on the Insert tab, click the Equations button. In the Structures group on the Equation Tools Design tab, click the Fraction button. Click the Stacked Fraction thumbnail, then click the upper box of the fraction, type 100 as the numerator, and press the DOWN ARROW. Type 25 as the denominator, press the RIGHT ARROW, type = ( an equals sign), and then type 4 to complete the equation. 13. Insert an equation WD2633 14. Insert an endnote WD2632 To insert an endnote, in the Footnotes group on the References tab, click the Insert Endnote button, and type See Page 3 as the endnote text. 15. Modify a source and update a bibliography WD2620 To modify a source and update a bibliography, click the Citation Options arrow, then click Edit Source. In the Edit Source dialog box, triple-click the Title text box, then type RVCG Annual Report, and click OK. Click the Citation Options arrow again, and click Update Citations and Bibliography. 16. Create a new citation WD2621 To insert a citation at the insertion point, in the Citations & Bibliography group on the References tab, Word 7 Training Tasks click the Insert Citation button, and click Add New Source. In the Create Source dialog box, click the Type of Source arrow, click Report, click the Author text box, and then type Sandra Kruse as the author. Click the Title text box, type OSHA Updates 2013 as the title, click the year text box, type 2013 as the year, click the Publisher text box, and type Midwest Construction as the publisher. Click the City text box, type Chicago as the city, and then click OK. 17. Create a table of figures 18. Create a table of authorities WD2586 Click the space below the Table of Figures header to move the insertion point, and then in the Captions group on the References tab, click the Insert Table of Figures button. Click OK to accept the default settings. WD2594 Click the left margin below the Table of Authorities header to place the insertion point, and then in the Table of Authorities group on the References tab, click the Insert Table of Authorities button. Click OK to accept the default settings and insert a table of authorities at the insertion point. 19. Use an Access database in a mail merge WD2592 In the Start Mail Merge group on the Mailings tab, click the Select Recipients button, and then click Use Existing List. In the Select Data Source dialog box, double-click RV Applicants.accdb, and then in the Preview Results group, click Preview Results. 20. Translate selected text In the Language group on the Review tab, click the Translate button. Click Mini Translator, point to the selected text, and then move the mouse pointer over the Mini Translator pane to view the translation in the Mini Translator window. 21. Select a translation language WD2525 WD2524 To select a translation language, in the Language group on the Review tab, click the Translate button. Click Choose Translation Language to open the Translation Language Options dialog box. In the Choose document translation languages section, click the Translate to arrow, click French (France), and then click OK. WD2280 Click the Picture Tools Format tab on the Ribbon, and in the Adjust group, click the Remove Background button. Then, in the Close group on the Background Removal tab, click the Keep Changes button to remove the background from the current photograph. 23. Compress pictures WD2565 In the Adjust group on the Picture Tools Format tab, click the Compress Pictures button. Then, in the Compress Pictures dialog box, in the Target output section, click the E-mail (96 ppi): minimize document size for sharing option, and click OK. 24. Rotate a graphic WD2214 Click the Picture Tools Format tab on the Ribbon. In the Arrange group, click the Rotate button, and then click Rotate Left 90° to rotate the selected picture. 22. Remove the background of a picture 25. Change the layout of a SmartArt graphic WD2513 In the Layouts group on the SmartArt Tools Design tab, click the More button, and in the Layouts Word 7 Training Tasks gallery, click the Trapezoid List layout (the fifth icon in the fifth row). 26. Add a shape to a SmartArt graphic 27. Edit components of a grouped Clip Art object WD2512 WD2644 In the Create Graphic group on the SmartArt Tools Design tab, click the Add Shape arrow, and on the Add Shape menu, click the Add Shape After option. Right-click the hard hat Clip Art, and then click Edit Picture on the shortcut menu. In the warning box, click Yes. In the Arrange group on the Drawing Tools Format tab, click Selection Pane, and in the Selection and Visibility pane, click the last Freeform option. in the Shape Styles group, click the Shape Fill arrow, and in the Standard Colors section of the Shape Fill gallery, click Yellow (the fourth color). In the Editing group, click Select, and then click Select All. In the Arrange group on the Drawing Tools Format tab, click the Group button, and then click Group on the menu.


