Packet Tracer – IPv6 Basic addressing, static routing, and host
configuration
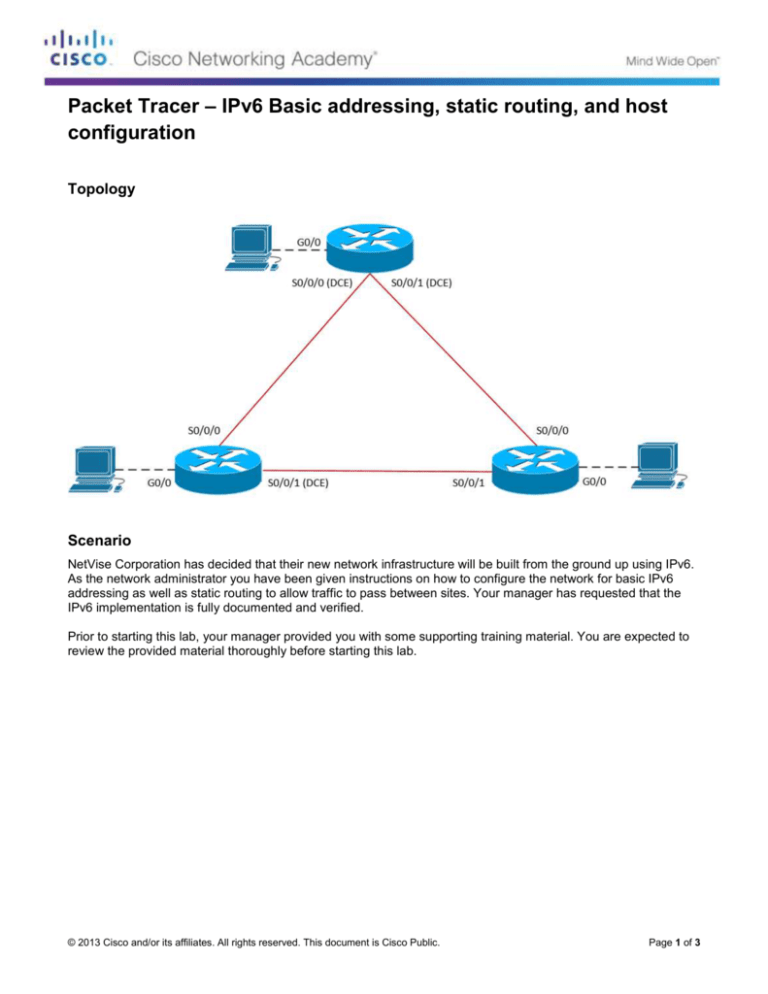
Topology
Scenario
NetVise Corporation has decided that their new network infrastructure will be built from the ground up using IPv6.
As the network administrator you have been given instructions on how to configure the network for basic IPv6
addressing as well as static routing to allow traffic to pass between sites. Your manager has requested that the
IPv6 implementation is fully documented and verified.
Prior to starting this lab, your manager provided you with some supporting training material. You are expected to
review the provided material thoroughly before starting this lab.
© 2013 Cisco and/or its affiliates. All rights reserved. This document is Cisco Public.
Page 1 of 3
Packet Tracer – Basic IPv6 addressing, static routing, and host configuration.
Addressing Table
Device
Interface
Type
IP Address
Prefix
Default Gateway
S0/0/0
Global Unicast
2001:db8:0:12::1
/64
N/A
S0/0/0
Link Local
FE80::12
/64
N/A
S0/0/1
Global Unicast
2001:db8:0:13::1
/64
N/A
S0/0/1
Link Local
FE80::13
/64
N/A
G0/0
Global Unicast
2001:db8:0:1::1
/64
N/A
G0/0
Link Local
FE80::1
/64
N/A
NIC
EUI-64
S0/0/0
Global Unicast
2001:db8:0:12::2
/64
N/A
S0/0/1
Global Unicast
2001:db8:0:23::2
/64
N/A
G0/0
Global Unicast
2001:db8:0:2::1
/64
N/A
NIC
Global Unicast
2001:db8:0:2::100
/64
2001:db8:0:2::1
S0/0/0
Global Unicast
2001:db8:0:13::3
/64
N/A
S0/0/1
Global Unicast
2001:db8:0:23::3
/64
N/A
G0/0
Global Unicast
2001:db8:0:3::1
/64
N/A
NIC
Global Unicast
2001:db8:0:3::100
/64
2001:db8:0:3::1
S1-RTR
S1-PC
S2-RTR
S2-PC
S3-RTR
S3-PC
Objectives
Enable IPv6 routing.
Configure IPv6 Link-Local and Global Unicast Addresses according to the address table.
Assign IPv6 addresses to hosts, statically and statefully using EUI-64.
Configure static routing
o
Directly attached (interface)
o
Recursive (next-hop)
o
Fully Specified (interface and next-hop)
o
Default
o
Floating
Perform route summarization.
© 2013 Cisco and/or its affiliates. All rights reserved. This document is Cisco Public.
Page 2 of 3
Packet Tracer – Basic IPv6 addressing, static routing, and host configuration.
Task 1: Enable IPv6 routing and assign IPv6 addresses to the appropriate interfaces.
Step 1: Although this step is not required to assign IPv6 addresses to the interfaces, you must enable IPv6 in
order to forward IPv6 unicast datagrams (routing).
Step 2: Assign IPv6 addresses according to the table provided. For design purposes, the hub location requires
manually configured link-local addresses on all interfaces. The following configuration is a sample of one of the
configured interfaces.
Task 2: Assign IPv6 addresses to hosts
Step 1: S1-PC should be configured using EUI-64 (stateful).
1.
Open up S1-PC > Config > under IPv6 Configuration select “Auto Config”
2.
Document host configuration and ping the default gateway.
Step 2: S2-PC and S3-PC should be configured statically.
1.
2.
Open S2-PC and S3-PC > under Gateway/DNS IPv6 > enter the IPv6 address assigned to S2-RTR and S3-RTR
G0/0 interface respectfully.
Next, under the FastEthernet0 interface > enter the static IPv6 address according to the table provided.
3.
Verify connectivity by pinging the default gateway.
Task 3: Configure static routing to allow all PCs to communicate
Step 1: Configure directly attached static routes to allow for S1 and S2 LANs to communicate.
Step 2: Configure recursive (next-hop) static routes to allow for S2 and S3 LANs to communicate.
Step 3: Configure a fully specified (interface and next-hop) static route to allow for S3’s LAN to reach S1’s LAN.
Step 3: Configure a static default route to allow for S1’s LAN to reach S3’s LAN.
Step 4: Verify connectivity, at this point all hosts should be able to ping each other.
Step 5: Configure a floating static route on S3-RTR to allow for traffic to take an alternate path to S1’s LAN in the
event of a link failure between S3-RTR and S1-RTR. Note that you will have to additionally configure a new static
route on S1-RTR to allow return traffic to reach S3’s LAN. The default route will be removed from the table once
the link goes down.
Task 4: Route Summarization
Step 1: Add the following IPv6 loopbacks on S2-RTR.
2001:db8:0:10::1/64
2001:db8:0:20::1/64
2001:db8:0:30::1/64
Step 2: Configure an IPv6 summary address on S3-RTR to reach the loopback addresses on S2-RTR.
© 2013 Cisco and/or its affiliates. All rights reserved. This document is Cisco Public.
Page 3 of 3

