Connecting to a Database Table
advertisement
About Java and Databases
Java uses something called JDBC (Java Database Connectivity) to connect to
databases. There's a JDBC API, which is the programming part, and a JDBC
Driver Manager, which your programmes use to connect to the database.
JDBC allows you to connect to a wide-range of databases (Oracle, MySQL, etc),
but we're going to use the in-built database you get with the Java/NetBeans
software. The database is called Java DB, a version of Apache Derby. It runs on
a virtual server, which you can stop and start from within NetBeans.
To check that have everything you need, have a look at the Services tab in
NetBeans. If you can't see the Services tab, click Window from the NetBeans
menu. From the Window menu, select Services. You should see something like
this:
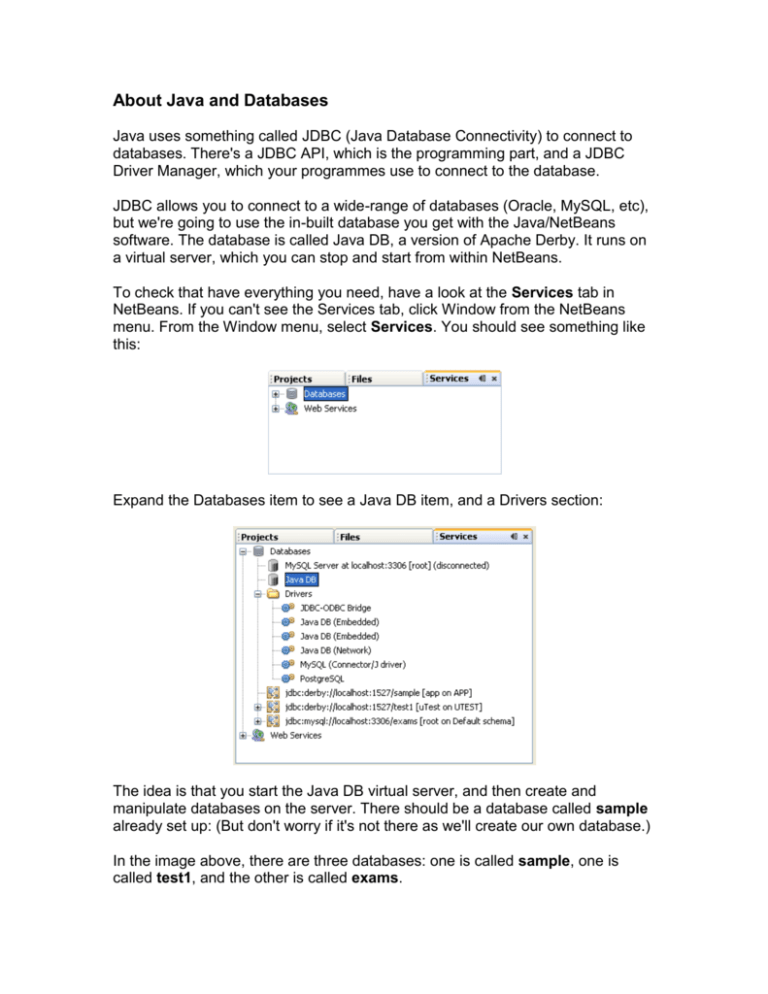
Expand the Databases item to see a Java DB item, and a Drivers section:
The idea is that you start the Java DB virtual server, and then create and
manipulate databases on the server. There should be a database called sample
already set up: (But don't worry if it's not there as we'll create our own database.)
In the image above, there are three databases: one is called sample, one is
called test1, and the other is called exams.
For the project in this section, we're going to set up a new database. You'll then
learn how to connect to this database using Java code. The database we'll create
will be a simple one-table affair, rather than multiple tables connected together.
You can indeed create multiple tables with Java DB, but we don't want to
complicate things unnecessarily.
Starting the Virtual Server
The first thing to do is to start the server. So right click on Java DB. You'll see a
menu appear. Select Start Server:
Have a look at the Output window and you'll see a few messages appear: (If you
have a firewall running, you'll need to let the Java DB server through.)
Once the server is up and running you can create databases. You'll see how to
do that in the next lesson.
To create a new database, right click on Java DB again. From the menu that
appears, select Create Database:
When you click on Create Database, you'll see a dialogue box appear:
Click OK to create your database. It should then appear on the list:
Creating a Table in the Database
Now that the database has been created, you need to create a table in the
database. To do so, right click on your database. From the menu that appears
select Connect:
To create a new table in your database, right click the Tables folder. From the
menu that appears, select Create Table:
When you click on Create Table, a dialogue box appears. Either this one:
To add a new row to your table, right click on your table name. From the menu
that appears, select View Data
To add a new row, click the icon with the green plus symbol, in the bottom half of
the window:
Connecting to the Database Using Java
To connect to a database you need a Connection object. The
Connection object uses a DriverManager. The DriverManager
passes in your database username, your password, and the location
of the database.
Add these three import statements to the top of your code:
import java.sql.Connection;
import java.sql.DriverManager;
import java.sql.SQLException;
To set up a connection to a database, the code is this:
Connection con = DriverManager.getConnection( host, username, password);
You can get the host address by looking at the Services tab on the left of
NetBean
Exceptions
"java.net.ConnectException : Error connecting to server
localhost on port 1527 with message Connection refused:
connect."
it means you haven't connected to your database server. In which case, right
click on Java DB in the Services window. From the menu that appears, click Start
Server:
"No suitable driver found for jdbc:derby:/localhost:1527/DB
The reason for this error is that the DriverManager needs a Driver in order to connect
search For derbyclient.jar
Connecting to a Database Table
To execute a SQL statement on your table, you set up a Statement object. So
add this import line to the top of your code:
import java.sql.Statement;
Statement stmt = con.createStatement( );
Con is The Connection Object
Here, we're creating a Statement object called stmt. The Statement object needs
a Connection object, with the createStatment method.
We also need a SQL Statement for the Statement object to execute. So add this
line to your code:
String SQL = "SELECT * FROM Table_Name";
We can pass this SQL query to a method of the Statement object called
executeQuery. The Statement object will then go to work gathering all the
records that match our query.
However, the executeQuery method returns all the records in something called
a ResultSet. Before we explain what these are, add the following import line to
the top of your code:
import java.sql.ResultSet;
Now add this line just below your SQL String line:
ResultSet rs = stmt.executeQuery( SQL );
So our ResultSet object is called rs. This will hold all the records from the
database table. Before we go any further, though, here's an explanation of what
ResultSets are.
Using a ResultSet
Once you have all the records in a Results set, there are methods you can use to
manipulate your records. Here are the methods you'll use most often:
The ResultSet also has methods you can use to identify a particular column
(field) in a row. You can do so either by using the name of the column, or by
using its index number. For our Workers table we set up four columns. They had
the following names: ID, First_Name, Last_Name, and Job_Title. The index
numbers are therefore 1, 2, 3, 4.
We set up the ID column to hold Integer values. The method you use to get at
integer values in a column is getInt:
int id_col = rs.getInt("ID");
Here, we've set up an integer variable called id_col. We then use the getInt
method of our ResultSet object, which is called rs. In between the round
brackets, we have the name of the column. We could use the Index number
instead:
int id_col = rs.getInt(1);
Notice that the Index number doesn't have quote marks, but the name does.
For the other three columns in our database table, we set them up to hold
Strings. We, therefore, need the getString method:
String first_name = rs.getString("First_Name");
Or we could use the Index number:
String first_name = rs.getString(2);
Because the ResultSet Cursor is pointing to just before the first record when the
data is loaded, we need to use the next method to move to the first row. The
following code will get the first record from the table:
rs.next( );
int id_col = rs.getInt("ID");
String first_name = rs.getString("First_Name");
String last_name = rs.getString("Last_Name");
String job = rs.getString("Job_Title");
Notice that rs.next comes first in this code. This will move the Cursor to the first
record in the table.
You can add a print line to your code to display the record in the Output window:
System.out.println( id_col + " " + first_name + " " + last_name + " " + job );
Here's what your code should look like now (we've adapted the print line because
it's a bit too long):
If you want to go through all the records in the table, you can use a loop.
Because the next method returns true or false, you can use it as the condition for
a while loop:
while ( rs.next( ) ) {
}
In between the round brackets of while we have rs.next. This will be true as long
as the Cursor hasn't gone past the last record in the table. If it has, rs.next will
return a value of false, and the while loop will end. Using rs.next like this will also
move the Cursor along one record at a time. Here's the same code as above, but
using a while loop instead. Change your code to match:
JDBC Examples
Connect To DataBase
Connection C=
DriverManager.getConnection("jdbc:derby:/localhost:1527/DataName");
Statement stmt = C.createStatement();
Create table:
String sql = "CREATE TABLE INFORMATION " + "(id INTEGER not NULL, " +"
FirstName VARCHAR(255), "+" LastMame VARCHAR(255), " +" PRIMARY KEY
( id ))";
stmt.executeUpdate(sql);
Drop Table:
String sql = "DROP TABLE INFORMATION ";
stmt.executeUpdate(sql);
Insert Records:
String sql ="Insert Into INFORMATION VALUES (1,'Mohamed','Ali')";
stmt.executeUpdate(sql);
Update Records:
String sql = "UPDATE INFORMATION " +"SET FIRSTNAME = 'seleem'
WHERE ID =11";
//if you need it in range write ID in(Start range,end range)
stmt.executeUpdate(sql);
Delete Records:
String sql = "DELETE FROM INFORMATION " + "WHERE id = 1";
stmt.executeUpdate(sql);
Select Records:
String sql = "SELECT ID, FirstName, LastMame FROM INFORMATION";
//If use Where
String sql = "SELECT ID, FirstName, LastMame FROM INFORMATION
WHERE ID >= 10 ";
//select Sorting Data
String sql = "SELECT ID, FIRSTNAME, LASTMAME FROM INFORMATION" +
" ORDER BY FIRSTNAME ASC";
ResultSet rs= stmt.executeQuery(sql);
while(rs.next()){
int id = rs.getInt("ID");//rs.getInt(1)
String FirstName = rs.getString("FIRSTNAME");//rs.getString(2)
String LastName = rs.getString("LASTMAME");//rs.getString(3);
System.out.println("ID: " + id);
System.out.println("FIrstNAme: " + FirstName);
System.out.println("LastNAme: " + LastName);
}
rs.close();
Reference :
http://www.homeandlearn.co.uk/java/java_and_databases.html
