doc
advertisement
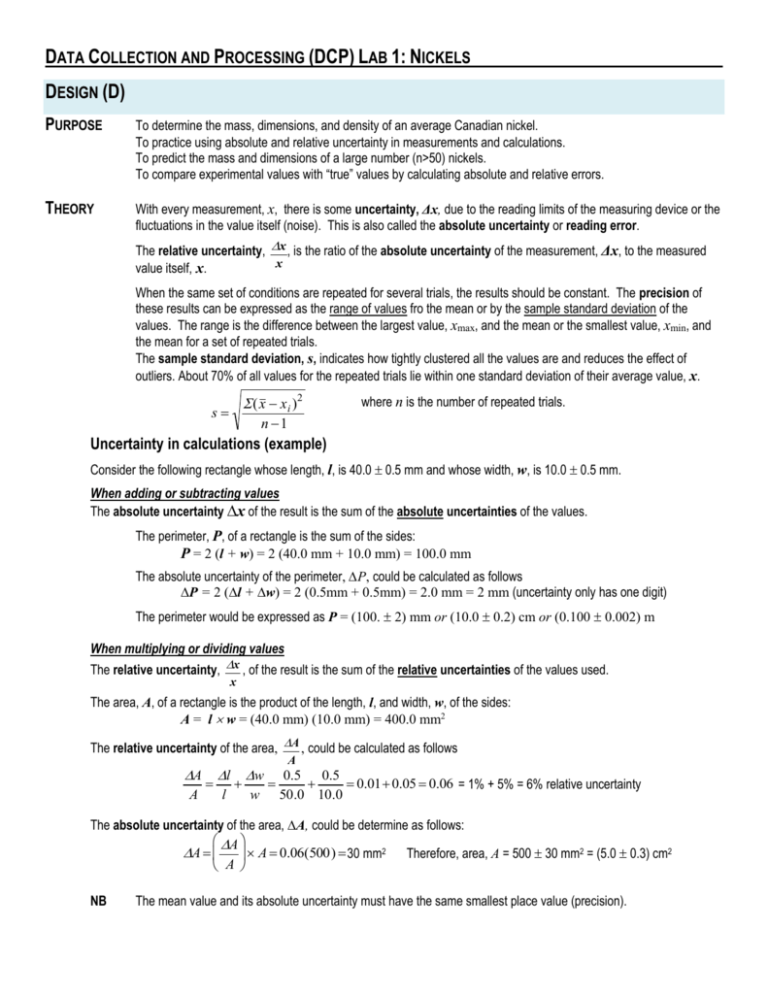
DATA COLLECTION AND PROCESSING (DCP) LAB 1: NICKELS DESIGN (D) PURPOSE To determine the mass, dimensions, and density of an average Canadian nickel. To practice using absolute and relative uncertainty in measurements and calculations. To predict the mass and dimensions of a large number (n>50) nickels. To compare experimental values with “true” values by calculating absolute and relative errors. THEORY With every measurement, x, there is some uncertainty, Δx, due to the reading limits of the measuring device or the fluctuations in the value itself (noise). This is also called the absolute uncertainty or reading error. The relative uncertainty, x , is the ratio of the absolute uncertainty of the measurement, Δx, to the measured x value itself, x. When the same set of conditions are repeated for several trials, the results should be constant. The precision of these results canbe expressed as the range of values fro the mean or by the sample standard deviation of the values. The range is the difference between the largest value, xmax, and the mean or the smallest value, xmin, and the mean for a set of repeated trials. The sample standard deviation, s, indicates how tightly clustered all the values are and reduces the effect of outliers. About 70% of all values for the repeated trials lie within one standard deviation of their average value, x. (x x i )2 s where n is the number of repeated trials. n 1 Uncertainty in calculations (example) Consider the following rectangle whose length, l, is 40.0 0.5 mm and whose width, w, is 10.0 0.5 mm. When adding or subtracting values The absolute uncertainty ∆x of the result is the sum of the absolute uncertainties of the values. The perimeter, P, of a rectangle is the sum of the sides: P = 2 (l + w) = 2 (40.0 mm + 10.0 mm) = 100.0 mm The absolute uncertainty of the perimeter, ∆P, could be calculated as follows ∆P = 2 (∆l + ∆w) = 2 (0.5mm + 0.5mm) = 2.0 mm = 2 mm (uncertainty only has one digit) The perimeter would be expressed as P = (100. 2) mm or (10.0 0.2) cm or (0.100 0.002) m When multiplying or dividing values The relative uncertainty, x , of the result is the sum of the relative uncertainties of the values used. x The area, A, of a rectangle is the product of the length, l, and width, w, of the sides: A = l w = (40.0 mm) (10.0 mm) = 400.0 mm2 The relative uncertainty of the area, A , could be calculated as follows A l w A 0.5 0.5 0.01 0.05 0.06 = 1% + 5% = 6% relative uncertainty A l w 50.0 10.0 The absolute uncertainty of the area, ∆A, could be determine as follows: A A A 0.06(500) 30 mm2 Therefore, area, A = 500 30 mm2 = (5.0 0.3) cm2 A NB The mean value and its absolute uncertainty must have the same smallest place value (precision). VARIABLES TYPE VARIABLE NAME, SYMBOL / UNITS Diameter, d / cm Thickness, h / cm Mass, m / g Independent Number of nickels , n Constants Nickels Dependent Measuring devices Environment METHOD AND COMMENTS metric ruler, 0.05 cm metric ruler, 0.05 cm 200 g digital scale, 0.01g Trials using 1, 5, 10, 15, and 20 nickels All nickels were Canadian of the same period (1982-1999) or (2000 to present). Nickels that were noticeably distorted were not used Nickels were randomly selected for each trial The same ruler and scale was used throughout. The scale was zeroed before measuring and the calibration was verified All measurements were conducted in a closed classroom during a short (2 hour) interval in which the temperature, air pressure and other environmental factors remained within a small range. These factors are expected to have insignificant effects on results. MATERIALS Measuring Devices Other SAFETY There are minimal risks in this investigation. As with all experiments, students are to behave courteously and carefully. Students should wash their hands well immediately after the completing the experiment. No food or drink should be brought into the lab area. PROCEDURE 30 cm ruler (± 0.5 mm) digital scale (200 ± 0.01g) Canadian nickels (more than 20) Part 1 : Examination and separation of nickels To ensure similar conditions, all nickels were inspected by group members for age and for severe variations. Nickels that were older than 1981 or were visible distorted were excluded from trials. Nickels were separated into two groups: A (1982-1999) and B (2000-present) Part 2 : Mass and dimensions of one nickel One nickel was selected at random by each group member The diameter and height of each nickel was measured using a 30-cm ruler. The data was recorded using ink in Table 1a. The mass of each nickel was measured using a 200-g digital scale. The data was recorded using ink in Table 1b. This was repeated so that at least 4 different nickels were measured. The data was recorded using ink in Table 1c. Part 3 : Groups of nickels Sets of 5, 10, 15, and 20 nickels were selected randomly. The diameter and height of each set of nickels was measured using a 30-cm ruler. The data was recorded using ink in Table 1a and Table 1b, respectively. The diameter was the maximum straightline distance of the set of nickels. The mass of each set of nickels was measured using a 200-g digital scale. The data was recorded using ink in Table 1c. This was repeated so that at least 4 different sets of each amount of nickels were measured. Part 4: Data Analysis – using Excel Spreadsheets The mean (average), standard deviation (absolute uncertainty), and relative uncertainty was calculated for each data set and presented in Table 2. Graphs of each measurement versus number of nickels were constructed. The graphs were given the following labels: Figure 1: Width versus Number; Figure 2: Thickness versus Number; and Figure 3: Mass versus Number. o Data points were plotted with uncertainty bars o For each, a linear trendline was constructed and its gradient (slope) determined. These values were presented in Table3. HYPOTHESIS As the number of coins increases, their measured values should also increase. The measurements should be directly proportional to the number of coins measured. Directly proportional relationships are linear that pass through the origin (0,0). By using a large sample size, the relative uncertainty is reduced. The use of trendlines also reduces the effect of outliers and further reduces the effects of random errors. The absolute error of each variable (d, h, m) is expected to be less than the absolute uncertainty of the measuring devices. DATA COLLECTION AND PROCESSING RAW DATA Table 1a. Diameter of various numbers of nickels for several (at least 4 repeated trials). The uncertainty for all diameters was 0.05 cm. Number of nickels 1 Diameter, d / cm 5 10 15 20 Table 1b. Thickness of various numbers of nickels for several (at least 4 repeated trials). The uncertainty for all diameters was 0.05 cm. Number of nickels 1 Thickness, h / cm 5 10 15 20 Table 1c. Mass of various numbers of nickels for several (at least 4 repeated trials). The uncertainty for all diameters was 0.01 g. Number of nickels 1 5 10 15 20 Mass, m / g PROCESSED DATA Table 2. Mean values and uncertainties of diameter, thickness, and mass for each number of nickels. Diameter, d Number of nickels Mean Diameter, d / cm Absolute Uncertainty, ∆d / cm Thickness, h Relative Uncertainty, d / % d Mean Thickness, h / cm Mass, m Relative Uncertainty, h / % Absolute Uncertainty, ∆h / cm Mean Mass, m/g h Relative Uncertainty, m , % Absolute Uncertainty, ∆m / g m 1 5 10 15 20 Table 3. Average diameter, thickness, and mass of one nickel taken from gradients of graphs of each measurement versus the number of nickels. Diameter, d / cm Mean Diameter, d / cm Thickness, h / cm Relative Uncertainty, d / % d Absolute Uncertainty, ∆d / cm Mean Thickness, h / cm3 Mass, m / g Relative Uncertainty, h / % h Absolute Uncertainty, ∆h / cm Mean Mass, m/g Relative Uncertainty, m , % Absolute Uncertainty, ∆m / g m SAMPLE CALCULATIONS For each TYPE of calculation, ONE sample calculation must be shown o Generally, the first set of data that uses the calculation is used to demonstrate the calculation o Communicate the variables and formula clearly for the reader o Substitute using a designated sample set and solve o Show proper number of significant digits and appropriate units in the final answer Sample calculations should be shown near the table where the data is presented Calculations to be shown include, but are not limited to: Mean Diameter, d, for 1 nickel (from data in Table 1a) x = (sum of all time intervals, xi ) ÷ (the number of samples taken, n) x xi n Sample Variance, s2, for one nickel (from data in Table 1a) ( x xi )2 s n 1 2 Sample Standard Deviation, s, for 1 nickel (from data in Table 1a) ( x xi )2 s s n 1 2 Relative Uncertainty for 1 nickel (from data in Table 1b) relative uncertainty or = (absolute uncertainty of the measurement) ÷ (measurement value) = = (sample standard deviation) ÷ (sample mean) = x x s 100% x Gradient for the change in diameter per change in number of nickels (from Figure 1: Diameter versus Number) Use distant points on trendline. Annotate graph to clearly show the two points used. d d2 d1 change in diameter change in number of nickels n n2 n1 Absolute Error using published value for diameter* Error = | Experimental – Accepted1| = (*cite your source of the published values) Relative Error, % Error, using published values for diameter | AbsoluteError | %Error 100% AcceptedValue 1 Royal Canadian Mint (2014). Industrious, enduring–the 5-cent coin – Technical specifications. Accessed online: http://www.mint.ca/store/mint/learn/5-cents-5300006#.UvRL2ij8EV8
