createDB
advertisement

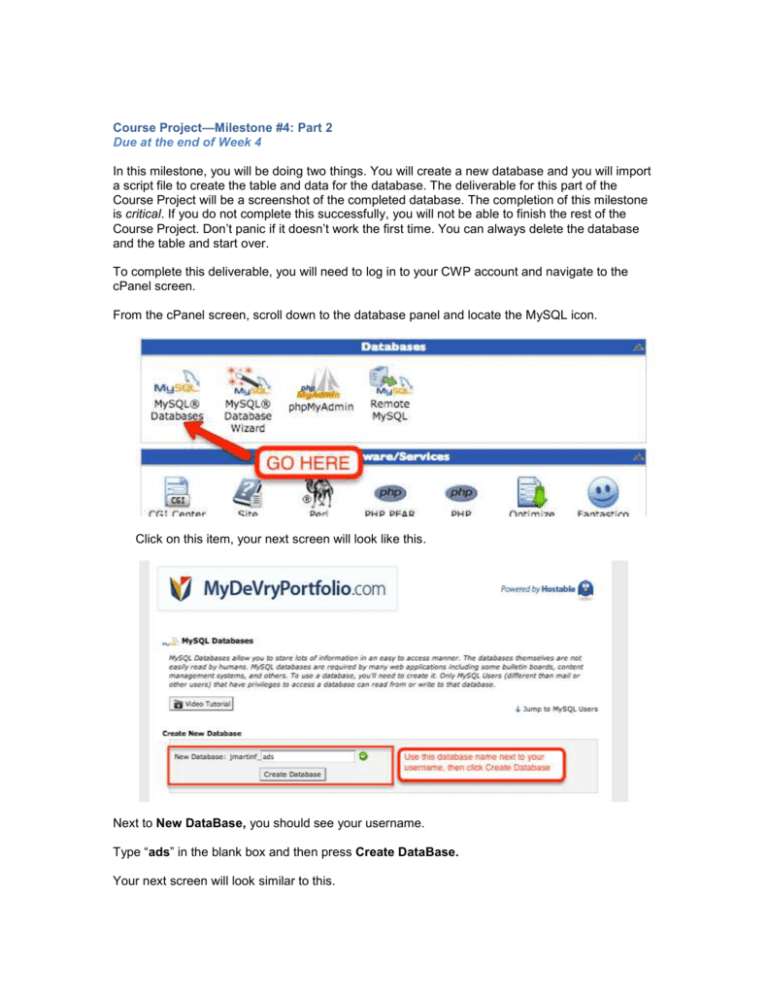
Course Project—Milestone #4: Part 2 Due at the end of Week 4 In this milestone, you will be doing two things. You will create a new database and you will import a script file to create the table and data for the database. The deliverable for this part of the Course Project will be a screenshot of the completed database. The completion of this milestone is critical. If you do not complete this successfully, you will not be able to finish the rest of the Course Project. Don’t panic if it doesn’t work the first time. You can always delete the database and the table and start over. To complete this deliverable, you will need to log in to your CWP account and navigate to the cPanel screen. From the cPanel screen, scroll down to the database panel and locate the MySQL icon. Click on this item, your next screen will look like this. Next to New DataBase, you should see your username. Type “ads” in the blank box and then press Create DataBase. Your next screen will look similar to this. Notice that next to Added the Database it lists your user name followed by _ads. Press the go back button to return to the previous screen. Now scroll down to the Add New User section, close to the bottom of the page. You will enter a username after your prefix. Create a password. Be sure to store the password securely. If you forget the password, you will have to drop and recreate the user. Click Create User. Create Password You should see a confirmation screen indicating that the new user was added. Click GO BACK. Scroll down to the bottom of the page again to the Add User To Database section. Select the user you have just created and select your database; you can only do this after you have created the user. Click Add. You will then be presented with a screen where you will select the privileges to assign to this user. Uncheck ALL PRIVILEGES at the top if it is checked. Check the box next to SELECT so this user will be able to execute SQL SELECT statements to query the database. Click on Make Changes. After you receive the confirmation screen indicating that the user was added to the database, click Go Back. Click on the home link in the upper right corner of the screen to return to the cPanel main screen. Scroll down the page to the databases panel. Click on the phpMyAdmin icon. The phpMyAdmin tool is a web-based application that is commonly used to manage MySQL databases. In the example below, there are multiple databases listed on the left side of the screen. If this is the first database you created, you will only see the information_schema for your account and the _ads database. Click on the _ads database on the left side of the screen. This will bring you to the admin screen for that database. Click on the import tab. This will open the screen where you will import the database script file create_ad_table.sql.txt. This is one of the files that was in the Week_4_CP.zip folder located in Doc Sharing. You should have already extracted the files from this folder and saved them to your computer. Do not change this file in any way. You should see the following screen. At the top of the screen, it will say, “Importing into the database,” followed by the database name, which consists of your username followed by _ads. There are three small steps on this screen. 1. Click the option to choose files. 2. Browse to find the file create_ad_table.sql.txt. 3. Click the GO button. This will execute the file create_ad_table.sql.txt, which will create the database table and fill it with data. If the file executed successfully, the next screen will be a confirmation of successful completion. Click on the ad_table on the left side of the screen. This will display the contents of the table as seen below. Make a screen capture of this page and save as a .jpg or paste to a Word document. Submit this screen capture file to the project Dropbox for this week. Congratulations you have completed creating and populating a database. You are now ready for the upcoming work in weeks 5, 6, and 7.


