Fetal Pig Dissection Lab Manual
advertisement
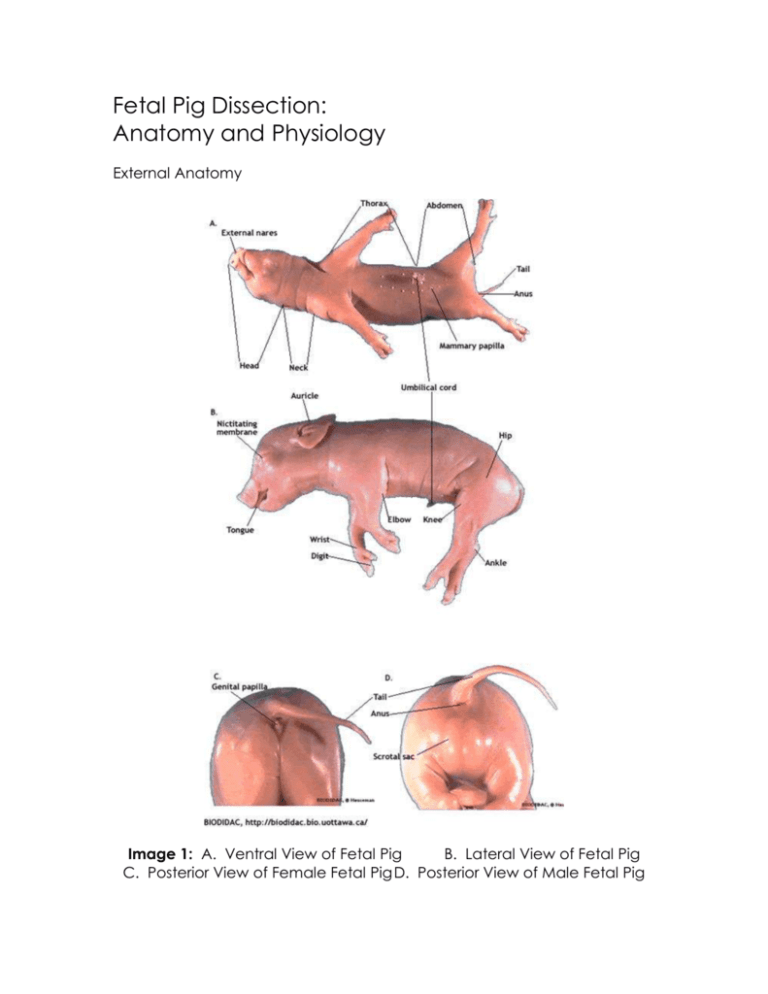
Fetal Pig Dissection: Anatomy and Physiology External Anatomy Image 1: A. Ventral View of Fetal Pig B. Lateral View of Fetal Pig C. Posterior View of Female Fetal Pig D. Posterior View of Male Fetal Pig **Make sure you know the locations of all the bold words on this handout** 1. Determine the sex of your pig by looking for the urogenital opening. On females, this opening is located near the anus. On males, the opening is located near the umbilical cord. Record this in your IntNB. If your pig is female, you should also note that urogenital papilla is present near the genital opening. Males do not have urogenital papilla. Both males and females have rows of nipples, and the umbilical cord will be present in both. 2. (Image 2: Lateral view of fetal pig: Cut and paste into the left-side of your IntNB, and label during lecture) Make sure you are familiar with terms of reference: anterior, posterior, dorsal, ventral. In addition, you'll need to know the following terms: Medial: toward the midline or middle of the body Lateral: toward the outside of the body Proximal: close to a point of reference Distal: farther from a point of reference Image 2: Lateral View of Fetal Pig 3. Gestation for the fetal pig is 112-115 days. The length of the fetal pig can give you a rough estimate of its age. 11mm - 21 days 17 mm - 35 days 2.8 cm - 49 days 4 cm - 56 days 22 cm - 100 days 30 cm -- birth How old is your pig? _______________ (Record this in your IntNB) 4. Observe the toes of the pig. How many toes are on the feet? _____________ Do they have an odd or even number of toes? _________________ CAUTION: Dissecting implements are very sharp. Use extreme care. The following steps, 5, 6 and 7 require some incision. This is not the actual dissection of the body cavities, and the pig does not have to be tied to the dissection tray for these steps, but it is very important that you follow proper lab procedure during the following observations. 5. Observe the eyes of the pig, carefully remove the eyelid so that you can view the eye underneath. Does it seem well developed? Do you think pigs are born with their eyes open or shut? __________________ 6. (Image 3: Lateral view of pig’s head with salivary glands exposed: Cut and paste into the left-side of your IntNB, and label during dissection) Carefully lay the pig on one side in your dissecting pan and cut away the skin from the side of the face and upper neck to expose the masseter muscle that works the jaw, lymph nodes, and salivary glands. The salivary glands kind of look like chewing gum, and are often lost if you cut too deeply. 7. (Image 4: Open mouth: Cut and paste into the left-side of your IntNB, and label during dissection) Open the pig's mouth and locate the hard and soft palate on the roof of the mouth. Can you feel your own hard and soft palates with your tongue? Note the taste buds (also known as sensory papillae) on the side of the tongue. Locate the esophagus at the back of the mouth. Feel the edge of the mouth for teeth. Does the fetal pig have teeth? ________ Are humans born with teeth? ___________ Locate the epiglottis, a cone-shaped structure at the back of the mouth, a flap of skin helps to close this opening when a pig swallows. The pharynx is the cavity in the back of the mouth - it is the junction for food (esophagus) and air (trachea). Using your scissors, cut the corners of the jaw so that the mouth will remain open. Locate the following structures and label them on the diagram below: tongue, teeth, nasopharynx, glottis, epiglottis, hard palate, soft palate, salivary glands, and the opening of the esophagus. PREPARING FOR THE DISSECTION 1. Place the pig on its back in the dissecting tray. Tie a piece of string or twine around the wrist of one forelimb. Then, pass the string under the tray, and tie it to the other wrist, as shown in Image 5: Primary Incisions. Tie and spread apart the fetal pig’s hind legs as you did the forelimbs. Your pig will be anchored for dissection. 2. CAUTION: Always cut away from yourself when you use dissecting scissors or a scalpel. Use dissecting scissors to cut through the skin and muscles along the lines indicated in Image 5. (NOTE: You can avoid cutting into the underlying organs by pulling up the umbilical cord as you make the incisions.) The flap formed by incisions 1 – 5 will remain attached to the main part of the pig’s body. To free this flap of tissue, cut the vein leading from the abdominal cavity into the umbilical cord. 3. Note: Incisions 6, 7, and 8 will not be made until Day 2 of the dissection. On day 2, make incision 6, and then connect incisions 1 and 6 by making incision 7. Open the flaps, pinning them down with dissecting pins. Rinse the abdominal cavity with running water to remove the excess preservative. 4. Identify the abdominal tissues and main organs that you can see. Notice the peritoneum that lines the abdominal cavity and supports the abdominal organs. Peel away this tissue if necessary. Identify the diaphragm, the thin sheet of muscle that separates the abdominal and chest cavity. Locate the large, dark brown, five-lobed liver, posterior to the diaphragm. Find the small intestine – the thin, coiled tube. The coiled mass of thicker tubing below the small intestine is the large intestine. (NOTE: As you proceed through the dissection, do not remove any organs unless you are directed to do so.) 8 6 Start here 7 1 2 4 3 5 Image 5: Primary Incisions The organ systems that we will be exploring in depth during this dissection will be: The Digestive System – Day 1 The Respiratory System – Day 2 The Circulatory System – Day 2 The Excretory System – Day 3 The Reproductive System – Day 3 Prior to exploring each system in the fetal pig, we will be virtually dissecting at the following website: http://www.whitman.edu/biology/vpd/main.html Day One Focus: The Digestive System After completing the cuts, locate the umbilical vein that leads from the umbilical cord to the liver. You will need to cut this vein in order to open up the abdominal cavity. Pin the skin and muscle to the side so that the internal organs are visible. Your pig may be filled with water and preservative, drain over the sink if necessary and rinse organs. Day Two Focus: The Circulatory and Respiratory Systems Dissection of the Thoracic Cavity You may need to cut through the pig's sternum and expose the chest cavity (thoracic cavity) to view. See the diagram to make the incisions. You will need to cut all the way up into the pig's neck, almost to the chin and open the thoracic cavity. Day Three Focus: The Excretory and Reproductive Systems Most of the work will be focused on the abdominal cavity, and the two posterior incision flaps that were made on Day One. Make sure that you observe both male and female anatomy during today’s dissection. Day One: DIGESTIVE SYSTEM 1. Your study of the Digestive System began before you made your first incision. You have examined and labeled the beginning of the digestive system, now it is your job to explore the remaining “tubes” that make up the digestive tract of the fetal pig. 2. At the rear of the mouth, locate the entrance to the esophagus. Feel the muscular walls of the esophagus with your finger. The esophagus muscles push food down the length of this tube toward the stomach. Locate each of the following organs below, check the box when you have located the structure. 1. Diaphragm. This muscle divides the thoracic and abdominal cavity and is located near the ribcage. The diaphragm aids in breathing. 2. Liver. This structure is lobed and is the largest organ in the body. The liver is responsible for making bile for digestion. 3. Gall bladder. This greenish organ is located underneath the liver, the bile duct attaches the gall bladder to the duodenum. The gall bladder stores bile and sends it to the duodenum, via the bile duct. This will be attached to the liver, and will need to be “teased” free. 4. Stomach. A “J-shaped” or “pouch shaped” organ that rests just underneath and to the pig's left. At the top of the stomach, you'll find the esophagus. The stomach is responsible for churning and breaking down food. The stomach is where mechanical digestion takes place. 5. The stomach leads to the small intestine, which is composed of the duodenum (straight portion just after the stomach) and the ileum (curly part). The ileum is held together by mesentery. In the small intestine, further digestion occurs and nutrients are absorbed through the arteries in the mesentery. Chemical digestion takes place in the small intestine. 6. Pancreas: a bumpy organ located along the underside of the stomach, a pancreatic duct leads to the duodenum. The pancreas makes insulin, which is necessary for the proper uptake of sugars from the blood. It is part of both the digestive and Endocrine Systems. 7. Spleen: a flattened organ that lies across the stomach and toward the extreme left side of the pig. The spleen stores white blood cells, and is part of the Lymphatic System. 8. At the end of the ileum, where it widens to become the large intestine, a "dead-end" branch is visible. This is the cecum. The cecum helps the pig digest plant material. 9. The large intestine can be traced to the rectum. The rectum lies toward the back of the pig and will not be moveable. The rectum opens to the outside of the pig, or the anus. The large intestine reabsorbs water from the digested food, any undigested food is stored in the rectum as feces. 10. Lying on either side of the spine are two bean shaped organs: the kidneys. The kidneys are responsible for removing harmful substances from the blood, these substances are excreted as urine. (more on this later when we discuss the Excretory System) 11. Two umbilical vessels can be seen in the umbilical cord, and the flattened urinary bladder lies between them. Identify the structures on the diagram. 1. ________________________________ 2. ________________________________ 3. ________________________________ 4. ________________________________ 5. ________________________________ 6. ________________________________ 7. ________________________________ 8. ________________________________ 9. ________________________________ 10. _______________________________ 11. _______________________________ 12. _______________________________ 13. _______________________________ Carefully remove and examine each of the following structures. 1. Remove the stomach by cutting it transversely (crosswise) across the esophagus and duodenum. Make a longitudinal (lengthwise incision along the stomach so that you can open it and view the inside. There are two important valves in the stomach: the cardiac sphincter (located at the anterior end) and the pyloric sphincter valve (located at the posterior) end. These valves open and close to allow food into and out of the stomach. 2. Remove the small intestine and carefully cut the mesentery so that the intestine can be stretched and measured. Note the arteries located in the mesentery - called mesenteric arteries. What is the length (in centimeters of the small intestine? ______________ Day 2: CIRCULATORY AND RESPIRATORY SYSTEMS The best way to view arteries is to carefully tease and pick the tissue surrounding the article with a dissecting pin. It is important that you do not break the vessels, since it is very difficult to determine the name of a vessel unless you can see where it comes from and where it goes. The blood vessels have been stained in your pigs. Red blood vessels carry oxygenated blood (typically arteries) and blue blood vessels carry deoxygenated blood (typically veins). 1. Once the chest cavity is opened, we will start with the center of the Circulatory System, the heart. Right above the heart is the thymus, which is a critical structure for the Lymphatic System. 2. Remove the pericardium, which is a membrane that surrounds the heart. This membrane is also located over many of the organs and can get in the way of your view. 3. The structures visible on the heart are the two atria, the ventricle (which has two chambers but the separation is not visible from the outside), and the large Aorta - a vessel which leaves the heart. 4. Observe the coronary vessels on the outside of the heart - these vessels supply blood to the muscle of the heart. These are the blood vessels that, when blocked, can lead to a heart attack. 5. The largest most visible vessel is the aorta, it arches from the heart and branches toward the head and curves around to go to the lower part of the body - where it is called the abdominal aorta. The aorta supplies the body with fresh blood. 6. Underneath they aorta is the pulmonary artery, which takes blood to the lungs, in a fetal pig this vessel is unused (the fetus doesn't yet breathe to get oxygen) and a shunt called the ductus arteriosus allows fetal blood to bypass the pulmonary vessels and go straight to the aorta. 7. Lift the heart to look on its dorsal side (toward the back), you should be able to see the anterior and posterior vena cavae (singular vena cava), which brings blood from the body back to the heart. 8. Follow the aorta to where it arches (appropriately called the "aortic arch", if you carefully pick away the surrounding tissue, you will find three main branches from the aortic arch. 9. Toward the pig's right, two branches move to the arm and to the neck. The rightmost branch is the right subclavian artery and it supplies blood to the pig's arm and shoulder. 10. Next to the right subclavian and heading directly toward the pig's head is the bicarotid, which will divide (in a Y shape) to form the left and right carotid arteries, which supply blood to the head and neck. 11. Toward the pig's left, you'll find the left subclavian artery which provides blood to the left shoulder and arm. 12. Also note the arteries that run along the ribs of the pig, these are the intercostal arteries. Cut and paste this image into the next left side of your IntNB. Match the numbers to the names on the diagram below. 13. Trace the abdominal aorta to the lower part of the body, careful teasing of the tissue will reveal several places where it branches, though some of the arteries may have been cut when you removed organs of the digestive system. 14. The hepatic artery leads to the liver. (may not be visible) 15. The splenic artery leads to the spleen (may not be visible) 16. The renal arteries lead to the kidney. 17. The mesenteric artery leads to the mesentery and branches into many smaller vessels. (You cut the mesentery in the first part of the lab, so these arteries may not be visible) 18. Trace the abdominal aorta and note where it joins the umbilical arteries. You will need to cut the muscle in the leg to trace the next vessels. Use a pin to carefully tease away the surrounding muscle and tissue. 19. The abdominal aorta splits into two large vessels that lead to each leg - the external iliac arteries will turn into the femoral arteries as they enter the leg. 20. Follow the umbilical artery toward the pig, you'll find that it branches and a small artery stretches toward the posterior of the pig - this is the ilio-lumbar artery. 21. Follow the external iliac into the leg (carefully tease away muscle), it will branch into two arteries: the femoral (toward the outside of the leg) and the deep femoral (toward the inside of the leg) 22. Follow the femoral to the lower leg where it branches into the anterior tibial artery and the posterior tibial artery. Cut and paste the following image into the left side of your IntNB. Label the lower abdominal arteries on the pig. 1. Find the diaphragm again. Remember that the diaphragm separates the abdominal cavity from the thoracic cavity and it aids in breathing. 2. Find the heart again, and push it to the side to locate two spongy lungs located to the left and right side. The lungs are connected to bronchial tubes which connect to the trachea (forming a Y). 3. The trachea is easy to identify due to the cartilaginous rings, which help keep it from collapsing as the animal inhales and exhales. The trachea should be located behind the heart and liver and near the esophagus, but note that the esophagus and trachea are separate tubes. 4. Lying ventral to the trachea, locate the pinkish-brown, V shaped structure called the thyroid gland. This gland secretes hormones that control growth and metabolism, and is part of the Endocrine System. 5. At the anterior (toward head) of the trachea, you can find the hard light colored larynx (or voice box). The larynx allows the pig to produce sounds - grunts and oinks. In the next left side of your IntNB, sketch the thoracic cavity of the fetal pig and label the trachea, heart, lungs, bronchial tubes, thyroid gland, and larynx. Day 3: EXCRETORY AND REPRODUCTIVE SYSTEMS Locate each of the structures below and check the box when you have found them. Make sure to view both the male and female pig. 1. Locate the kidneys, the tubes leading from the kidneys that carry urine are the ureters. The ureters carry urine to the urinary bladder - located between the umbilical vessels. 2. Look for the tissue resting anterior/medial edge of the kidneys, these are the adrenal glands. They are important members of the Endocrine System, in that they produce a variety of hormones and neurotransmitters. The adrenal glands produce adrenaline, cortisol, and androgens to name a few. 3. Lift the bladder to locate the urethra, the tube that carries urine out of the body. Male 1. Find the scrotal sacs at the posterior end of the pig, testis are located in each sac. Open the scrotal sac to locate the testis. 2. On each testis, find the coiled epididymis. Sperm cells produces in the testis pass through the epididymis, where they mature, and into a tube called the vas deferens (in humans, a vasectomy involves cutting this tube). 3. The vas deference crosses over the ureter and enters the urethra, which leads to the penis. The penis will be located in the flap that has the umbilical cord. Cut away the skin to reveal the penis. Female 4. In the female pig, locate two bean shaped ovaries located just posterior to the kidneys. 5. The ovaries are connected to the fallopian tubes, which carry eggs from the ovaries to the uterus. The uterus is dorsal to the urinary bladder. 6. Trace the uterus to the vagina. The vagina will actually will appear as a continuation of the uterus. The vagina and urethra open into a common area called the urogenital sinus. Cut and paste the following diagrams into the left side of your IntNB. Label the diagrams with the vocabulary words in bold.
