SAP Navigation by www.sapkshare.com
SAP Navigation
Configure the Log on Pad
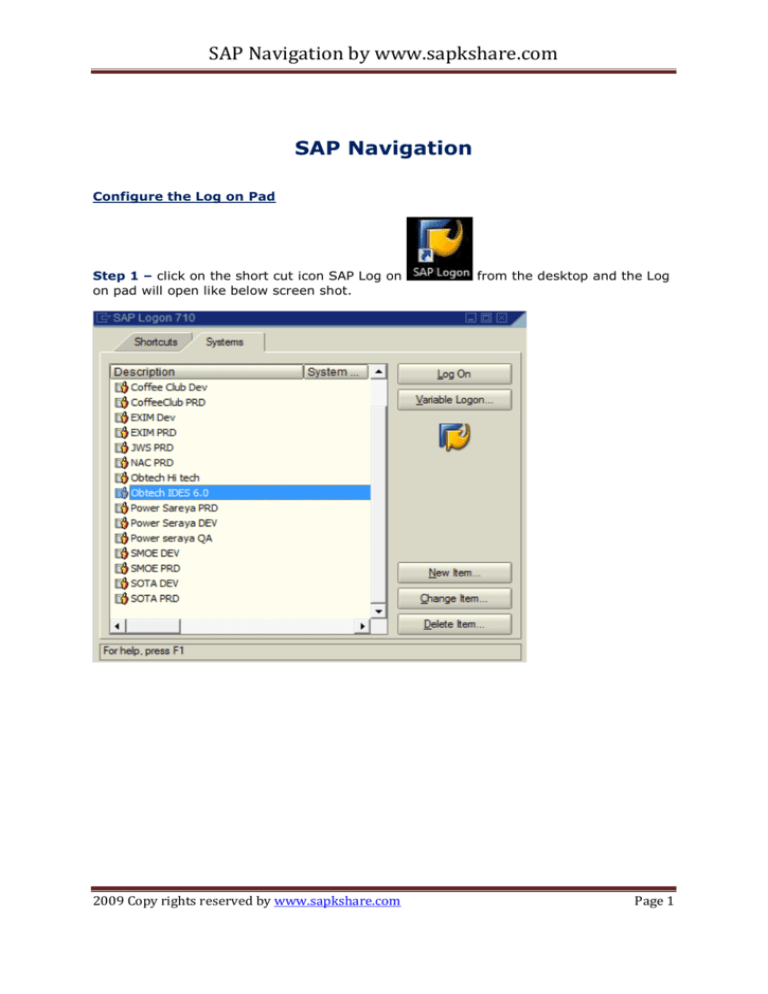
Step 1 – click on the short cut icon SAP Log on
on pad will open like below screen shot.
2009 Copy rights reserved by www.sapkshare.com
from the desktop and the Log
Page 1
SAP Navigation by www.sapkshare.com
Step 2 – Click on the New Item
2009 Copy rights reserved by www.sapkshare.com
then click on Next
Page 2
SAP Navigation by www.sapkshare.com
This setting is
used
only
for
remote access
2009 Copy rights reserved by www.sapkshare.com
Page 3
SAP Navigation by www.sapkshare.com
Step 3 - Click on Finish
to complete the configuration
Logging on to the System
SAP Log on pad is used to configure the SAP server and subsequently logging into the
SAP system. The SAP Graphical User Interface – SAP GUI is used to connect the
computer to the SAP system and additional program provided by SAP will be responsible
to logging on to SAP system.
SAP GUI types
. SAP GUI for the Windows environment
. SAP GUI for the Java environment
. SAP GUI for HTML
SAP Log on
Step 1 – click on the short cut icon SAP Log on
from the desktop. In SAP Log
on pad you can see the list of SAP systems configured and you can select the system
you want to log in.
2009 Copy rights reserved by www.sapkshare.com
Page 4
SAP Navigation by www.sapkshare.com
Step 2 – click on the log on button
Step 3 – In the Initial Screen you have enter the Client code, User name, password and
Language if applicable.
Client
As a rule, the client represents a company in an SAP system. This means that in an SAP
system with several clients, several companies can be represented at the same time.
The client has an equivalent as a key field in the tables of the database used by the SAP
system. After you log on to a client, you can access data for that client only. Clients
represent business-independent entities.
Users
User data is stored in the system according to client. For example, you can log on to
client 100 in your system, but not have a user for client 200. The data for a user within a
client is also known as the user master record..
2009 Copy rights reserved by www.sapkshare.com
Page 5
SAP Navigation by www.sapkshare.com
Password
The first time you log on to the system, you will receive an initial password from your
system administrator. During your first logon, you must specify your own individual pass
word. After this, you use this password every time you log on.
On the logon screen, you can use the New Password button to change your password up
to once a day.
Language
When you log on, you can select one of the logon languages that the system supports.
Installed SAP systems can support many languages, which always include at least
English and one other selected language. The number of installed languages determine
which languages are supported by your system.
2009 Copy rights reserved by www.sapkshare.com
Page 6
SAP Navigation by www.sapkshare.com
Once you log on to the SAP System you can see the SAP Easy access page as shown in
above screen shot with SAP menu on the left hand side which includes all the core SAP
Module packages like SAP MM, SAP SD, SAP FICO, SAP PP/QM, SAP HR, SAP ABAP etc.,
2009 Copy rights reserved by www.sapkshare.com
Page 7
SAP Navigation by www.sapkshare.com
You can log on to an SAP system more than once with a user. Note however, that
multiple logons are logged as of SAP R/3 Release 4.6. This is for security and licensing
reasons. For a second logon and each additional logon with the same user ID, an
information message appears, suggesting three options:
. Terminate this logon.
. Continue with this logon without ending any other logons to the system.
. Continue with this logon and end any other logons in the system.
2009 Copy rights reserved by www.sapkshare.com
Page 8
SAP Navigation by www.sapkshare.com
Screen Layout
The SAP Easy Access screen is the standard initial screen in SAP systems. In the left
screen area, you will see a tree hierarchy diagram of the menus available in the SAP
system and in the right screen area, you can display a logo. This logo is made available
centrally by your system administration, and cannot be set by the individual users.
You will see a typical screen layout (with different elements) if you choose System >
User Profile > Own Data and then select the tab page Defaults. Then you will see the
below screen, which is specific to your user:
2009 Copy rights reserved by www.sapkshare.com
Page 9
SAP Navigation by www.sapkshare.com
Command
Field
Menu bar
Standard
Tool bar
Title bar
Application
Tool bar
Tab page
Input Fields
Check box
Radio
button
Status bar
Command field: You can select applications directly by entering the transaction code in
the command field. You can see the transaction code under status bar when you are into
any application
Menu Bar: The menu bar is the upper line of each screen in the SAP system. The menus
displayed here are dependent on the particular application currently in use.
Standard Toolbar: The buttons on the standard toolbar are available on every SAP
screen layout. The buttons that cannot be used, depending on the application, are
greyed out.
Title Bar: The title bar names the function that is currently displayed.
2009 Copy rights reserved by www.sapkshare.com
Page 10
SAP Navigation by www.sapkshare.com
Application Toolbar: Here you can see the buttons that can be used in the current
application.
Check Boxes : checkboxes allow you to select several options from a group of fields.
Radio Buttons: you can only select one option.
Tab / Tab Page: Tabs combine multiple entry screens of an application on one screen.
You access individual tab pages by clicking on the page title.
Status Bar: The status bar shows information about the current system status, for
example, warnings and errors. Here you can also display the transaction code of your
current application using the corresponding display selection.
Other screen elements include input fields and buttons.
Log Off SAP System
Log off using the Menu bar go to System>Log off
Log off using the Tool bar button
Log off by closing the session
Navigating SAP Menu, User Menu & Favorites
After logged on the SAP system you can see the tree hierarchy menu on the left side column.
The menus are divided into SAP Menu/Favorites or User Menu/Favorites. You can switch between
SAP menu and User menu. User menu will have only authorised application access where as SAP
menu has all the application access.
SAP Menu
2009 Copy rights reserved by www.sapkshare.com
Page 11
SAP Navigation by www.sapkshare.com
User Menu – to switch from SAP menu to user menu Click button
2009 Copy rights reserved by www.sapkshare.com
Page 12
SAP Navigation by www.sapkshare.com
To switch to SAP menu from User menu click Button
Favorites menu is used to personalise the application access and is user friendly. User can store
the following information in the Favorites menu. Whatever the user stores in the Favorites it will
reflect in both the Favorites ( SAP Menu & User Menu).
To edit the Favorites menu there are various options available in SAP
Use Drag & Drop to drag the transaction to the favorites list.
Select the transaction, and from the menu bar, choose Favorites → Add.
Click the transaction with the right mouse button and choose Add to favourites
from the context menu.
Select the transaction and choose Add to favorites from the application toolbar.
From the menu bar, choose Favorites > Insert Transaction and enter the
transaction code of the transaction.
2009 Copy rights reserved by www.sapkshare.com
Page 13
SAP Navigation by www.sapkshare.com
Drag and Drop the Transaction code into Favorites
Right Click on the Transaction code and click on Add to favorites
Right click on the Favorites menu and insert the transaction code
2009 Copy rights reserved by www.sapkshare.com
Page 14
SAP Navigation by www.sapkshare.com
To Insert a Folder into Favorites right click on the favorites menu and click on insert
folder then key in the folder name , press enter to save the folder into Favorites menu.
2009 Copy rights reserved by www.sapkshare.com
Page 15
SAP Navigation by www.sapkshare.com
Navigating with few important Transaction codes
1. /n to end the current transaction
2. /nME21N to start transaction ME21N from another transaction. Without the /n
prefix, you can start transaction ME21N only from the SAP Easy Access.
3. /o to display a list of your own sessions.
4. /oME21N to start transaction ME21N from another transaction in a new session.
5. /nend to log off a session with a confirmation prompt.
6. /nex to end a logon session without a confirmation prompt.
7. /i to delete the current session.
Navigating with Help Functions
F1 Key – With F1 key you can get the documentation help about the particular
field and Technical parameter of that field.
F4 Key – With F4 Key you can input the possible input values for the particular
field.
SAP Online Library – You can access the SAP Library from the Menu path
Help>SAP Library where you can access the whole documentation of SAP.
To Know about the Output device in the User profile place the cursor on the output
device field and press F1 key to get the documentation help.
2009 Copy rights reserved by www.sapkshare.com
Page 16
SAP Navigation by www.sapkshare.com
To Know the technical parameters click the button
2009 Copy rights reserved by www.sapkshare.com
on the help documentation
Page 17
SAP Navigation by www.sapkshare.com
Table & Field name
To input the possible input values of particular field you can place the cursor on the field
which is displaying the push button
or drop down menu
then press F4 key to get
the list of possible input values or else you can press the respective buttons to get the
list of values.
2009 Copy rights reserved by www.sapkshare.com
Page 18
SAP Navigation by www.sapkshare.com
Additional settings
To see the transactions codes in the SAP menu Go to Menu Extras>Settings>Tick the
check box to display technical Names
2009 Copy rights reserved by www.sapkshare.com
Page 19


