JUNOS High Availability
advertisement
CHAPTER 7
Painless Software Upgrades
Juniper Networks recently added features to JUNOS software that dramatically reduce
the impact of software upgrades on transit traffic by making it possible to upgrade the
router operating system while the router is “in service.” In this chapter, we build on
the pre-upgrade procedures discussed in the previous chapter and show how unified
In-Service Software Upgrade (ISSU) functionality supports high availability goals.
Unified ISSU functionality applies only to platforms with redundant routing engines
(REs). And since not all routers have redundant REs, this chapter examines software
upgrades for platforms that support unified ISSU and software upgrades for platforms
with a single RE or where a release of JUNOS supporting unified ISSU is not in use.
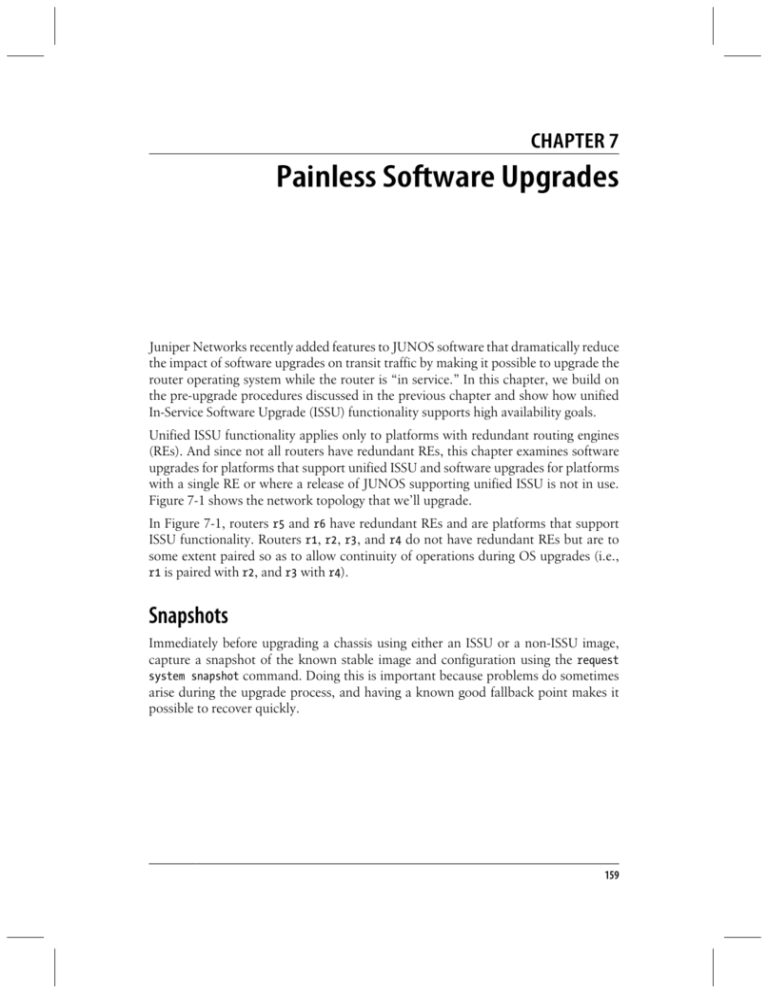
Figure 7-1 shows the network topology that we’ll upgrade.
In Figure 7-1, routers r5 and r6 have redundant REs and are platforms that support
ISSU functionality. Routers r1, r2, r3, and r4 do not have redundant REs but are to
some extent paired so as to allow continuity of operations during OS upgrades (i.e.,
r1 is paired with r2, and r3 with r4).
Snapshots
Immediately before upgrading a chassis using either an ISSU or a non-ISSU image,
capture a snapshot of the known stable image and configuration using the request
system snapshot command. Doing this is important because problems do sometimes
arise during the upgrade process, and having a known good fallback point makes it
possible to recover quickly.
159
fe-0/0/0
fe-0/0/1
r6
172.16.2.1/24 Io0 10.0.0.6 172.16.1.1/24
se-0/0/2
10.0.1.1/30
se-0/0/3
10.0.1.5/30
se-0/0/2
.2
se-0/0/3
.6
ge-0/0/1.401
172.16.4.1/24
Corp 401
ge-0/1/0
r4
ge-0/0/1.402
Io0
10.0.0.4
.18
172.16.6.1/24
Corp 402
/0/
ge-0/1/1
10.0.1.29/30
ge-0/1/1
.30
0
VIP= .1
8.7.6/24
Bastion Server
.3
0/2
/
172.16.7/24
VIP= .1
ge-0/0/1
ge-0/0/0
r2
.26 Io0 10.0.0.2 172.17.0.1/30
Internet
Kiosk 2
ge-0/1/0
7.6.5.2/24
ge-0/0/1
ge-0/0/0
r1
172.17.0.5/30 Io0 10.0.0.1 10.0.1.25
ge-0/1/0
7.6.5.1/24
ge-
ge-0/1/1
.22
ge0
8.7 /2/0
.6.2
/24
ge-0/1/1
10.0.1.21/30
.10
ge
-0
0/0
-0/
.14
/0
0/2
ge- /24
.6.3
8.7
/0
0/2
ge.2
Kiosk 1
ge
/30
10
.13
0
0/0
1
.0.
Corp 302
ge-0/1/0
r3
ge-0/0/1.302 Io0 10.0.0.3
10.0.1.17
172.16.5.1/24
-0/
ge-0/0/1.301
172.16.3.1/24
10
Corp 301
r5
Io0 10.0.0.5
Corp 601
ge
ge
.0. -0/0
1.9
/
/30 1
Corp 602
Figure 7-1. Enterprise topology to be upgraded
The snapshot command copies the content of /config and /root on the boot media
to /altconfig and /altroot on the alternate boot media. For example, if the router boots
from CompactFlash, the snapshot command creates the /alt files on the hard drive. If
the router boots from the hard drive, the /alt files are created on the CompactFlash:
[edit]
lab@r5-re0# run request system snapshot
160 | Chapter 7: Painless Software Upgrades
The request system snapshot command is commonly used with the
partition option to troubleshoot failed boot media, including
CompactFlash or the hard drive. In the following example, the
CompactFlash has failed and should be replaced. We know this because
of the error message generated:
[edit]
lab@r5-re0# run request system snapshot partition
error: s1a media missing or invalid
Software Upgrades with Unified ISSU
For routers with redundant REs, unified ISSU allows the administrator to upgrade
between two different JUNOS software releases with no disruption on the control plane
and with minimal disruption of traffic.
How It Works
Although the goal of this book is to discuss practical application of tools and technologies rather than protocol theory, let’s take a quick look at how unified ISSU performs
its magic. The process begins when the in-service-upgrade command is executed on
the master RE:
[edit]
lab@r5-re0# run request system software in-service-upgrade /var/tmp/jinstall-9
.3R1.7-domestic-signed.tgz reboot
After this command is entered, the router begins an eight-step sequence to complete
the upgrade:
1. The router validates the configuration to make sure all elements are compatible
with the new revision of code, in this case 9.3R1.7. The router also checks to make
sure that all Physical Interface Cards (PICs) are compatible with ISSU. If an incompatible PIC is found, the upgrade continues but the router issues a warning.
2. Kernel state on the backup RE is synchronized with the master RE.
3. The configuration file on the master RE is copied to the backup RE.
4. The backup RE is upgraded with the new operating system, and then kernel state
is resynchronized to the master.
5. chassisd on the master RE notifies the Packet Forwarding Engine (PFE) on each
Flexible PIC Concentrator (FPC) to download the new image from the backup RE.
6. The PFEs download the image, then reboot. Following reboot, they come back
online synchronized to the backup RE.
7. Once all PFEs are synchronized to the backup RE, ownership of the chassis transfers to the backup RE and the backup becomes the master.
Software Upgrades with Unified ISSU | 161
8. The former master is now upgraded to the new version of code and the process is
complete.
Implementation Details
Support for unified ISSU is expanding across the M Series and T Series product lines
with most new major releases of JUNOS. Table 7-1 shows unified ISSU platform support by JUNOS release.
Table 7-1. Unified ISSU platform support
Platform
First software release that supports unified ISSU
M120
JUNOS 9.2
M320
JUNOS 9.0
MX240, MX960
JUNOS 9.3
T320
JUNOS 9.0
T640
JUNOS 9.0
T1600
JUNOS 9.1
TX Matrix
JUNOS 9.3
Notice that not every protocol feature of JUNOS is compatible with unified ISSU.
Table 7-2 lists protocols that support unified ISSU and the first software release on
which unified ISSU for the protocol began being supported.
Table 7-2. Unified ISSU protocol support
Protocol
First software release that supports unified ISSU
Border Gateway Protocol (BGP)
JUNOS 9.0
Open Shortest Path First (OSPF), OSPFv3
JUNOS 9.0
Intermediate System to Intermediate System (IS-IS)
JUNOS 9.0
Label Distribution Protocol (LDP)
JUNOS 9.0
Virtual Private LAN Service (VPLS)
JUNOS 9.3
Layer 2 circuits
JUNOS 9.2
Layer 3 virtual private networks (VPNs)
JUNOS 9.2
Protocol-Independent Multicast (PIM; sparse, dense modes)
JUNOS 9.3
Notice that not all PICs are compatible with unified ISSU. During a unified ISSU operation, legacy PICs that do not support unified ISSU trigger a warning message which
indicates that specific PICs in the chassis will be momentarily taken offline during the
software upgrade. Once the new firmware is upgraded, the PICs are brought back
online.
162 | Chapter 7: Painless Software Upgrades
While a few seconds of interface downtime may sound trivial, it can be
significant. During this time, any routing protocol enabled on the interface loses connectivity across that interface to neighbors. This means
that while the PIC downtime might last for only a second, the protocols’
recovery time could be dramatically longer. It is indeed best to understand potential downtime well in advance of the upgrade. A complete
list of legacy PICs that do not support unified ISSU is available in the
“High Availability Guide” that accompanies each release of JUNOS
software. For JUNOS 9.3, it is available at the following URL:
http://www.juniper.net/techpubs/software/junos/junos93/swconfig-high
-availability/unified-issu-pic-support.html#section-issu-supported-pics
Configuration dependencies
To perform unified ISSU, Graceful Routing Engine Switchover (GRES) and Non-Stop
Active Routing (NSR) must be enabled on the router. GRES is the component that
allows the router to switch between the master and backup REs without interrupting
packet forwarding. NSR builds on GRES to preserve routing and switching protocol
state information during the transfer between the master and backup REs.
GRES configuration. You add GRES configuration elements at the chassis level of the configuration hierarchy:
[edit]
lab@r5-re0# set chassis redundancy graceful-switchover
Once committed, this configuration change triggers a marker on the hierarchy label to
tell users whether they are on the master or backup RE. You need to know this because
you must execute the ISSU command from the master RE:
[edit]
lab@r5-re0# commit
commit complete
{master}[edit]
lab@r5-re0#
NSR configuration. NSR configuration requires GRES configuration (as shown previously)
as well as configuration elements at the system and routing-options hierarchy levels.
At the system level of hierarchy, we enable the commit synchronize option to automatically synchronize any configuration changes between REs. The nonstop-routing element under the routing-options level of hierarchy enables NSR:
{master}[edit]
lab@r5-re0# set system commit synchronize
{master} [edit]
lab@r5-re0# set routing-options nonstop-routing
{master} [edit]
lab@r5-re0# commit
Software Upgrades with Unified ISSU | 163
re0;
configuration check succeeds
re1;
commit complete
re0;
commit complete
Notice that with the commit synchronize feature enabled, all commits result in a configuration update on both the master and backup REs.
Software Upgrades Without Unified ISSU
Chapter 6 looked in detail at configuration elements, such as Virtual Router Redundancy Protocol (VRRP) and the OSPF overload bit, which you can use to “encourage”
network traffic to avoid specific routers or links within the network. These configurations deployed chassis in pairs to allow you to perform software upgrades in situations
where ISSU is not an option.
If you look at Figure 7-1 again, you might notice that routers r1 and r2 share responsibilities to a great extent. With the exception of the Kiosk LANs, these two chassis
effectively serve as a redundant pair. In this scenario, traffic could be shifted from r1
to r2 to permit a JUNOS upgrade on r1 and then from r2 to r1 to permit the r2 upgrade.
Routers r3 and r4 are also redundant in many ways; however, each serves as a nonredundant gateway for a pair of Corp LANs. To upgrade JUNOS on r3 with minimal
disruption, transit traffic and ownership of virtual IP (VIP) 172.16.7.1 can be transferred to r4. Once the upgrade to r3 is complete, transit traffic and ownership of the VIP
can be transferred back to r3 to permit the r4 upgrade with minimal impact.
Loading a JUNOS Image
Only two steps are needed to load a JUNOS image. First, get the image onto the chassis.
Then, make the chassis use it as a boot image.
FTP is commonly used to transfer a JUNOS image. The only real trick to the transfer
is to make sure the image is sent to the router using the bin (binary) option available
in most FTP client applications. Here’s the transfer, using a Microsoft Windows-based
host system:
Microsoft Windows XP [Version 5.1.2600]
(C) Copyright 1985-2001 Microsoft Corp.
C:\Documents and Settings\jsonderegger>ftp 10.10.13.6
Connected to 10.10.13.6.
220 r5-re0 FTP server (Version 6.00LS) ready.
User (10.10.13.6:(none)): lab
331 Password required for lab.
Password:
164 | Chapter 7: Painless Software Upgrades
230 User lab logged in.
ftp> bin
200 Type set to I.
ftp> put c:\jinst*
200 PORT command successful.
150 Opening BINARY mode data connection for
'jinstall-9.0R4.5-domestic-signed.tgz'.
226 Transfer complete.
ftp: 163950321 bytes sent in 14.23Seconds 11521.46Kbytes/sec.
ftp>
Once the image is on the router, it can be loaded. When upgrading JUNOS without
ISSU, it is necessary to reboot the router to load the image. Here we see jinstall-9.0R4.5domestic-signed.tgz loading and the router rebooting and starting the new image:
lab@r5-re0> request system software add
/var/home/lab/jinstall-9.0R4.5-domestic-signed.tgz no-validate
Installing package '/var/home/lab/jinstall-9.0R4.5-domestic-signed.tgz' ...
Verified jinstall-9.0R4.5-domestic.tgz signed by PackageProduction_9_0_0
./+INSTALL: /sbin/x509-exts: not found
Adding jinstall...
WARNING:
WARNING:
WARNING:
WARNING:
WARNING:
WARNING:
WARNING:
This package will load JUNOS 9.0R4.5 software.
It will save JUNOS configuration files, and SSH keys
(if configured), but erase all other files and information
stored on this machine. It will attempt to preserve dumps
and log files, but this can not be guaranteed. This is the
pre-installation stage and all the software is loaded when
you reboot the system.
Saving the config files ...
Installing the bootstrap installer ...
WARNING:
WARNING:
WARNING:
WARNING:
WARNING:
A REBOOT IS REQUIRED TO LOAD THIS SOFTWARE CORRECTLY. Use the
'request system reboot' command when software installation is
complete. To abort the installation, do not reboot your system,
instead use the 'request system software delete jinstall'
command as soon as this operation completes.
Saving package file in /var/sw/pkg/jinstall-9.0R4.5-domestic-signed.tgz ...
Saving state for rollback ...
lab@r5-re0> request system reboot
Reboot the system ? [yes,no] (no) yes
Snapshots Redux
After you complete the software upgrade and confirm that all hardware and protocol
behavior is as expected, run the request system snapshot command again to copy the
new image to the backup boot media. This step is important because the backup media
Snapshots Redux | 165
is intended to be redundant to the primary boot media. To be truly redundant, the
backup must have the same JUNOS image as the primary media:
lab@r5-re0> request system snapshot
Image Upgrade Tweaks and Options
The traditional request system software add <image-name> command supports options
for additional functionality through the upgrade process. The help key (?) lists the
options:
lab@r5-re0> request system software add jbundle-8.1R1.5-domestic.tgz?
Possible completions:
<[Enter]>
Execute this command
delay-restart
Don't restart processes
force
Force addition of package (ignore warnings)
no-copy
Don't save copies of package files
no-validate
Don't check compatibility with current configuration
reboot
Reboot system after adding package
validate
Check compatibility with current configuration
|
Pipe through a command
delay-restart
Installs the software package but does not restart any software process. This option
does not eliminate the need to restart for the upgrade to take effect; it just stops
the restart from happening automatically.
force
Forces the image to be loaded regardless of any system warnings that are generated.
This is a dangerous option and can result in a corrupt JUNOS image being loaded
as a boot image, effectively making the router inoperable.
no-copy
Installs the new image but does not save copies of package files.
no-validate
Installs the new image but suppresses the warning messages that would be generated by the validate function.
validate
Confirms that all configuration elements and hardware components are compatible with the image being loaded.
reboot
Automatically reboots the system after finishing the image upgrade.
unlink
Removes the package after successful installation. This option is very useful on J
Series chassis, where storage space is at a premium.
best-effort-load
Load succeeds if at least one statement is valid.
166 | Chapter 7: Painless Software Upgrades
J Series Considerations
Currently, J Series routers—the chassis most commonly used in the enterprise—are
not equipped with a rotating media hard drive. Their on-system memory for storing
JUNOS images is limited. As a result, some additional image upgrade commands and
options are available as mentioned previously.
Cleanup
J Series chassis support a cleanup command that frees up storage space by deleting files
in the /cf/var/tmp/ directory that have not been accessed in the past 48 hours, as well
as all crash files in the /cf/var/crash directory. This command also rotates all current
logfiles in the /cf/var/log directory. This command takes a minute or two to complete.
You can run it immediately before a software upgrade to free up space for the JUNOS
image:
lab@r5-re0> request system storage cleanup
List of files to delete:
Size Date
2300B Dec 8 09:39
8561B Jun 11 06:00
9.8K Jun 10 09:00
9290B Jun 2 2008
8990B May 20 2008
2408B Dec 8 09:39
11.7K Dec 8 08:00
14.8K Jul 30 09:00
11.1K Jul 25 07:00
5550B Jul 9 19:00
5527B Jul 9 14:00
20.3K Jul 9 09:00
17.0K Jun 11 06:00
13.0K Jun 10 10:00
10.6K Jun 10 06:00
8269B May 20 2008
36.3M May 18 2008
Delete these files ?
Name
/cf/var/log/interactive-commands.0.gz
/cf/var/log/interactive-commands.1.gz
/cf/var/log/interactive-commands.2.gz
/cf/var/log/interactive-commands.3.gz
/cf/var/log/interactive-commands.4.gz
/cf/var/log/messages.0.gz
/cf/var/log/messages.1.gz
/cf/var/log/messages.2.gz
/cf/var/log/messages.3.gz
/cf/var/log/messages.4.gz
/cf/var/log/messages.5.gz
/cf/var/log/messages.6.gz
/cf/var/log/messages.7.gz
/cf/var/log/messages.8.gz
/cf/var/log/messages.9.gz
/cf/var/log/sampled.0.gz
/cf/var/tmp/junos-jseries-8.2R4.5-domestic.tgz
[yes,no] (no) yes
Backup Images
J Series chassis support a USB port that allows files, including JUNOS images, to be
added and removed from the chassis. Table 7-3 shows the list of officially supported
USB thumb drives as of JUNOS 9.3.
J Series Considerations | 167
Table 7-3. Officially supported USB drives
Manufacturer
Size
Manufacturer part number
SanDisk—Cruzer Mini 2.0
256 MB
SDCZ2-256-A10
SanDisk
512 MB
SDCZ2-512-A10
SanDisk
1,024 MB
SDCZ2-1024-A10
SanDisk—ImageMate USB 2.0 Reader/Writer for CompactFlash Type I and II
N/A
SDDR-91-A15
SanDisk-CompactFlash
512 MB
SDCFB-512-455
SanDisk-CompactFlash
1,024 MB
SDCFB-1000–A10
Kingston
512 MB
DTI/512KR
Kingston
1,024 MB
DTI/1GBKR
Before upgrading an image, you can write the current configuration and image to a USB
drive using the request system snapshot command. In this example, the USB drive has
not previously been used on a JUNOS platform, a FreeBSD environment, so the
partition option is also necessary. The initial da0 output is generated when the USB
drive is inserted into the chassis:
da0 at umass-sim0 bus 0 target 0 lun 0
da0: <OPTI3 Flash Disk 2.00> Removable Direct Access SCSI-2 device
da0: 1.000MB/s transfers
da0: 125MB (256000 512 byte sectors: 64H 32S/T 125C)
lab@r5-re0> request system snapshot partition media usb
Clearing current label...
Partitioning usb media (da0) ...
Partitions on snapshot:
Partition Mountpoint Size
Snapshot argument
a
/
111MB
root-size
e
/config
13MB
config-size
Running newfs (111MB) on usb media / partition (da0s1a)...
Running newfs (13MB) on usb media /config partition (da0s1e)...
Copying '/dev/ad0s1a' to '/dev/da0s1a' .. (this may take a few minutes)
Copying '/dev/ad0s1e' to '/dev/da0s1e' .. (this may take a few minutes)
The following filesystems were archived: / /config
The USB port can also be used as boot media if it is loaded with a
jinstall image that meets the install-media guidelines. For the J Series
chassis, the install-media packages will have a size indicated in the suffix
of the package name to describe system storage requirements for the
image, as in this example:
Junos-jseries-8.0R2-export-cf256.gz
168 | Chapter 7: Painless Software Upgrades
Rescue Configuration
A rescue configuration is a feature specific to J Series routers. Though it is not a true
part of the software upgrade procedure, its functionality is directly related. The rescue
configuration allows you to create a known stable working configuration and save it in
a special memory location in the J Series router. There is no rescue configuration by
default. It must be created and saved by the administrator.
lab@r4> request system configuration rescue save
Once saved, it can be viewed as needed to make sure it is still current and appropriate
for the system:
lab@r4> show system configuration rescue
version 9.4R2.9;
system {
host-name r4;
root-authentication {
encrypted-password "$1$vky7kv0i$/NeUtRaLSDgDb3we4nPVs/"; ## SECRET-DATA
}
login {
class juniper {
permissions view;
allow-commands "show route";
}
user lab {
uid 2003;
class superuser;
authentication {
encrypted-password "$1$pYM5k*hEy_zeUS6rfe32R.4bg.";
## SECRET-DATA
}
}
}
...
Then the rescue configuration can be loaded and committed on the router by momentarily pressing theo RESET CONFIG button on the face of the chassis. The rescue
configuration can also be loaded through the command-line interface (CLI).
[edit]
lab@r4# rollback rescue
load complete
Pressing the RESET CONFIG button momentarily loads and commits
the rescue configuration, but be warned: holding the RESET CONFIG
button for 15 seconds will delete the active configuration, the rescue
configuration, and all rollback configurations, and will reset the system
to a factory default.
J Series Considerations | 169
