Lifesaver Proficiency Bulletin 2010/11
advertisement
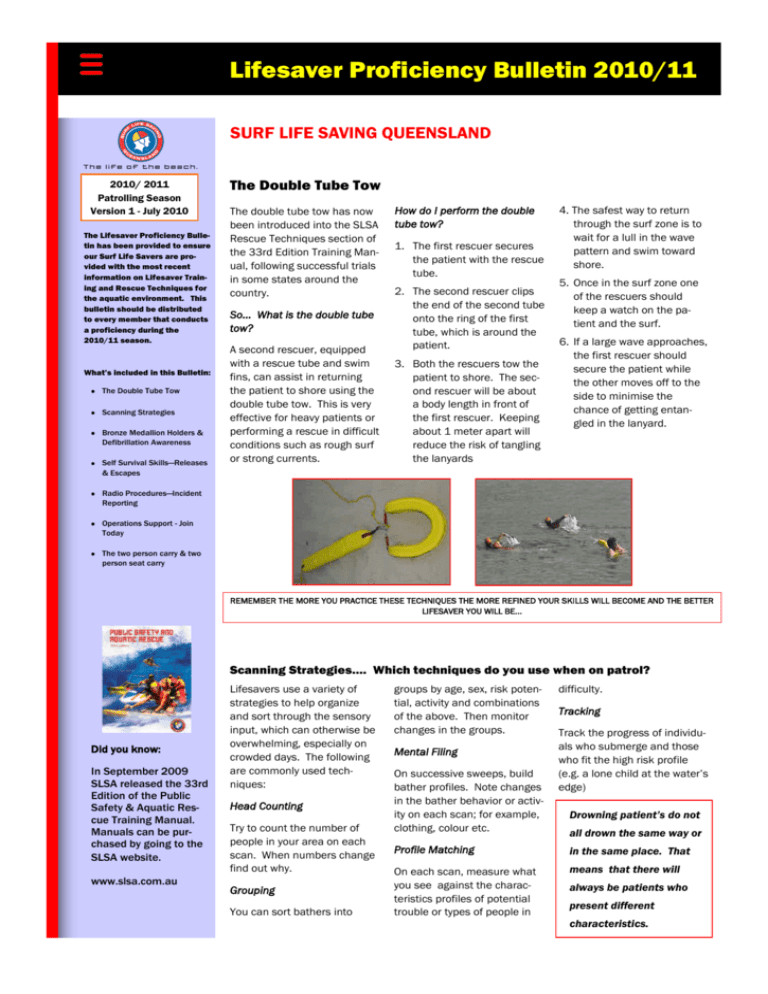
Lifesaver Proficiency Bulletin 2010/11 SURF LIFE SAVING QUEENSLAND 2010/ 2011 Patrolling Season Version 1 - July 2010 The Lifesaver Proficiency Bulletin has been provided to ensure our Surf Life Savers are provided with the most recent information on Lifesaver Training and Rescue Techniques for the aquatic environment. This bulletin should be distributed to every member that conducts a proficiency during the 2010/11 season. What’s included in this Bulletin: The Double Tube Tow Scanning Strategies Bronze Medallion Holders & Defibrillation Awareness Self Survival Skills—Releases & Escapes The Double Tube Tow The double tube tow has now been introduced into the SLSA Rescue Techniques section of the 33rd Edition Training Manual, following successful trials in some states around the country. So… What is the double tube tow? A second rescuer, equipped with a rescue tube and swim fins, can assist in returning the patient to shore using the double tube tow. This is very effective for heavy patients or performing a rescue in difficult conditions such as rough surf or strong currents. How do I perform the double tube tow? 1. The first rescuer secures the patient with the rescue tube. 2. The second rescuer clips the end of the second tube onto the ring of the first tube, which is around the patient. 3. Both the rescuers tow the patient to shore. The second rescuer will be about a body length in front of the first rescuer. Keeping about 1 meter apart will reduce the risk of tangling the lanyards 4. The safest way to return through the surf zone is to wait for a lull in the wave pattern and swim toward shore. 5. Once in the surf zone one of the rescuers should keep a watch on the patient and the surf. 6. If a large wave approaches, the first rescuer should secure the patient while the other moves off to the side to minimise the chance of getting entangled in the lanyard. Radio Procedures—Incident Reporting Operations Support - Join Today The two person carry & two person seat carry REMEMBER THE MORE YOU PRACTICE THESE TECHNIQUES THE MORE REFINED YOUR SKILLS WILL BECOME AND THE BETTER LIFESAVER YOU WILL BE... Scanning Strategies…. Which techniques do you use when on patrol? Did you know: In September 2009 SLSA released the 33rd Edition of the Public Safety & Aquatic Rescue Training Manual. Manuals can be purchased by going to the SLSA website. www.slsa.com.au Lifesavers use a variety of strategies to help organize and sort through the sensory input, which can otherwise be overwhelming, especially on crowded days. The following are commonly used techniques: Head Counting Try to count the number of people in your area on each scan. When numbers change find out why. Grouping You can sort bathers into groups by age, sex, risk potential, activity and combinations of the above. Then monitor changes in the groups. Mental Filing On successive sweeps, build bather profiles. Note changes in the bather behavior or activity on each scan; for example, clothing, colour etc. difficulty. Tracking Track the progress of individuals who submerge and those who fit the high risk profile (e.g. a lone child at the water’s edge) Drowning patient’s do not all drown the same way or Profile Matching in the same place. That On each scan, measure what you see against the characteristics profiles of potential trouble or types of people in means that there will always be patients who present different characteristics. Page 2 Lifesaver Proficiency Bulletin 2010/11 Defibrillation Awareness — What you need to know as Bronze Medallion Holder... Accessories: Defibrillation Items that should Early defibrillation is an important link in the Chain of Survival and is a component of the basic life support process—DRABCD. Defibrillation involves delivering an electronic shock to revert the heart to its normal rhythm. Defibrillation of the heart by first aid personnel has become possible with Automatic External Defibrillators (AED’s) be kept with the unit include: resus masks gloves razors DEFIBRIALLTION SHOULD PREFERABLY BE UNDERTAKEN BY A MEMBER HOLDS THE SLSA AWARD. WHERE A MEMBER WITH THE QUALIFICATION IS UNAVAILBLE, A LIFESAVER WITH APPROPRAITE DEFIBRILLATION TRAINING CAN ACCESS AND OPERATE A DEFIB UNIT. shears The Defibrillation Process Effective Adherence of Electrode Pads gauze wipes The AED delivers an electric shock through electrode pads applied to the patients chest. The following points will help ensure effective adherence of electrode pads: spare battery space blanket pen & paper chamois or towel Indications for use of AED are: Only place electrode pads on clean dry skin The patient has no signs of life Do not use alcohol wipes The rescuer has access to an AED If chest is hairy, remove hair with a razor or scissors When connected to a patient, the AED will: Prompt specific actions Analyse the patient’s cardiac activity. Apply electrode pads with a smooth rolling action to prevent air bubbles. Advise to shock if appropriate Once applied, electrode pads should not be repositioned or removed unless advised by the AED. Deliver the shock when activated by the operator Do not use electrodes pads after their expiry date. Advise to recommence CPR if no shockable arrhythmia is detected Defibrillation Safety The prompts given by an AED Operator should be trained in the use of the AED. will vary, The patient must be unresponsive, not breathing and without signs of life. depending on the make and model, Remove any metallic jewellery near the electrode sites. it is important to Do not place electrodes over medication patches. familiarize Avoid electrode contact with any metal surface. yourself with the Operators & bystanders must have no contact with the patient during defibrillation. units you have at your club. Positioning of Electrode Pads Safety considerations include, but not limited to: Do not operate AED in an explosive environment (e.g. where gases & fumes might be present) or in a wet environment (e.g. rain) wipe down the chest before positioning electrodes. Move a patient lying in water to a dry area. If the patient has an implanted pacemaker, make sure the pads are least 2.5cm away from it. Use only equipment that is compatible with the unit. Do not operate in close proximity to mobile phones, radios etc. Do not operate the unit in an unstable environment. Oxygen should be turned off during defibrillation. Correct positioning of the electrode pads is essential for successful defibrillation to take place. The position is usually indicated on the electrode pads or the packaging they come in. Place the sternum electrode pad to the right of the sternum (breastbone) below the collarbone and above the right nipple. Place the apex electrode pad to the left of the sternum, with the upper edge of the pad below and to the left of the left nipple. Shock Delivery Protocols Operation of an AED Shocks are delivered one at a time followed by a pause for recovery, checks and resuscitation. The important shock delivery protocols to remember are: CPR should be commenced and continued until the patient is prepared and the defibrillation unit is ready. The operator of the defibrillation unit will be in charge of the procedure. Interruptions to 1. Confirm that the patient needs defibrillating, that is the patient has no signs of life. kept to a 2. Ensure that the conditions are safe for use of a defibrillator. as short as Respond to all prompts within safety constraints Make sure all personnel are clear of the patient during analysis and before delivering a shock Currently, all electrode pads are for single use only Do no remove electrode pads after patient shows signs of life. Keep them in place to allow prompt action should the patient’s condition deteriorate Do not place electrodes over medication patches If the patient has an implanted pacemaker, make sure the pads are at least 2.5cm away from it. Page 3 CPR should be minimum and for 3. Turn on the AED and follow the prompts. possible. Do not 4. Apply the electrodes to the patients chest. stop CPR while 5. Respond to the unit’s prompts the pads are being 6. Deliver the shock in an appropriate and safe manner when prompted. placed on the 7. Maintain basic life support protocols; that is, check for signs of life and commence CPR if required. usually only need patient. You will to stop CPR during analysis For more information on Use of the Defibrillator refer to Chapter Five of the SLSA Training Manual (33rd Edition) and delivery of shock. IF A DEFIBRILLATOR UNIT PROVIDES A PROMPT SIMILAR TO ‘NO SHOCK ADVISED’ THIS DOES NOT NECESSARILY MEAN THAT THE PATIENT’S SIGNS OF LIFE HAVE RETURNED. LIFESAVERS SHOULD STILL CONFIRM MANUALLY IF SIGNS OF LIFE ARE PRESENT & PROVIDE APPROPRIATE TREATMENT. Self Survival Skills - Releases & Escapes In the water a panicking patient might try & grab hold of you the rescuer. This presents a serious danger to any lifesaver. It is essential that you are able to release yourself & escape from the patient if this situation occurs. 4. Surface well clear of the patient. Front Release & Escape 2. Place your hands on the patients elbows. 1. Tuck your chin into your chest. 2. Put your hands against the body of the patient; under the rib cage is recommended. 3. Push yourself down & swim away from the patient, You are not attempting to lift 5. Push your rescue equipment, if available, toward the patient. the patient out of Rear Release & Escape aim is to push the water. Your 1. Tuck your chin to your chest. yourself below Front Release & Escape the surface & away from the 3. Push yourself down & away from the patient. patient. 4. Push your rescue equipment, if available, toward the patient. 5. Reassure the patient Rear Release & Escape Radio Procedures - Incident Reporting The correct radio procedures for patrol operations should be regularly practiced and utilised at all times. It’s a good idea to advise SurfCom or your Radio Base of an incident as it unfolds, which will result in a quicker and more efficient response time. Rescues: Location (distance to flagged area, distance to shore) Type of rescue (tube, board, IRB etc) & number of patients. Age and gender of patient. Nationality if known. Further assistance required (first aid, oxygen therapy, am- bulance etc.) Ambulance: Patient’s level of consciousness If the patient breathing and ii experiencing any difficultly. Patient’s age & gender What type of injury (laceration, fracture, spinal etc.) How the injury occurred (brief description) Known medical history (medical conditions, medications) Treatment administered (first aid, oxygen therapy etc.) Location of patient now & when QAS arrives. Note: If located in an area where SurfCom operates this information should be provided direct to SurfCom. For areas that do not operate with SurfCom this information should be provided direct to 000. All other incidents: Before requesting Ambulance ensure you know the following information about the patient: Level of consciousness Breathing / Breathing Position Difficulty Problem Gender People Age Progress Details of injury For more information on Radio Procedures for Patrol Operations refer to Section 16 of the SLSQ Patrol Operations Manual. How the injury happened Medical History / Medication Treatment Administered Location of patient Tackle the waves whilst protecting our beaches and learn to operate the fast manoeuvrable Rescue Water Craft Jet Rescue Boats operate off the Gold and Sunshine Coast patrolling the outer break. Primarily used for surveillance, these craft enable dangerous areas to be covered by watchful eyes! SLSQ OPERATIONS SUPPORT - JOIN TODAY! Our Lifesaving Operations Support services are a critical part of patrol operations network throughout Queensland. The Offshore Rescue Boat, operates in Nth Qld provides back up to patrolled and unguarded beaches throughout the marine stinger season. Tailored for tropical waters, the skills and experience you gain from operating this craft will help keep our northern beaches safer. As a SurfCom Controller you will be responsible for the coordination of Operations Support services, you will also liaise with other emergency service agencies. By joining the SurfCom team you will learn valuable communication, coordina- Through the Rescue Water Craft, Jet Rescue Boats, Offshore Rescue Boat, the Westpac Lifesaver Helicopter Rescue Service, SurfCom (Communications Centres), the Duty Officer Program and the 24hr Emergency Response Team, Surf Life Saving Queensland are able to extend lifesaving patrols in the air, on the beach and on the water. These services are vital in accessing dangerous and unpatrolled beaches, assisting beach users back between the red and yellow flags. The SLSQ Operations Support Team are recruiting now! Interested…. By becoming a Duty Officer you can help build the profile of Surf Life Saving Queensland to external agencies, provide support to frontline members and assist with the integration of lifesaving services. Simply complete Operations Support Application Form that can be found in the SLSQ Patrol Operations Manual or on the SLSQ website www.lifesaving.com.au. The form should be forwarded to SLSQ for consideration and endorsement. The Two Person Carry & Two Handed Seat Carry Two Person Carry A two person carry may be used when an exhausted or unconscious patient requires removal from the shallows or away from danger on land. The basic principles are: 1. When the lifesaver(s) return to shore, additional patrol members should be waiting at the water’s edge to receive the patient. 2. One lifesaver should: a. provide support with the patient’s back against his/ her chest. b. slide both arms under the patient’s armpits. c. use one hand to maintain a pistol grip on the patient’s jaw line. d. use the second hand to grip the patient’s corresponding arm at the wrist. 3. Another lifesaver should grasp the patient’s legs under the knees. 4. Both lifesavers should lift the patient together. Lift with your legs not your back. 5. The patient should be carried up the beach or away from danger. 6. The patient can then be lowered with both lifesavers lowering at the same time. each other’s forearm. 1. The patient’s arms go around the lifesavers necks & the lifesavers standup thus creating a chair. 2. The lifesavers take the patient to a safe area. longer considered best practice by SLSA. The two person or two Two Handed Seat Carry handed seat carry Two Person Carry should now be used. 1. The lifesavers stand facing each other, on opposite sides of the patient, bend their knees & place one arm each around the patients back & waist. 2. The lifesavers’ free arms are placed under the patient’s thighs & the lifesavers grasp That the three person carry is no 7. If the patient is unconscious, they should be placed into the recovery position for assessment. This carry is used when a patient is conscious & can help support themselves but may need assistance. Did you know: Two Handed Seat Carry
