CCNPv6 SWITCH
Chapter 7 Lab 7-1, Configuring Switches for IP Telephony Support
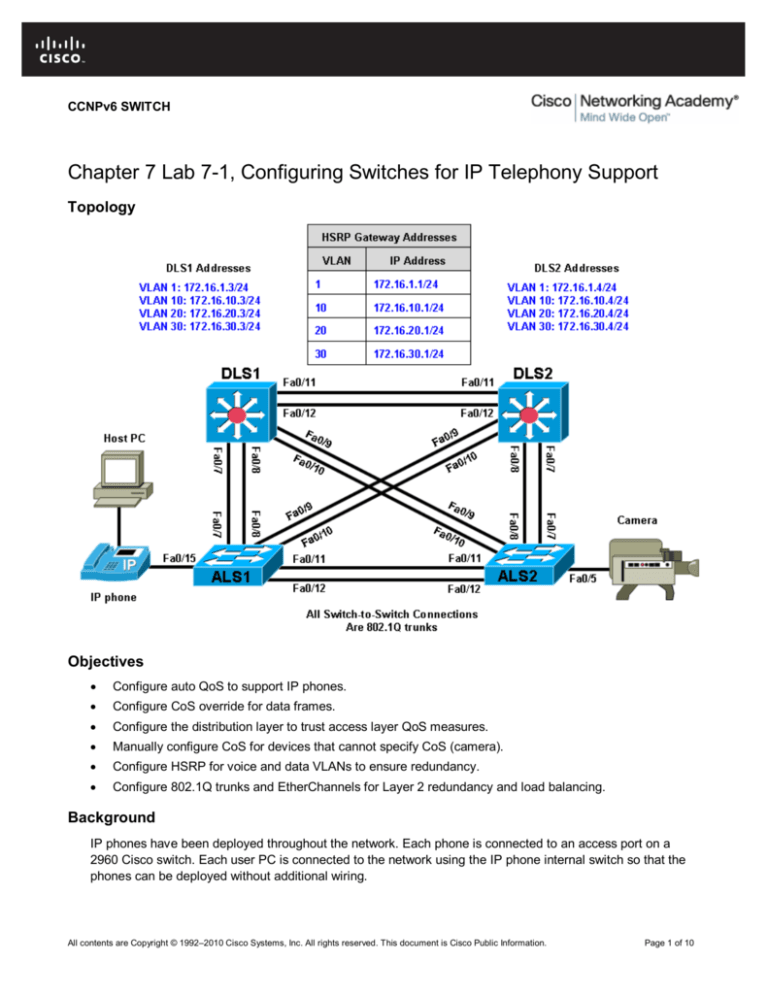
Topology
Objectives
•
Configure auto QoS to support IP phones.
•
Configure CoS override for data frames.
•
Configure the distribution layer to trust access layer QoS measures.
•
Manually configure CoS for devices that cannot specify CoS (camera).
•
Configure HSRP for voice and data VLANs to ensure redundancy.
•
Configure 802.1Q trunks and EtherChannels for Layer 2 redundancy and load balancing.
Background
IP phones have been deployed throughout the network. Each phone is connected to an access port on a
2960 Cisco switch. Each user PC is connected to the network using the IP phone internal switch so that the
phones can be deployed without additional wiring.
All contents are Copyright © 1992–2010 Cisco Systems, Inc. All rights reserved. This document is Cisco Public Information.
Page 1 of 10
CCNPv6 SWITCH
Note: The access layer switches depicted in the topology are assumed to support PoE for the IP phones.
However, the switches used in this lab do not support PoE. This will not affect the commands used in this lab.
In this lab, you configure the quality of service (QoS) on the access and distribution layer switches so that
they trust the class of service (CoS) mapping provided by the IP phone through Cisco Discovery Protocol
(CDP). To ensure redundancy for the phones and user end stations, you will use Hot Standby Router Protocol
(HSRP) on the distribution layer switches.
A camera for video is also deployed on the network, which requires that its access port on the 2960 be
manually configured. It is not necessary to have an IP phone or camera to successfully complete the lab. The
focus is on the configuration of access and distribution layer switches to support QoS for these devices.
Note: This lab uses Cisco WS-C2960-24TT-L switches with the Cisco IOS image c2960-lanbasek9-mz.12246.SE.bin, and Catalyst 3560-24PS with the Cisco IOS image c3560-advipservicesk9-mz.122-46.SE.bin. You
can use other switches (such as a 2950 or 3550) and Cisco IOS Software versions if they have comparable
capabilities and features. Depending on the switch model and Cisco IOS Software version, the commands
available and output produced might vary from what is shown in this lab.
Required Resources
•
2 switches (Cisco 2960 with the Cisco IOS Release 12.2(46)SE C2960-LANBASEK9-M image or
comparable)
•
2 switches (Cisco 3560 with the Cisco IOS Release 12.2(46)SE C3560-ADVIPSERVICESK9-mz image or
comparable)
•
Host PC (optional)
•
IP phone (optional)
•
Camera (optional)
•
Ethernet and console cables
Step 1: Prepare the switches for the lab.
Erase the startup configuration, delete the vlan.dat file, and reload the switches. Refer to Lab 1-1, “Clearing a
Switch” and Lab 1-2, “Clearing a Switch Connected to a Larger Network” to prepare the switches for this lab.
Cable the equipment as shown.
Step 2: Configure basic switch parameters.
Configure the management IP addresses in VLAN 1, and the hostname, password, and Telnet access on all
four switches. Also configure a default gateway on the access layer switches. The distribution layer switches
act as Layer 3 devices and do not need default gateways.
Switch(config)# hostname ALS1
ALS1(config)# enable secret class
ALS1(config)# line vty 0 15
ALS1(config-line)# password cisco
ALS1(config-line)# login
ALS1(config-line)# exit
ALS1(config)# interface vlan 1
ALS1(config-if)# ip address 172.16.1.101 255.255.255.0
ALS1(config-if)# no shutdown
ALS1(config-if)# exit
ALS1(config)# ip default-gateway 172.16.1.1
Switch(config)# hostname ALS2
ALS2(config)# enable secret class
All contents are Copyright © 1992–2010 Cisco Systems, Inc. All rights reserved. This document is Cisco Public Information.
Page 2 of 10
CCNPv6 SWITCH
ALS2(config)# line vty 0 15
ALS2(config-line)# password cisco
ALS2(config-line)# login
ALS2(config-line)# exit
ALS2(config)# interface vlan 1
ALS2(config-if)# ip address 172.16.1.102 255.255.255.0
ALS2(config-if)# no shutdown
ALS2(config-if)# exit
ALS2(config)# ip default-gateway 172.16.1.1
Switch(config)# hostname DLS1
DLS1(config)# enable secret class
DLS1(config)# line vty 0 15
DLS1(config-line)# password cisco
DLS1(config-line)# login
DLS1(config-line)# exit
DLS1(config)# interface vlan 1
DLS1(config-if)# ip address 172.16.1.3 255.255.255.0
DLS1(config-if)# no shutdown
Switch(config)# hostname DLS2
DLS2(config)# enable secret class
DLS2(config)# line vty 0 15
DLS2(config-line)# password cisco
DLS2(config-line)# login
DLS2(config-line)# exit
DLS2(config)# interface vlan 1
DLS2(config-if)# ip address 172.16.1.4 255.255.255.0
DLS2(config-if)# no shutdown
Step 3: Configure the trunks and EtherChannels.
Configure the trunks according to the diagram, and configure EtherChannels between the switches. Using
EtherChannel for the trunks provides Layer 2 load balancing over redundant trunks.
a. The following is a sample configuration for the trunks and EtherChannel from DLS1 to the other three
switches. Notice that the 3560 switch needs the switchport trunk encapsulation {dot1q | isl} command,
because this switch also supports ISL encapsulation.
DLS1(config)# interface range fastEthernet 0/7 - 8
DLS1(config-if-range)# switchport trunk encapsulation dot1q
DLS1(config-if-range)# switchport mode trunk
DLS1(config-if-range)# channel-group 1 mode active
Creating a port-channel interface Port-channel 1
DLS1(config-if-range)#
DLS1(config-if-range)#
DLS1(config-if-range)#
DLS1(config-if-range)#
interface range fastEthernet 0/9 - 10
switchport trunk encapsulation dot1q
switchport mode trunk
channel-group 2 mode active
Creating a port-channel interface Port-channel 2
DLS1(config-if-range)#
DLS1(config-if-range)#
DLS1(config-if-range)#
DLS1(config-if-range)#
interface range fastEthernet 0/11 - 12
switchport trunk encapsulation dot1q
switchport mode trunk
channel-group 3 mode active
All contents are Copyright © 1992–2010 Cisco Systems, Inc. All rights reserved. This document is Cisco Public Information.
Page 3 of 10
CCNPv6 SWITCH
Creating a port-channel interface Port-channel 3
b. The following is a sample configuration for the trunks and EtherChannels from DLS2 to the other three
switches.
DLS2(config)# interface range fastEthernet 0/7 - 8
DLS2(config-if-range)# switchport trunk encapsulation dot1q
DLS2(config-if-range)# switchport mode trunk
DLS2(config-if-range)# channel-group 1 mode active
Creating a port-channel interface Port-channel 1
DLS2(config-if-range)#
DLS2(config-if-range)#
DLS2(config-if-range)#
DLS2(config-if-range)#
interface range fastEthernet 0/9 - 10
switchport trunk encapsulation dot1q
switchport mode trunk
channel-group 2 mode active
Creating a port-channel interface Port-channel 2
DLS2(config-if-range)#
DLS2(config-if-range)#
DLS2(config-if-range)#
DLS2(config-if-range)#
interface range fastEthernet 0/11 - 12
switchport trunk encapsulation dot1q
switchport mode trunk
channel-group 3 mode active
Creating a port-channel interface Port-channel 3
c.
The following is a sample configuration for the trunks and EtherChannel from ALS1 and ALS2 to the other
switches.
ALS1(config)# interface range fastEthernet 0/7 - 8
ALS1(config-if-range)# switchport mode trunk
ALS1(config-if-range)# channel-group 1 mode active
Creating a port-channel interface Port-channel 1
ALS1(config-if-range)# interface range fastEthernet 0/9 - 10
ALS1(config-if-range)# switchport mode trunk
ALS1(config-if-range)# channel-group 2 mode active
Creating a port-channel interface Port-channel 2
ALS1(config-if-range)# interface range fastEthernet 0/11 - 12
ALS1(config-if-range)# switchport mode trunk
ALS1(config-if-range)# channel-group 3 mode active
Creating a port-channel interface Port-channel 3
ALS2(config)# interface range fastEthernet 0/7 - 8
ALS2(config-if-range)# switchport mode trunk
ALS2(config-if-range)# channel-group 1 mode active
Creating a port-channel interface Port-channel 1
ALS2(config-if-range)# interface range fastEthernet 0/9 - 10
ALS2(config-if-range)# switchport mode trunk
ALS2(config-if-range)# channel-group 2 mode active
Creating a port-channel interface Port-channel 2
All contents are Copyright © 1992–2010 Cisco Systems, Inc. All rights reserved. This document is Cisco Public Information.
Page 4 of 10
CCNPv6 SWITCH
ALS2(config-if-range)# interface range fastEthernet 0/11 - 12
ALS2(config-if-range)# switchport mode trunk
ALS2(config-if-range)# channel-group 3 mode active
Creating a port-channel interface Port-channel 3
d. Use the show interfaces trunk command on all switches to verify the trunks.
Which VLANs are currently allowed on the newly created trunks?
e. Use the show etherchannel summary command on each switch to verify the EtherChannels.
Which EtherChannel negotiation protocol is in use here?
Step 4: Configure VTP on ALS1 and ALS2.
a. Change the VTP mode of ALS1 and ALS2 to client.
ALS1(config)# vtp mode client
Setting device to VTP CLIENT mode.
ALS2(config)# vtp mode client
b. Verify the VTP changes with the show vtp status command.
How many VLANs can be supported locally on the 2960 switch?
Step 5: Configure VTP and the VLANs on DLS1.
a. Create the VTP domain on DLS1, and create VLANs 10, 20, and 30 for the computer data, voice, and
video VLANs in the domain.
DLS1(config)# vtp domain SWPOD
DLS1(config)# vtp version 2
DLS1(config)# vlan 10
DLS1(config-vlan)# name CP-DATA
DLS1(config-vlan)# exit
DLS1(config)# vlan 20
DLS1(config-vlan)# name VOICE
DLS1(config-vlan)# exit
DLS1(config)# vlan 30
DLS1(config-vlan)# name VIDEO
b. Verify the VTP information throughout the domain using the show vlan and show vtp status commands.
How many existing VLANs are in the VTP domain?
All contents are Copyright © 1992–2010 Cisco Systems, Inc. All rights reserved. This document is Cisco Public Information.
Page 5 of 10
CCNPv6 SWITCH
Step 6: Configure IP routing, VLAN SVIs, and HSRP on DLS1 and DLS2.
a. Configure HSRP between the VLANs to provide redundancy in the network. To achieve some load
balancing, use the standby [group] priority command. Use the ip routing command on DLS1 and DLS2
to activate routing capabilities on the switch.
Each route processor will have its own IP address on each switched virtual interface (SVI) and also be
assigned an HSRP virtual IP address for each VLAN. Devices connected to VLANs 10, 20, and 30 use
the gateway IP address for the VLANs.
The standby command is also used to configure the IP address of the virtual gateway and configure the
router for preemption. The preempt option allows for the active router with the higher priority to take over
again after a network failure has been resolved.
Notice in the following configurations that the priority for VLANs 1 and 10 has been configured for 150 on
DLS1, making DLS1 the active router for those VLANs. VLANs 20 and 30 have been configured for a
priority of 100 on DLS1, making DLS1 the standby router for these VLANs. Reverse priorities have been
configured on the VLANs on DLS2. DLS2 is the active router for VLANs 20 and 30, and the standby
router for VLANs 1 and 10.
HSRP Configuration for DLS1
DLS1(config)# ip routing
DLS1(config)# interface vlan 1
DLS1(config-if)# standby 1 ip 172.16.1.1
DLS1(config-if)# standby 1 preempt
DLS1(config-if)# standby 1 priority 150
DLS1(config-if)# exit
DLS1(config)# interface vlan 10
DLS1(config-if)# ip address 172.16.10.3 255.255.255.0
DLS1(config-if)# standby 1 ip 172.16.10.1
DLS1(config-if)# standby 1 preempt
DLS1(config-if)# standby 1 priority 150
DLS1(config-if)# exit
DLS1(config)# interface vlan 20
DLS1(config-if)# ip address 172.16.20.3 255.255.255.0
DLS1(config-if)# standby 1 ip 172.16.20.1
DLS1(config-if)# standby 1 preempt
DLS1(config-if)# standby 1 priority 100
DLS1(config-if)# exit
DLS1(config)# interface vlan 30
DLS1(config-if)# ip address 172.16.30.3 255.255.255.0
DLS1(config-if)# standby 1 ip 172.16.30.1
DLS1(config-if)# standby 1 preempt
DLS1(config-if)# standby 1 priority 100
HSRP Configuration for DLS2
DLS2(config)# ip routing
DLS2(config)# interface vlan 1
DLS2(config-if)# standby 1 ip 172.16.1.1
DLS2(config-if)# standby 1 preempt
DLS2(config-if)# standby 1 priority 100
DLS2(config-if)# exit
DLS2(config)# interface vlan 10
DLS2(config-if)# ip address 172.16.10.4 255.255.255.0
DLS2(config-if)# standby 1 ip 172.16.10.1
DLS2(config-if)# standby 1 preempt
DLS2(config-if)# standby 1 priority 100
All contents are Copyright © 1992–2010 Cisco Systems, Inc. All rights reserved. This document is Cisco Public Information.
Page 6 of 10
CCNPv6 SWITCH
DLS2(config-if)# exit
DLS2(config)# interface vlan 20
DLS2(config-if)# ip address 172.16.20.4 255.255.255.0
DLS2(config-if)# standby 1 ip 172.16.20.1
DLS2(config-if)# standby 1 preempt
DLS2(config-if)# standby 1 priority 150
DLS2(config-if)# exit
DLS2(config)# interface vlan 30
DLS2(config-if)# ip address 172.16.30.4 255.255.255.0
DLS2(config-if)# standby 1 ip 172.16.30.1
DLS2(config-if)# standby 1 preempt
DLS2(config-if)# standby 1 priority 150
b. Enter the show standby brief command on both DLS1 and DLS2.
Which router is the active router for VLANs 1 and 10? Which is the active router for VLAN 20?
How is the active HSRP router selected?
c.
Enter the show standby command on both DLS1 and DLS2.
What is the default hello time for each VLAN? What is the default hold time?
d. Verify routing using the show ip route command. The following is sample output from DLS1.
DLS1# show ip route
Codes: C - connected, S - static, R - RIP, M - mobile, B - BGP
D - EIGRP, EX - EIGRP external, O - OSPF, IA - OSPF inter area
N1 - OSPF NSSA external type 1, N2 - OSPF NSSA external type 2
E1 - OSPF external type 1, E2 - OSPF external type 2, E - EGP
i - IS-IS, su - IS-IS summary, L1 - IS-IS level-1, L2 - IS-IS level-2
ia - IS-IS inter area, * - candidate default, U - per-user static
route
o - ODR, P - periodic downloaded static route
Gateway of last resort is not set
C
C
C
C
172.16.0.0/24 is subnetted, 4 subnets
172.16.20.0 is directly connected, Vlan20
172.16.30.0 is directly connected, Vlan30
172.16.1.0 is directly connected, Vlan1
172.16.10.0 is directly connected, Vlan10
All contents are Copyright © 1992–2010 Cisco Systems, Inc. All rights reserved. This document is Cisco Public Information.
Page 7 of 10
CCNPv6 SWITCH
Step 7: Configure access ports to trust IP phone CoS.
The access layer switches will be the QoS trust boundaries for the network. Data coming in on the switch
ports will either have the CoS trusted or altered based on the information received on the ports.
Configure Fast Ethernet access ports 15 to 24 to trust the CoS for recognized IP phones on the network. The
CoS of a Cisco IP phone is 5 by default. Any port that has a device other than a Cisco phone will not trust the
CoS that is advertised. This configuration is accomplished by using the Cisco auto QoS features offered on
these switches. Using a single command at the interface level, you can implement both trust boundaries and
QoS features. Information obtained through CDP is used to determine when an IP phone is attached to the
access port.
The following configuration also sets the voice VLAN on the interface with the switchport voice vlan vlannumber command.
Configure Fast Ethernet ports 15 through 24 on ALS1 and ALS2 using the interface range command.
ALS1(config)# interface range fastEthernet 0/15 - 24
ALS1(config-if-range)# switchport mode access
ALS1(config-if-range)# switchport access vlan 10
ALS1(config-if-range)# switchport voice vlan 20
ALS1(config-if-range)# auto qos voip cisco-phone
ALS2(config)# interface range fastEthernet 0/15 - 24
ALS2(config-if-range)# switchport mode access
ALS2(config-if-range)# switchport access vlan 10
ALS2(config-if-range)# switchport voice vlan 20
ALS2(config-if-range)# auto qos voip cisco-phone
Note: Configuring auto QoS on an interface automatically adds global mls qos srr-queue, class-map and
policy-map commands to the running configuration. A number of interface-specific command are also added,
including spanning-tree portfast.
Step 8: Verify the access layer auto QoS configuration.
Verify the auto QoS configuration at the access layer using the show mls qos interface interface-type
interface-number and show run commands.
ALS1# show mls qos interface fastEthernet 0/15
FastEthernet0/15
Attached policy-map for Ingress: AutoQoS-Police-CiscoPhone
trust state: not trusted
trust mode: trust cos
trust enabled flag: dis
COS override: dis
default COS: 0
DSCP Mutation Map: Default DSCP Mutation Map
Trust device: cisco-phone
qos mode: port-based
ALS1# show run interface fastEthernet 0/15
interface FastEthernet0/15
switchport access vlan 10
switchport voice vlan 20
srr-queue bandwidth share 10 10 60 20
priority-queue out
mls qos trust device cisco-phone
mls qos trust cos
All contents are Copyright © 1992–2010 Cisco Systems, Inc. All rights reserved. This document is Cisco Public Information.
Page 8 of 10
CCNPv6 SWITCH
auto qos voip cisco-phone
spanning-tree portfast
service-policy input AutoQoS-Police-CiscoPhone
What is the default CoS for a PC connected to these interfaces?
Step 9: Configure the distribution layer switches to trust access layer CoS.
Configure the distribution layer switches to trust the CoS information in the Layer 2 frames being sent from
the access layer. Because the trust boundary is at the access layer, frames being sent from this layer should
be trusted into the distribution layer for optimal QoS.
DLS1(config)# mls qos
DLS1(config)# interface range fastEthernet 0/7 - 12
DLS1(config-if-range)# auto qos voip trust
DLS2(config)# mls qos
DLS2(config)# interface range fastEthernet 0/7 - 12
DLS2(config-if-range)# auto qos voip trust
Step 10: Verify the distribution layer auto QoS configuration.
a. Verify auto QoS at the distribution layer on DLS1 and DLS2 using the show auto qos interface
command.
DLS1# show auto qos interface
FastEthernet0/7
auto qos voip trust
FastEthernet0/8
auto qos voip trust
FastEthernet0/9
auto qos voip trust
FastEthernet0/10
auto qos voip trust
FastEthernet0/11
auto qos voip trust
FastEthernet0/12
auto qos voip trust
b. Use the show mls qos interface fastEthernet interface ID command on DLS1 to verify QoS on the trunk
interfaces.
DLS1# show mls qos interface fastEthernet 0/7
FastEthernet0/7
trust state: trust cos
trust mode: trust cos
trust enabled flag: ena
COS override: dis
default COS: 0
All contents are Copyright © 1992–2010 Cisco Systems, Inc. All rights reserved. This document is Cisco Public Information.
Page 9 of 10
CCNPv6 SWITCH
DSCP Mutation Map: Default DSCP Mutation Map
Trust device: none
qos mode: port-based
Step 11: Manually assign access layer CoS for the camera.
A camera needs to be moved from its current location in the network and connected to FastEthernet0/5 of
ALS2.
Video traffic must have priority treatment within the network, because it has different requirements than data
or voice traffic. The priority of the video traffic will be configured to be lower than the priority of the voice
traffic.
a. Because the camera is not capable of setting its own CoS, assign a CoS of 3 to ensure that the video
traffic is identified by other switches and routers within the network.
ALS2(config)# interface fastEthernet 0/5
ALS2(config-if)# switchport mode access
ALS2(config-if)# switchport access vlan 30
ALS2(config-if)# mls qos trust cos
ALS2(config-if)# mls qos cos 3
b. Verify the configuration using the show mls qos interface command on ALS2.
ALS2# show mls qos interface fastEthernet 0/5
FastEthernet0/5
trust state: trust cos
trust mode: trust cos
trust enabled flag: ena
COS override: dis
default COS: 3
DSCP Mutation Map: Default DSCP Mutation Map
Trust device: none
qos mode: port-based
All contents are Copyright © 1992–2010 Cisco Systems, Inc. All rights reserved. This document is Cisco Public Information.
Page 10 of 10

