free
Supplies:
· 5- 14" x18" InnerFuse Sheets - HeavyWeight (or 2½ yards from bolt)
· 1 ½ yds - Orange fabric (pumpkin body and lid)
· 2 yds - Black fabric (pumpkin lining, lid lining, and face)
· 1 Fat Quarter - Green fabric (leaves)
· 1 pkg - Dritz ® Ball Point Machine Needle - Size 14/90 (# 58-90)
· 1 DritzAwl with Protective Sheath (# 624)
· Sewing Machine - with zigzag stitch
· 1 each - Orange, Black, and Green thread
· 1 each - Orange, Black, and Green permanent marking pen
· Hot Glue Gun and Glue Sticks
· Green Heavy Gauge CraftWire
· Scissors
· Pinking Shears
· Raffia ( optional)
Determining the Jack-O-Lantern Size
The formula for creating the 36" x 18" pumpkin is very easy. Four template panels
zigzagged together will create the rounded shape. To create a different size, use the
formula below to draw the templates needed. (Our measurements are in
parenthesis).
Jack-O-Lantern circumference ___(36). Divide circumference by 2___(18)(pumpkin template length- figure A, below). Divide circumference by 4___ (9)
(pumpkin template width-figure B, below)
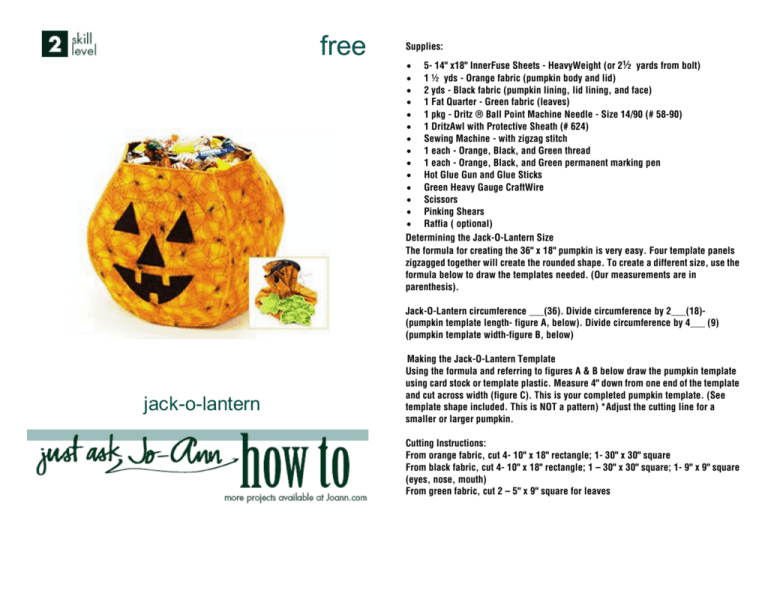
jack-o-lantern
Making the Jack-O-Lantern Template
Using the formula and referring to figures A & B below draw the pumpkin template
using card stock or template plastic. Measure 4" down from one end of the template
and cut across width (figure C). This is your completed pumpkin template. (See
template shape included. This is NOT a pattern) *Adjust the cutting line for a
smaller or larger pumpkin.
Cutting Instructions:
From orange fabric, cut 4- 10" x 18" rectangle; 1- 30" x 30" square
From black fabric, cut 4- 10" x 18" rectangle; 1 – 30" x 30" square; 1- 9" x 9" square
(eyes, nose, mouth)
From green fabric, cut 2 – 5" x 9" square for leaves
Directions:
1. Using pumpkin template, trace and cut 4 shapes from InnerFuse.
2. Draw or trace Jack-O-Lantern eyes, nose and mouth, then cut shapes from
InnerFuse.
3. Using pattern, trace and cut leaves from InnerFuse.
4. Cut 7” square of Innerfuse.
5. Referring to package directions, fuse orange fabric to one side of each
pumpkin template shapes. Trim excess fabric around edges.
6. Turn orange templates over and fuse black fabric. Again, trim excess fabric.
7. Fuse green fabric to leaf shapes, trim, turn, and repeat on opposite side again
using green fabric.
8. Fuse black fabric to only one side of InnerFuse eyes, mouth and nose. Trim
each shape.
* Because these pieces are small, it is easier to fuse fabric then cut out
shapes.
9. Using any left over fabric, fuse a 7” square to InnerFuse. This is the lid base
and any fused fabric will not show on finished project.
* Tip- Use a coordinating color permanent marker and mark the edges of the
templates to hide the white of the InnerFuse after it is satin-stitched.
10. Set sewing machine for a wide zigzag with a short length. This will be a satin
stitch set-up. Insert a new size 90/14 ball point needle for best results. Test by
sewing on a sample of InnerFuse covered with scrap fabric. Make any
machine adjustments and record settings for future projects.
11. Butt the edges of one pumpkin piece against another making sure they are
aligned evenly with orange fabric facing up. You can use tape to temporarily
secure them if necessary. Starting at the straight end of each template, satin
stitch together, ending at tapered end. Continue stitching each pumpkin
section joining the first to the last to complete. Because of the shape created
by stitching the tapered pieces, the pumpkin is wrong side out when
completed.
12. Turn to right side. Gently shape the pumpkin and flatten the bottom to create a
Jack-O-Lantern.
13. Satin stitch around eyes, nose, and mouth pieces to finish raw edges. Hot glue
each piece to the pumpkin to create a face.
14. Satin stitch around InnerFuse leaves. Use a narrow satin stitch to create veins
in each leaf.
Courtesy of Prym
Consumer/Dritz
Designed by Mark Lipinski
Jack-O-Lantern Lid
1. Trim each of the 30” x 30” pieces of black and orange fabrics with
pinking shears for a decorative edge.
2. Align fabric with wrong sides together and black fabric facing up.
Center the 7” square InnerFuse piece and enclose square by
gathering fabric into center. Work with fabric until it is evenly
gathered and bottom of square is smooth.
3. Wrap wire around gathered fabric as close to base as possible.
Wrap wire several times to secure. Trim wire, leaving a 12” tail.
4. Using awl, make a small hole in the bottom of each leaf as indicated
on the pattern. Thread leaves through wire tail and place where
desired. Wrap the wire tails around the permanent marker to create
a decorative coil. Stretch coil to create pumpkin vine.
5. Trim top of gathered fabric to create the look of a stem and also to
create a handle for the lid. Add a raffia bow around base of stem for
a completed project.
Skill Level: Some Experience Required
Approximate Crafting Time: 2 hours
Due to seasonal nature of project, supplies are available for a limited time only. Please read all
instructions prior to beginning; read and follow all manufacturers’ instructions for all tools and materials
used. Provide adult supervision if children participate in this and all craft projects. Because Jo-Ann
Stores, Inc. has no control over the use of materials and tools, nor surroundings, during construction of
projects, Jo-Ann Stores, Inc. disclaims any liability for injury, damage or other untoward results.
Content of this project sheet is presented in good faith, but no warranty is given, nor results guaranteed.
©Jo-Ann Stores, Inc. All rights reserved.


