Teacher Notes - Water Quality Testing
Teacher Notes - Water Quality Testing
Temperature
The temperature should be taken in the same area where the other water quality tests are performed. The temperature can be taken in two different ways: Take a water sample by placing a container approximately 10 inches in depth in the water and fill to approximately 2-3 inches from the top. Place the thermometer in the sample and place in a area where it will not be disturbed. Wait approximately 2 minutes and read the temperature off the thermometer. Place the thermometer in the water approximately 4 inches below the surface. Wait approximately 2 minutes for the temperature to stabilize. Remove the thermometer from the water and immediately read the temperature off the thermometer.
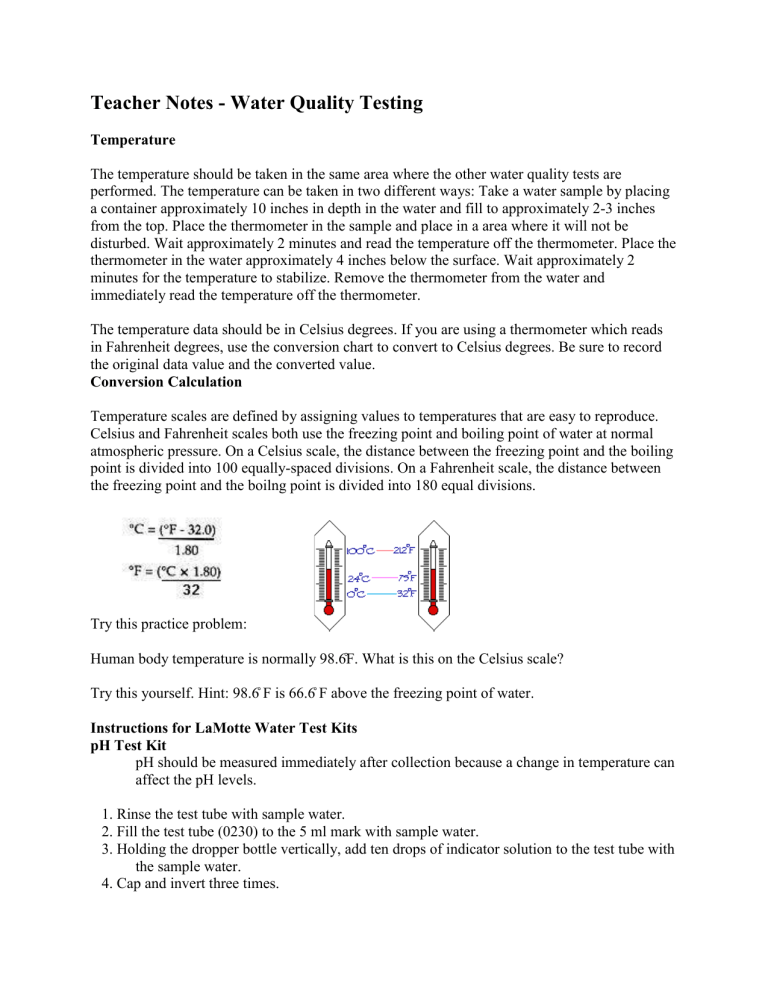
The temperature data should be in Celsius degrees. If you are using a thermometer which reads in Fahrenheit degrees, use the conversion chart to convert to Celsius degrees. Be sure to record the original data value and the converted value.
Conversion Calculation
Temperature scales are defined by assigning values to temperatures that are easy to reproduce.
Celsius and Fahrenheit scales both use the freezing point and boiling point of water at normal atmospheric pressure. On a Celsius scale, the distance between the freezing point and the boiling point is divided into 100 equally-spaced divisions. On a Fahrenheit scale, the distance between the freezing point and the boilng point is divided into 180 equal divisions.
Try this practice problem:
Human body temperature is normally 98.6̊F. What is this on the Celsius scale?
Try this yourself. Hint: 98.6̊ F is 66.6̊ F above the freezing point of water.
Instructions for LaMotte Water Test Kits pH Test Kit pH should be measured immediately after collection because a change in temperature can affect the pH levels.
1. Rinse the test tube with sample water.
2. Fill the test tube (0230) to the 5 ml mark with sample water.
3. Holding the dropper bottle vertically, add ten drops of indicator solution to the test tube with the sample water.
4. Cap and invert three times.
5. Place test tube into Octet Comparator. Match sample color to a color standard. Record pH number off of the Octet Comparator.
NOTE: If more than one pH reading is taken, report the most common value, the mode, rather than the average.
Normal values for most freshwater systems are 6.5-8.5.
Dissolved Oxygen Test Kit
Goggles and gloves should be worn while performing the dissolved oxygen tests.
Sampling Method
1. Rinse the sampling bottle (0688-DO) with the sample to be tested.
2. Replace the top on the empty sampling bottle and submerge it in water sample to be tested.
3. After submerging the sampling bottle, remove the top under the water and fill the bottle while tapping the sides to release the air bubbles.
4. Replace top while the bottle is submerged.
5. Remove the full, capped bottle from the water and remove the top.
Preserving (fixing) Sample for Testing
1. Add 8 drops of Manganous Sulfate Solution (4167) to the bottle of sample water.
2. Add 8 drops of Alkaline Potassium Iodide Azide (7166) to the bottle of sample water. Put the top on the bottle and invert 2 or 3 times. A precipitate will form and should be allowed to settle below the shoulder of the bottle before continuing with the next step.
3. Use the 1.0 gram measuring spoon (0697) provided with the kit to add 1 gram of Sulfamic
Acid Powder (6286).
4. Put the top on the bottle and invert to mix until the precipitate is dissolved. A clear yellow to orange brown color will develop depending on the oxygen content of the sample.
5. The sample is now "fixed" and ready to be tested.
NOTE: Once the sample is fixed, contact between the sample and the atmosphere will not affect test results.
Testing the Water Sample
If the color of the fixed sample is already a faint yellow, skip steps #3 and #4 and continue with the second part of step #5 which is the addition of Starch Indicator Solution.
1. Fill the titration tube (0299) to the 20 ml mark with the fixed sample.
2. Fill the Direct Reading titrator (0377) with Sodium Thiosulfate (4169).
3. Place the titrator in the top of the titration tube and add one drop of the Sodium Thiosulfate and swirl.
4. Continue to add Sodium Thiosulfate dropwise until the sample is a faint yellow.
5. Remove the top of the titration tube and the titrator. Add 8 drops of Starch Indicator Solution
(4170WT). This will cause the sample to turn blue.
6. Replace the top of the titration tube and the titrator. Continue to add Sodium Thiosulfate drop wise until the blue color disappears.
7. Read the titrator scale in parts per million (ppm).
NOTE: If the titrator is empty (10 ppm) and a color change has not been observed, refill the titrator with Sodium Thiosulfate and continue the titration until the color change occurs.
If more than one dissolved oxygen reading is taken, take average of all the readings and record that number.
Most natural water systems require 5-6 parts per million of dissolved oxygen to support adiverse population.
Nitrate & Phosphate Test Kit
Nitrate
1. Fill the test tube (0844) to the 2.5 ml mark with the water sample.
2. Add Mixed Acid Reagent (V-6278) to the water sample to the 5 ml mark.
3. Cap and invert three times. Wait 2 minutes.
4. Using the 1.0 gram measuring spoon (0699) provided with the test kit, add one level spoon of Nitrate Reducing Reagent (V-6279). Cap and invert 30-40 times in a one minute period. Wait 10 minutes.
5. Mix after the 10 minute waiting period and remove the cap.
6. Insert the tube into the Nitrate-N and Phosphate Comparator (3120) with the Axial Reader
(2071).
7. Match the sample color to a color standard.
8. Read the number off the Nitrate-N and Phosphate Comparator and record as Nitrate-
Nitrogen in parts per million (ppm).
9. To convert to Nitrate, multiple by 4.4.
NOTE:Reading off Nitrate-N and Phosphate Comparator x 4.4 = mg/L or ppm Nitrate.
If more than one nitrate reading is taken, take the average of all the readings and record that number.
This test will measure a range of Nitrate-Nitrogen from 0.2-1.0 ppm.
Phosphate
NOTE: This test should be run on clear samples only. Filter sample if necessary.
1. Fill the test tube (0844) to the 10 ml mark with sample water.
2. Use the 1.0 ml pipet (0354) provided with the water test kit to add 1.0 ml to Phosphate Acid
Reagent (V-6282).
3. Cap the test tube and invert three times.
4. Use the 0.1 gram spoon (0699) to add one level measure of Phosphate Reducing Reagent
(V-6283). Cap and invert until the reagent is dissolved. Wait 5 minutes.
5. Remove the cap. Place the test tube in the Nitrate-N and Phosphate Comparator (3120) with the Axial Reader (2071).
6. Match the sample color to the color standard.
7. Record the result as ppm Total Phosphate.
NOTE:If more than one phosphate reading is taken, take the average of all the readings and record that number.
Total phosphate levels of non-polluted waters are usually less than 0.1mg/L or ppm.
NOTE: All the waste generated by the LaMotte test procedures may be poured down the drain with the water running to dilute it. The only time the waste may not be disposed of in this manner is if the waste generated is from 30 or more tests for a single parameter.
For example, if 30 students all use the LaMotte test kit to test the dissolved oxygen levels of a sample, the waste cannot be poured down the drain. A waste management facility should be contacted to determine the correct method of disposal.
But if 10 students test for pH, 10 students test for nitrates and 10 students test for dissolved oxygen, the waste generated by this group can be disposed of down the drain with the water running to dilute it.
If the tests are done in the field, carry a waste container with a lid along with the kits. Pour all the waste into the container and save it for appropriate disposal at a later time.
Teacher Notes, Lesson Extensions and Alternative Assessment Ideas
Lesson 1 -Does a change in temperature effect the growth and survival rate of aquatic plants?
1. Duckweed or elodea (anacharis) may be purchased from a pet supply store which specializes in aquariums or outdoor ponds.
Lesson 2 -How is the metabolic rate of clams effected by a change in temperature?
1. To make saltwater, add 35 grams of 1 Liter of aged tap water. Stir thoroughly and cap to store.
2. Clams may be purchased from a biological supply company or a local seafood market.
Make sure the shells are not open when they are purchased. Store in the refrigerator until a few minutes before using.
3. Make sure the students wash their hands thoroughly with antibacterial soap after handling the clams.
4. Background Information-Thermal Pollution For many years water has been used as a coolant in industry, especially in power stations. It was never thought of as a problem, as nothing was actually added to the water. However, higher temperatures can cause enzymes and microbes to speed up, and can eventually kill them. Changes in temperature cause fish to migrate to regions where the water is at the best temperature for them, and can kill any species which cannot move away.
Recently people have realized that only small changes in temperature are needed to have considerable environmental impact.
5. If degrees Fahrenheit thermometers are used, have the students use the following conversion chart to convert to degrees Celsius.
Lesson 3 -What is the Optimal Temperature for the Hatching and Development of Brine Shrimp
Eggs?
1. Brine shrimp eggs may be purchase from a scientific supply company or at a local pet supply store.
2. Brine shrimp culture should be made 24 hours in advance and can be kept indefinitely, if fresh salt water is added on a continual basis.
3. The common brine shrimp (artemia) are closely related to zooplankton such as
Daphnia and are often used as live food for aquariums. The artemia life cycle begins by the hatching of dormant cysts which are encased embryos that are metabolically inactive. The cysts can remain dormant for many years as long as they are kept dry. When the cysts are placed in salt water, they are rehydrated and resume their development. After 15 or 20 hours at 25 degrees C (77 degrees F), the cysts burst and the embryo leaves the shell. For the first few hours, the embryo hangs beneath the cyst shell, still enclosed in the hatching membrane. The embryo will grow and progress through 15 molts before reaching adulthood in approximately 8 days. Adult artemia average about 8mm long, but can reach lengths of 20 mm under ideal conditions.
Other variables of importance are pH, light and oxygen. A pH of 7.5-8.5 is optimal, and can be lowered with muriatic acid (any type of acid may be used) or increased with baking soda. A minimum amount of light is necessary for hatching and is beneficial for increased adult growth.
Two liter soda bottles with the tops cut off and filled with tap water make great hatching containers. To the bottle filled with water add 10 to 20 grams of salt without iodine and a pinch of sodium bicarbonate (baking soda). Test the pH to make sure in stays in a range of 7.5-8.5.
Aeration is necessary and can be accomplished by a small air pump with a length of tubing long enough to reach the bottom of the bottle. Aeration should be light, as the eggs will not hatch if aeration is too brisk.
Feeding the brine shrimp is necessary if the culture is to be used for several days. A solution of baker's yeast and fish tank water to form a milky solution is an ideal food for the growing brine shrimp. The brine shrimp culture only needs a few drops of the yeast solution as they are
not big eaters and overfeeding can foul the culture. The yeast solution can be placed in a dropper bottle and stored in the refrigerator.
Lesson Extensions
1. Allow the students to dissect the clams and identify the parts of the digestive system after finishing Lesson 2.
2. Use other filter feeders such as oysters or mussels and compare their metabolic rates to those of the clam.
Alternative Assessment Ideas
1. Have students assess the quality of several different water samples and determine how the numbers of plants and organisms will vary from sample to sample based on the temperature.
2. Set up several different aquatic ecosystems at different temperatures. Have the students keep a daily journal of the changes which take place over a period of time. http://www.ncsu.edu/sciencejunction/depot/experiments/water/lessons/temp/tempteachernotes.ht
m

