Magnetic Field of a Solenoid
advertisement
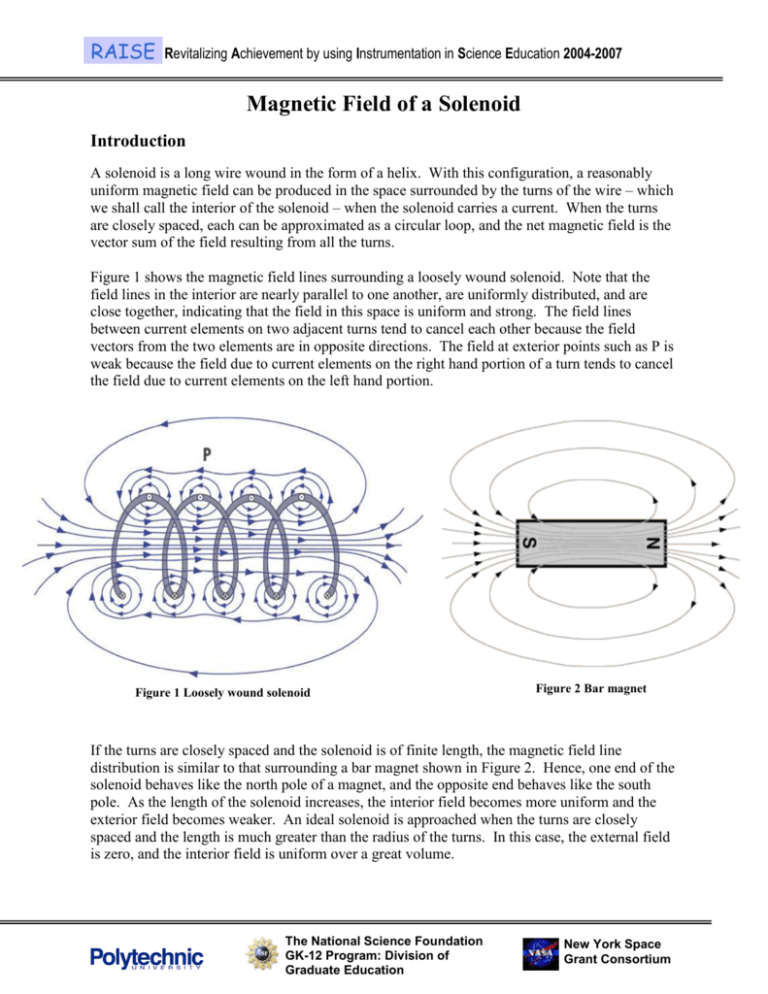
RAISE Revitalizing Achievement by using Instrumentation in Science Education 2004-2007 Magnetic Field of a Solenoid Introduction A solenoid is a long wire wound in the form of a helix. With this configuration, a reasonably uniform magnetic field can be produced in the space surrounded by the turns of the wire – which we shall call the interior of the solenoid – when the solenoid carries a current. When the turns are closely spaced, each can be approximated as a circular loop, and the net magnetic field is the vector sum of the field resulting from all the turns. Figure 1 shows the magnetic field lines surrounding a loosely wound solenoid. Note that the field lines in the interior are nearly parallel to one another, are uniformly distributed, and are close together, indicating that the field in this space is uniform and strong. The field lines between current elements on two adjacent turns tend to cancel each other because the field vectors from the two elements are in opposite directions. The field at exterior points such as P is weak because the field due to current elements on the right hand portion of a turn tends to cancel the field due to current elements on the left hand portion. Figure 1 Loosely wound solenoid Figure 2 Bar magnet If the turns are closely spaced and the solenoid is of finite length, the magnetic field line distribution is similar to that surrounding a bar magnet shown in Figure 2. Hence, one end of the solenoid behaves like the north pole of a magnet, and the opposite end behaves like the south pole. As the length of the solenoid increases, the interior field becomes more uniform and the exterior field becomes weaker. An ideal solenoid is approached when the turns are closely spaced and the length is much greater than the radius of the turns. In this case, the external field is zero, and the interior field is uniform over a great volume. The National Science Foundation GK-12 Program: Division of Graduate Education New York Space Grant Consortium RAISE Revitalizing Achievement by using Instrumentation in Science Education 2004-2007 The magnetic field, B, within the solenoid can be determined from the relationship B nI (1) where k 0 , n is the turns per unit length, and I is the current flowing through the solenoid. k is the relative permeability and is a real number. 0 is the permeability of free space and is T m 0 4 10 7 . A In this lab, you will examine how the magnetic field is related to both the number of turns in a solenoid and the current through it. A complication that must be considered is that the sensor will also detect the Earth’s field and any local fields due to electric currents or some metals in the vicinity of the sensor. Objective Verify the relationship between magnetic field and the number of turns in a solenoid. Verify the relationship between magnetic field and the current in a solenoid. Magnetic Field Sensor Power Supply LabPro Figure 3 Experiment setup Materials Windows PC LabPro Interface, Logger Pro Software Vernier Magnetic Field Sensor Alligator clips Graphical Analysis or graph paper Hollow cylinder long spool of insulated wire (at least 12 m) adjustable power supply Initial Setup 1. Connect the Vernier Magnetic Field Sensor to Channel 1 of the LabPro Interface. Set the switch on the sensor to High. 2. Loop the wire 20 times around a hollow cylinder forming a solenoid of 20 turns and fix the cylinder to the ring stand as shown in Figure 3. Use tape to secure the wire on the cylinder. 3. The ground alligator clip can be connected to the solenoid at all times. Connect the positive only when taking measurements. The National Science Foundation GK-12 Program: Division of Graduate Education New York Space Grant Consortium RAISE Revitalizing Achievement by using Instrumentation in Science Education 2004-2007 Preliminary Questions 1. Hold the plastic rod containing the Magnetic Field Sensor vertically. Click to begin data collection. Rotate the rod axially. Look at the graph. What do you observe? What is causing the variation of field reading? 2. Set the power supply so that the current will be 3A when attached to the solenoid. Attach the ground alligator clip to one end of the solenoid. Hold the sensor along one end of the solenoid. Click . Wait 2 to 3 seconds and then connect the positive alligator clip to the solenoid as shown in Figure 3. What did you observe? Warning: This lab requires fairly large currents to flow through the wires. Do not leave the solenoid connect to the power supply except when taking measurements. The wire and possibly the power supply may get hot if you leave current flowing continuously. 3. Repeat Step 2, but this time rotate the Magnetic Field Sensor while the power supply is connected to the solenoid. Determine the orientation of the sensor that gives the maximum reading. How much does the reading change in one rotation of the sensor? Procedure Part I: How Is The Magnetic Field In A Solenoid Related To The Current? For the first part of the experiment you will determine the relationship between the magnetic field produced by a solenoid and the current through it. Use a solenoid with 20 turns for all of Part I. As before, leave the current off except when making a measurement. 1. Set the power supply so that the current will be 3A when connect to the solenoid. 2. Hold the Magnetic Field Sensor in the orientation which gives maximum magnetic field intensity. Keep the sensor in the same position for the remainder of the experiment. 3. We will first zero the sensor when no current is flowing; that is, we will remove the effect of the Earth’s magnetic field and any local magnetism. With the power supply disconnected, click . 4. Click to begin data collection. Wait a few seconds and then connect positive alligator clip to the solenoid. 5. View the field vs. time graph and determine when the current was flowing in the wire. Select this region on the graph, by dragging over it. Determine the average field while the current was on by clicking on the Statistics button, . Record the average field and the current through the solenoid in the data table. 6. Disconnect the power supply and decrease the current by 0.5A and repeat Steps 4 and 5. 7. Repeat Step 6 down to a minimum of 0.5 A. Part II: How Is The Magnetic Field In A Solenoid Related To The Number Of Turns? For the second part of the experiment you will determine the relationship between the magnetic field produced by a solenoid and the number of turns in the solenoid. The Magnetic Field Sensor should be oriented as before. Use a current of 3.0 A for all of part II. Leave the current off except when making a measurement. 1. We will first zero the sensor when no current is flowing. That is, we will remove the effect of the Earth’s magnetic field and local magnetism. With the switch open, click on . The National Science Foundation GK-12 Program: Division of Graduate Education New York Space Grant Consortium RAISE Revitalizing Achievement by using Instrumentation in Science Education 2004-2007 2. Set the power supply so that the current will be 3A when the switch is closed. Click After a few seconds, connect the positive alligator clip to the solenoid. . 3. View the field vs. time graph and determine where the current was flowing in the wire. Select this region of the graph by dragging over it with the mouse cursor. Determine the average field while the current was on by clicking on the Statistics button, . Record the average field and the number of turns on the solenoid (20) in the data table. 4. Remove one loop of wire from the frame to reduce the number of turns by one and repeat Steps 2-3. 5. Repeat Step 4 until you have eleven turn of wire on the frame. Keep the current at 3.0 A. Data Table Part I Current in solenoid (A) Magnetic field (mT) 3.0 2.5 2.0 1.5 1.0 0.5 Part II Number of turns Magnetic field (mT) Number of turns 20 15 19 14 18 13 17 12 16 11 Magnetic field (mT) Analysis 1. Plot a graph of magnetic field vs. current through the solenoid. Use either Graphical Analysis or graph paper. 2. Plot a graph of magnetic field vs. the number of turns on the solenoid. Use Graphical Analysis or graph paper. 3. How is magnetic field related to the number of turns? How is it related to current through the wire? The National Science Foundation GK-12 Program: Division of Graduate Education New York Space Grant Consortium
