Ride Green Capri Quick Start Guide
advertisement
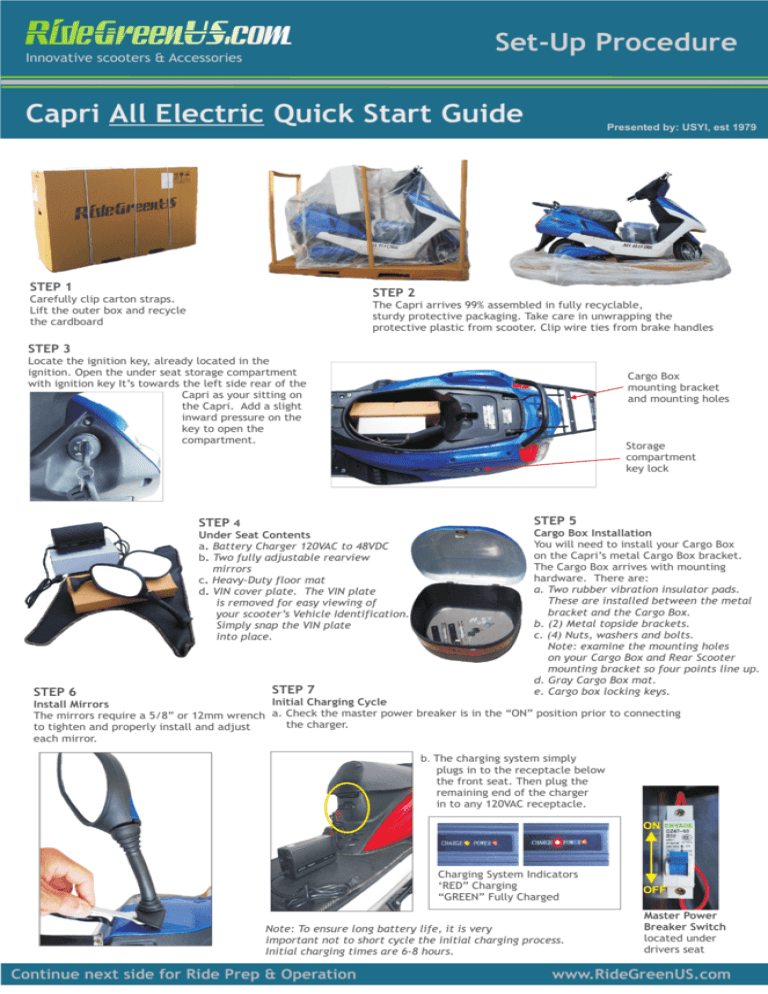
RideGreenUS.com Set-Up Procedure Innovative scooters & Accessories Capri All Electric Quick Start Guide STEP 1 Presented by: USYI, est 1979 STEP 2 Carefully clip carton straps. Lift the outer box and recycle the cardboard The Capri arrives 99% assembled in fully recyclable, sturdy protective packaging. Take care in unwrapping the protective plastic from scooter. Clip wire ties from brake handles STEP 3 Locate the ignition key, already located in the ignition. Open the under seat storage compartment with ignition key It’s towards the left side rear of the Capri as your sitting on the Capri. Add a slight inward pressure on the key to open the compartment. STEP 6 Cargo Box mounting bracket and mounting holes Storage compartment key lock STEP 4 STEP 5 Under Seat Contents a. Battery Charger 120VAC to 48VDC b. Two fully adjustable rearview mirrors c. Heavy-Duty floor mat d. VIN cover plate. The VIN plate is removed for easy viewing of your scooter’s Vehicle Identification. Simply snap the VIN plate into place. Cargo Box Installation You will need to install your Cargo Box on the Capri’s metal Cargo Box bracket. The Cargo Box arrives with mounting hardware. There are: a. Two rubber vibration insulator pads. These are installed between the metal bracket and the Cargo Box. b. (2) Metal topside brackets. c. (4) Nuts, washers and bolts. Note: examine the mounting holes on your Cargo Box and Rear Scooter mounting bracket so four points line up. d. Gray Cargo Box mat. e. Cargo box locking keys. STEP 7 Initial Charging Cycle Install Mirrors The mirrors require a 5/8” or 12mm wrench a. Check the master power breaker is in the “ON” position prior to connecting the charger. to tighten and properly install and adjust each mirror. b. The charging system simply plugs in to the receptacle below the front seat. Then plug the remaining end of the charger in to any 120VAC receptacle. ON Charging System Indicators ‘RED” Charging “GREEN” Fully Charged Note: To ensure long battery life, it is very important not to short cycle the initial charging process. Initial charging times are 6-8 hours. Continue next side for Ride Prep & Operation OFF Master Power Breaker Switch located under drivers seat www.RideGreenUS.com Front Brake STEP 8 RideGreenUS.com Rear Brake Brake Check Prior to Riding a. Check FRONT and REAR brakes. Squeeze each brake lever. There should be about 1.5” to 2” of travel before you experience firm resistance. b. To adjust the brakes simple use a 9/16” or 15mm open end wrench. As you face of the brake cable clockwise tightens, the reverse loosens. Innovative scooters & Accessories Capri All Electric Quick Start Guide Ride-Prep & Operation Presented by: USYI, est 1979 Brake Adjustment Nut Clockwise to Tighten Note: The Right Side brake grip operates the front brake. The Left Side brake grip operates the rear brakes. Always use both brakes when stopping. It is good driving practice to lightly flash your brakes when making a turn. This practice in addition to using the scooters turn singles makes one more visible to traffic. STEP 9 Step 11 Ignition Switch a. OFF, always turn the ignition key in the OFF position when the Capri is parked. Your battery will continue to discharge as long as the key in set to the ON position. b. To ride set key to ON. Control Switches Right Side Switch Full Left All Lights & Dash ON Switch Center Dash Lights Only Switch Full Right Lights Off Right side Horn Step 10 Dash Panel Lights ON Indicator BLUE Step 12 Battery Power Level Control Switches Left Side Power “KEY ON” Indicator RED Headlights Hi-Low Beam Left Side Horn WARNING Left-Right Turn Signals GREEN Flashing Step 12a Let’s go! The Capri uses a DC drive system to accelerate and to assist in braking. At first, gently twist the throttle towards you. Acceleration increases the further back you twist. www.RideGreenUS.com Turn Signals Left-Right This switch locks as you set the signal left or right. Gently push the switch inward to turn off the signal. Finally... Accelerate by twisting toward you Quick Start Guide Review We highly recommend reading the entire Capri Scooter Manual for complete safety operation and required warranty service intervals. This Quick Start Guide is only a brief overview. ! THIS IS A QUICK START GUIDE PLEASE READ THE ENTIRE OPERATORS MANUAL. SEVERE INJURY OR DEATH can result if supplied manuals and instructions are not followed. Maximum loading weight 245lbs. ALWAYS wear a Department (DOT) USYI Inc. Technical Support of Transportation Approved 217B Seneca Way helmet when operating the scooter. Havre de Grace, MD 21078 717.395.3250 info@RideGreenUS.com USYI Inc. Corporate Headquarters 1220 US Hwy. 1, Suite F North Palm Beach, FL 33408 561.656.0720 info@RideGreenUS.com


