a microcontroller based auto tracking robot
advertisement

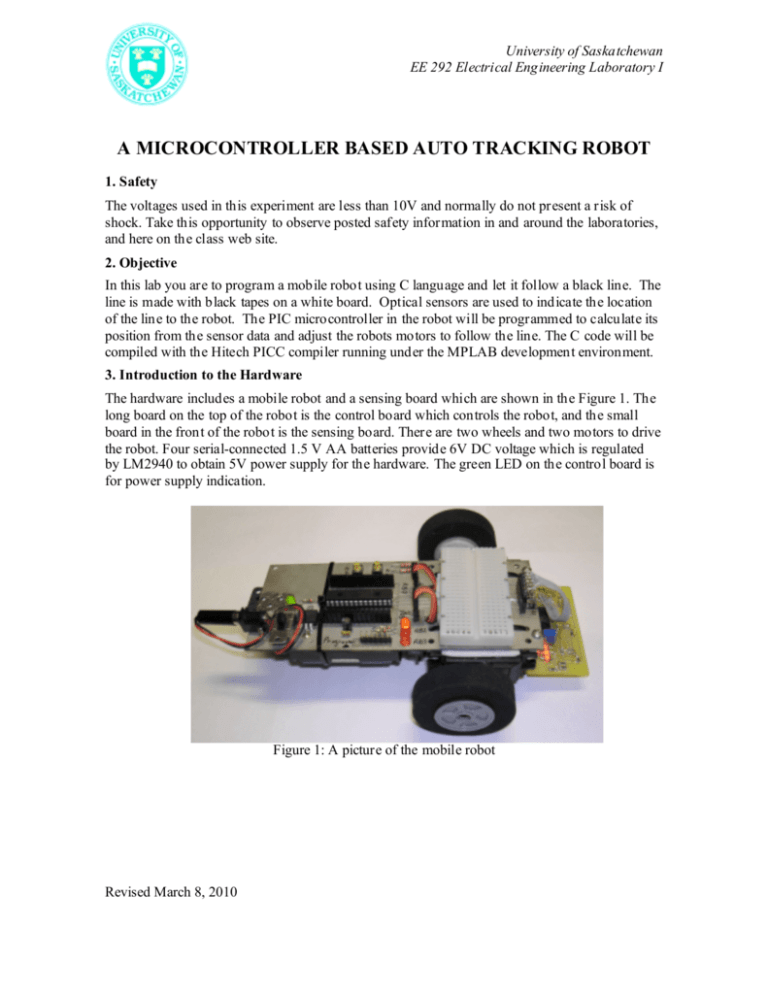
University of Saskatchewan EE 292 Electrical Engineering Laboratory I A MICROCONTROLLER BASED AUTO TRACKING ROBOT 1. Safety The voltages used in this experiment are less than 10V and normally do not present a risk of shock. Take this opportunity to observe posted safety information in and around the laboratories, and here on the class web site. 2. Objective In this lab you are to program a mobile robot using C language and let it follow a black line. The line is made with black tapes on a white board. Optical sensors are used to indicate the location of the line to the robot. The PIC microcontroller in the robot will be programmed to calculate its position from the sensor data and adjust the robots motors to follow the line. The C code will be compiled with the Hitech PICC compiler running under the MPLAB development environment. 3. Introduction to the Hardware The hardware includes a mobile robot and a sensing board which are shown in the Figure 1. The long board on the top of the robot is the control board which controls the robot, and the small board in the front of the robot is the sensing board. There are two wheels and two motors to drive the robot. Four serial-connected 1.5 V AA batteries provide 6V DC voltage which is regulated by LM2940 to obtain 5V power supply for the hardware. The green LED on the control board is for power supply indication. Figure 1: A picture of the mobile robot Revised March 8, 2010 University of Saskatchewan EE 292 Electrical Engineering Laboratory I (1) Robot The mobile robot includes the control board, batteries, two motors and wheels. The schematic of the robot is shown in Figure 2. The “heart” of the control board is a PIC16F886 microcontroller. Data sheets and information on this chip can be found at www.microchip.com . This chip contains a wide variety of useful peripherals on board such as: analog-to-digital converters (convert analog signals to digital signals), pulse-width-modulation (generate modulated voltage pulses whose width and period can be controlled), comparators, UART (for serial communications), etc. PORTA (RA0-RA7) and PORTB (RB0-RB7) of the microcontroller are 8-bit wide, bidirectional ports. The corresponding data direction registers are TRISA and TRISB. Setting a TRISA bit (=1) will make the corresponding PORTA pin an input (i.e., disable the output driver). Clearing a TRISA bit (= 0) will make the corresponding PORTA pin an output. It is the same for TRISB. HU UH For the robot in our lab, PORTA of the microcontroller are all configured as input and digital pins. RA0, RA1 and RA2 are connected to the sensor board to receive the data from infrared sensors which is further described in the sensor board section. RA4 and RA5 are connected to two push buttons on the control board. PORTB are all configured as output pins to control the motors and LEDs. RB0 and RB1 are used to send the pulse signals to control the left and right motors. RB2 and RB3 are connected to two LEDs to display useful information. RB7 is connected to the program connector to program the microcontroller. The robot has 2 variable speed drive motors. These motors are controlled by two signals RB0 and RB1 from the microcontroller. The control signals are positive pulses of 1-2ms every 20ms. If you need forward full speed, then send a 2ms pulse every 20ms. If you need stop the motor, then send a 1.5ms pulse every 20ms. If you need a reverse full speed, then send a 1ms pulse every 20ms. The pulse width can be set at any value between 1-2ms to achieve various speeds for forward or reverse directions. The speed of the wheels can be calibrated by two pots under the control board of the robot which are close the motors. More detailed information is given in the next section. (2) Sensor Board The schematic for the sensor board is shown in Figure 3. The line sensing consists of 3 reflective sensors. The reflective sensor is essentially an infrared LED and a phototransistor. When the phototransistor “sees” infrared light reflected, it will conduct. The phototransistor is connected to a comparator so that a digital signal can be generated. When the sensor is facing to a dark background (for example back strip) little light is reflected back to the phototransistor, then the red led will be off and corresponding digital output will be 1. When the sensor is facing to a white background the red led will be on and the corresponding digital output will be 0. Three sensors are connected to RA0 (left), RA1 (center), and RA2 (right), which are sent back to the microcontroller through a 6-wire cable. Turn the robot power on and experiment with the light sensors to verify their operation with a test card (piece of paper with a strip of black electrical tape stuck to it). 2 University of Saskatchewan EE 292 Electrical Engineering Laboratory I Figure 2: Schematic of the control board. Figure 3: Schematic for the sensor board 3 University of Saskatchewan EE 292 Electrical Engineering Laboratory I 4. Introduction to the Software The software to control the robot is written in C language. It will be developed in the MPLAB development environment which is provided by Microhip Technology Inc. The C code is compiled with a compiler from HI-TECH Software, called HI-TECH PICC C compiler. This compile is integrated into the MPLAB IDE (Integrated Development Environment) platform to ease the design process. Like any other embedded system developing procedure, you need to create a project, then develop the code for the project and compile it. After that you program the microcontroller using the developed program. The following is the brief tutorial about how to • Create a project, add files to the project, • Compile the files, • Program the robot with the compiled C program. (1) Create a project First create a new directory called robotLab in your H or C disk, download a C file called linefollower_lab.c from here or the lab webpage. Right click the link and save it to the directory you just created. Launch the MPLAB IDE software by clicking Start -> All Programs -> Microchip -> MPLAB IDE V8.10 -> MPLAB. This will start the MPLAB development environment. Create a project in MPLAB. Select the Project Wizard menu item from the Project pull-down menu as illustrated in the following Figure 4. HU UH Figure 4: Project Wizard In the dialog that opens, click Next to move to the chip selection dialog. Select a PIC16F886 device then click Next. The next dialog is where you get to specify the toolsuite associated with the project. Select HITECH Universal Toolsuite as the Active Toolsuite in this dialog, as shown in Figure 5. Notice that the Toolsuite Contents area shows the generic name HI-TECH ANSI C Compiler. Notice also the path shown in the Location area. This path is not important and you do not need to edit it to point to the compiler location. The Universal Toolsuite determines the location of the installed compilers via other means. Click Next. 4 University of Saskatchewan EE 292 Electrical Engineering Laboratory I Figure 5: Select HI-TECH Universal ToolSuite in creating project In the next dialog you can specify the name and location of the project you are creating. Click on Browse and change the directory to robotLab that you have created at the beginning. Type in a meaningful name such as linefollower for the project and Click Next. Lastly the Project Wizard is asking to see if you would like any existing files to be added to the project. We will add the downloaded file in the directory called linefollower_lab.c to the project. Select the file from the left panel and click on Add to add it to the project. The file should show in the right panel at this time. Then click Next and show the project summary. If everything looks okay in the summary click Finish and we are done for this part. (2) Compile the code To ensure that the file was correctly added, click the View menu, and select Project. This will open a window which shows an overview of the project. In this window you will see several folder icons. Under the Source Files icon you should see the name of the file listed next to a file icon. You can double-click the file to open and edit it. If you close the editor window containing our code, you can re-open it by double-clicking the file icon associated with the file in the Project window. Now let’s compile the downloaded code. Select Rebuild from the Project menu, or choose any of MPLAB IDE’s short cuts to build the project — you can, for instance, click on the toolbar button that shows the HI-TECH “ball and stick” logo. You will notice that the Project menu has two items: Build and Rebuild. The Build menu item action only processes those source files that have changed since the last build, then performs the code generation and link step. Rebuiding a project will always process every source file in the project, regardless of whether they have changed. If 5 University of Saskatchewan EE 292 Electrical Engineering Laboratory I in doubt, use Rebuild. The HI-TECH Build buttons are linked to the Build menu item. The program should now be compiled. You will see a window open showing content similar to that shown in Figure 6. Figure 6: Information after the code is successfully built This shows the steps both MPLAB IDE and the compiler took to build the project. The lines starting with Executing: show the command lines passed to the compiler command-line driver, PICC, that were used to actually build. Note that there are two commands: one for the only source file the project contains; the other for the code generation and link step. The compiler has produced a memory summary and there is no message indicating that the build failed, so we have successfully compiled the project. If there are errors they will be printed in Build tab of this window. You can double-click each error message and MPLAB IDE will show you the offending line of code, where possible. If you do get errors, check that the program is what is contained in this document. (3) Program the Robot The programmer you are using is called PICkit 2. Plug this programmer into the robot programming connector (note pin 1) on the board and also connect it to your PC with the USB connector. Turn on the power switch of the robot. At this time, click on Programmer -> Select Programmer -> PICkit 2. Then you are ready to program the robot with the compiled code. Click on Programmer -> Program, the robot should be successfully programmed as shown in the following Figure. This means that the program is downloaded to the memory of the robot and ready to run. 6 University of Saskatchewan EE 292 Electrical Engineering Laboratory I Figure 7: Programming the robot If you want to program the robot every time you have successfully compiled the code, you can select Program -> Settings -> Program after every successful build. 5. Lab Procedure: (a) Read previous sections thoroughly to make sure you have the background knowledge of the hardware used in this lab. (b) Follow the instructions in section 4 (Introduction to the Software) to create a project, compile the downloaded linefollower_lab.c code, and program the robot. Once it is successfully completed, you can calibrate the motor speed when powering on the robot. Pressing push button RA5 will send 1.5 ms pulses (stop signals) in every 20ms to the motors for calibration. Notice that LED RB3 is also on at this time. You can adjust the motor pots until there is no movement of the wheels. The robot will exit this mode and go into ready if button RA5 is pushed again and LED RB3 will be off. (c) Read carefully the C program file, linefollower_lab.c, including the comments of the code. You need to complete this program to make the robot follow a black stripe on a white board. When push button RA5 is pressed, the robot is in calibration mode and LED RB3 is on. When it is pressed again, it quits this mode. When RA4 is pressed, the robot is in line-following mode, and LED RB2 is on. The robot should be able to follow the black stripes on a whiteboard. When it is pressed again, the robot will quite this mode and LED RB2 is off. You can try to make the robot move as fast as possible and follow the line at the same time. In the partially-completed code, fill in the function checkSensors(void) to read the sensors and adjust the motors accordingly. Also fill in the function checkForInRange(void) to check the motor data (in the range of 0 to 50). Properly comment your code. Compile the code and program the robot. Test the robot on the test track. Demo your working robot to your lab instructors using the test track setup by the lab instructors. Record the travel time of your robot on the track, the shorter, the better. HU UH 7 University of Saskatchewan EE 292 Electrical Engineering Laboratory I 6. Lab Questions If you are asked to enhance this mobile robot to travel through a Maze, what kind of other sensors you can think about to be used? Briefly describe how you are going to implement them. 7. Lab Documentation You need to document your lab activities in your lab book. In addition, you need to attach the following items to your lab book. (1) A flow chart of the completed program linefollower_lab.c (2) Working code with proper comments (3) Answers to lab questions in section 6 8. Extra Work The following is not required, just for your future work if you are interested in this robot. You will receive 5% bonus if you can complete them and pass the test path built by the lab instructors. (1) Can you make the robot follow a very sharp turn without losing tracking? (2) Can you make the robot to find its way if part of the black line is missing? 8


