SNet Manual v3.1
advertisement
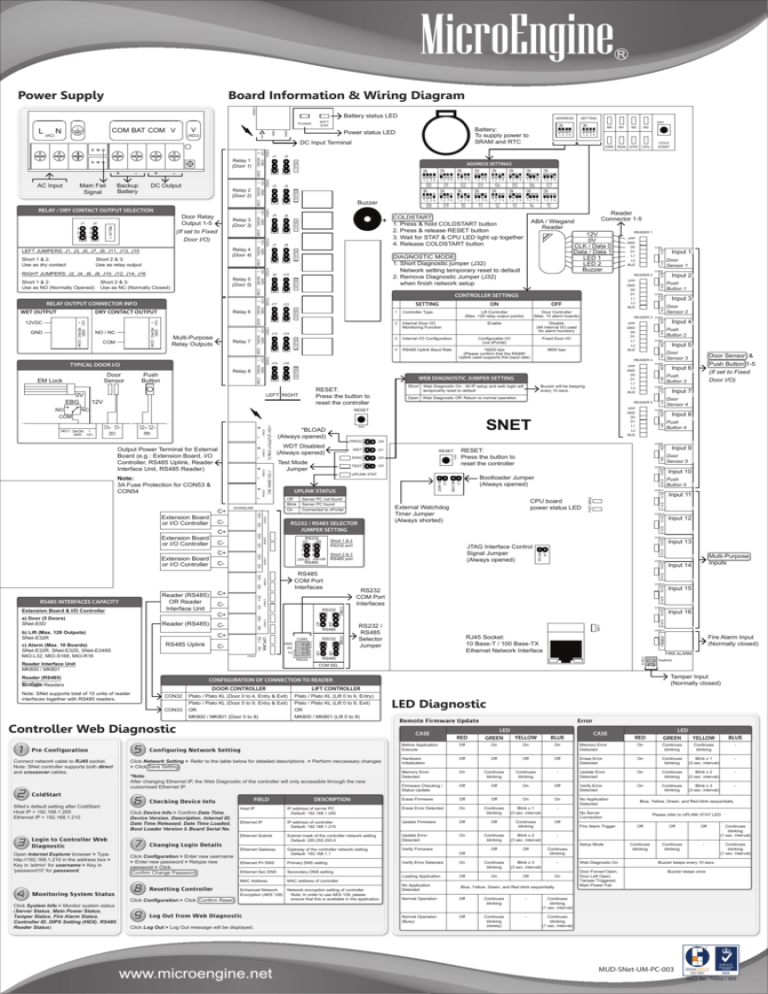
Power Supply Board Information & Wiring Diagram CON50 Battery status LED Battery: To supply power to SRAM and RTC Power status LED MAIN (ADJ) GND V COM BAT COM V 12V L (AC) N ADDRESS BATT STAT POWER DC Input Terminal DC Output Relay 2 (Door 2) J3 07 09 10 11 12 13 14 15 Reader Connector 1-5 ABA / Wiegand Reader 12V 0V CLK / Data 0 Data / Data 1 LED 1 LED 2 Buzzer OFF Lift Controller (Max. 128 relay output points) Door Controller (Max. 10 alarm boards) Enable Disable (All internal I/O used for alarm function) Fixed Door I/O 4 RS485 Uplink Baud Rate 19200 bps (Please confirm that the RS485 Uplink used supports this baud rate) 9600 bps READER 4 S14S15S16- 8 Click Configuration > Click Confirm Reset . 9 Remote Firmware Update Input 12 Input 13 Multi-Purpose Inputs Input 14 DESCRIPTION RED BLUE Input 16 Fire Alarm Input (Normally closed) - + CASE RED LED GREEN YELLOW BLUE Before Application Execute Off On On On Memory Error Detected On Continues blinking Continues blinking - Hardware Initialization Off Off Off Off Erase Error Detected On Continues blinking Blink x 1 (3 sec. interval) - Memory Error Detected On Continues blinking Continues blinking - Update Error Detected On Continues blinking Blink x 2 (3 sec. interval) - Firmware Checking / Status Update Off Off On Off Verify Error Detected On Continues blinking Blink x 3 (3 sec. interval) - No Application Detected Erase Firmware Off Off On On Erase Error Detected On Continues blinking Blink x 1 (3 sec. interval) - Ethernet IP IP address of controller Default: 192.168.1.210 Update Firmware Off Off Continues blinking Off Ethernet Subnet Subnet mask of the controller network setting Default: 255.255.255.0 Update Error Detected On Continues blinking Blink x 2 (3 sec. interval) - Ethernet Gateway Gateway of the controller network setting Default: 192.168.1.1 Verify Firmware Off Off Continues blinking Ethernet Pri DNS Primary DNS setting Verify Error Detected Secondary DNS setting Continues blinking Blink x 3 (3 sec. interval) - Ethernet Sec DNS MAC Address MAC address of controller On Off On Network encryption setting of controller Enhanced Network Note: In order to use AES 128, please Encryption (AES 128) ensure that this is available in the application. Input 15 Error LED YELLOW GREEN IP address of server PC Default: 192.168.1.200 Click Log Out > Log Out message will be displayed. Input 11 LED Diagnostic Host IP Log Out from Web Diagnostic Input 10 Push Button 5 Tamper Input (Normally closed) CASE Configuring Network Setting Resetting Controller Input 9 Door Sensor 5 -FIRE+ MK800 / MK801 (Lift 0 to 9) Click Configuration > Enter new username > Enter new password > Retype new password > Click Confirm Change Password . Input 8 Push Button 4 S16+ MK800 / MK801 (Door 0 to 9) Changing Login Details Input 7 Door Sensor 4 S15+ OR *Note: After changing Ethernet IP, the Web Diagnostic of the controller will only accessible through the new customised Ethernet IP. 7 Input 6 Push Button 3 S14+ Plato / Plato KL (Lift 0 to 9, Exit) OR Click Device Info > Confirm Date Time, Device Version, Description, Internal ID, Date Time Released, Date Time Loaded, Boot Loader Version & Board Serial No. Door Sensor & Push Button 1-5 (If set to Fixed Door I/O) S13+ 12V GND + NO/NC COM Click System Info > Monitor system status (Server Status, Main Power Status, Tamper Status, Fire Alarm Status, Controller ID, DIPS Setting (HEX), RS485 Reader Status) S13- Plato / Plato KL (Door 5 to 9, Entry & Exit) FIELD Input 5 Door Sensor 3 S12+ Monitoring System Status S12- Plato / Plato KL (Lift 0 to 9, Entry) Checking Device Info Input 4 Push Button 2 TAMPER LIFT CONTROLLER Plato / Plato KL (Door 0 to 4, Entry & Exit) Click Network Setting > Refer to the table below for detailed descriptions > Perform neccessary changes > Click Save Setting . 6 Input 3 Door Sensor 2 S11+ Open Internet Explorer browser > Type http://192.168.1.210 in the address box > Key in 'admin' for username > Key in 'password10' for password. 5 Input 2 Push Button 1 FIRE ALARM RS485 Controller Web Diagnostic Login to Controller Web Diagnostic S11- CON33 SNet’s default setting after ColdStart: Host IP = 192.168.1.200 Ethernet IP = 192.168.1.210 S10+ CON32 Input 1 Door Sensor 1 CON17 RJ45 Socket: 10 Base-T / 100 Base-TX Ethernet Network Interface CON18 DOOR CONTROLLER Note: SNet supports total of 10 units of reader interfaces together with RS485 readers. ColdStart S10- RS232 / RS485 Selector Jumper CONFIGURATION OF CONNECTION TO READER MicroEngine Readers Connect network cable to RJ45 socket. Note: SNet controller supports both direct and crossover cables. CON16 COM SEL Reader (RS485) Pre-Configuration CON14 RS232 COM Port Interfaces J26 J25 PC- RS232 COM0 RS232 CON38 UPLINK PC+ CON31 Reader Interface Unit MK800 / MK801 S9+ RS485 GND RX TX CON13 JTAG Interface Control Signal Jumper (Always opened) LAN J28 J27 D0- CON32 D0+ C- COM1 D1- RS485 Uplink c) Alarm (Max. 10 Boards) SNet-E32R, SNet-E32S, SNet-E248S MiO-L32, MiO-S168, MiO-R16 RS232 COM0 CON12 CON15 CON33 D1+ C+ S9- D2- b) Lift (Max. 128 Outputs) SNet-E32R CON11 External Watchdog Timer Jumper (Always shorted) Short 2 & 3 RS485 port RS485 COM Port Interfaces CON34 D2+ C- C+ Bootloader Jumper (Always opened) J4 RTCK D3- Reader (RS485) C- RS485 CON10 CPU board power status LED Short 1 & 2 RS232 port 3 3 J25/J27 J26/J28 CON35 D3+ a) Door (5 Doors) SNet-E5D RS485 INTERFACES CAPACITY RS232 J28 J27 1 1 2 2 S8+ D3- Extension Board & I/O Controller Reader (RS485) OR Reader Interface Unit C+ Server PC not found Server PC found Connected to xPortal RS232 / RS485 SELECTOR JUMPER SETTING CON36 D3+ C- J33 UPLINK STAT PWR CPU D3- Extension Board or I/O Controller CON37 D3+ C+ TEST RESET: Press the button to reset the controller J1 BLOAD - C- J32 CON9 RESET J2 E-WDT CON54 + C+ Extension Board or I/O Controller DIAG CON8 S8- - +12V (MAX 3A) CON53 + C- J31 S7+ DOWNLINK J30 WDT UPLINK STATUS Off Blink On S7- VPP GND D0 D1 L1 L2 BUZ SNET PROG Test Mode Jumper CON7 READER 5 SW1 CON52 + C+ WDT Disabled (Always opened) S6+ Buzzer will be beeping every 10 secs. Open Web Diagnostic Off: Return to normal operation SW4 *BLOAD (Always opened) CON6 VPP GND D0 D1 L1 L2 BUZ S6- - CON51 + PB1 +12V (OUTPUT ONLY) S2+ S2- DS1 CON5 S5+ Configurable I/O (via xPortal) CON4 S5- Internal I/O Configuration VPP GND D0 D1 L1 L2 BUZ S4+ 3 READER 3 S4- ON CON3 S3+ Internal Door I/O Monitoring Function CON2 READER 2 S3- Controller Type 2 CON1 S2+ 1 READER 1 VPP GND D0 D1 L1 L2 BUZ VPP GND D0 D1 L1 L2 BUZ RESET S1+ S1- COLD START ON WEB DIAGNOSTIC JUMPER SETTING NC Extension Board or I/O Controller 4 06 ON Short Web Diagnostic On : All IP setup and web login will temporarily reset to default RESET: Press the button to reset the controller 12V Note: 3A Fuse Protection for CON53 & CON54 3 05 ON J16 LEFT RIGHT Output Power Terminal for External Board (e.g.: Extension Board, I/O Controller, RS485 Uplink, Reader Interface Unit, RS485 Reader) 2 CPU S2- J15 COM NO COM 04 ON J14 RELAY8 12V GND + NO/NC 0V EBG CON28 EM Lock Relay 8 Push Button Door Sensor STAT S1+ J13 COM TYPICAL DOOR I/O 03 ON ON SETTING J12 RELAY7 Relay 7 RUN S1- J11 RELAY6 12V GND + NO/NC Multi-Purpose Relay Outputs CON27 COM ERR CONTROLLER SETTINGS COM NO / NC RELAY5 12V GND + NO/NC GND 12V GND + NO/NC COM 12V GND + NO/NC COM 12VDC Relay 6 CON26 DRY CONTACT OUTPUT M3 ON ON ON DIAGNOSTIC MODE 1. Short Diagnostic jumper (J32) Network setting temporary reset to default 2. Remove Diagnostic Jumper (J32) when finish network setup J10 COM Short 2 & 3: Use as NC (Normally Closed) ON COLDSTART 1. Press & hold COLDSTART button 2. Press & release RESET button 3. Wait for STAT & CPU LED light up together 4. Release COLDSTART button J8 J9 02 ON 08 RELAY4 12V GND + NO/NC Relay 5 (Door 5) RELAY OUTPUT CONNECTOR INFO WET OUTPUT J7 CON25 RIGHT JUMPERS: J2, J4, J6, J8, J10, J12, J14, J16 M2 1234 1234 1234 1234 1234 1234 1234 1234 Buzzer J6 COM Short 2 & 3: Use as relay output Short 1 & 2: Use as NO (Normally Opened) 12V GND + NO/NC Short 1 & 2: Use as dry contact J5 CON24 Relay 4 (Door 4) LEFT JUMPERS: J1, J3, J5, J7, J9, J11, J13, J15 ON ON 01 ON RELAY3 Relay 3 (Door 3) ON 00 J4 COM 3 2 1 RELAY 1 3 2 1 12V GND + NO/NC Door Relay Output 1-5 (If set to Fixed Door I/O) J2 CON23 J1 1234 M1 1234 1234 1234 1234 1234 1234 1234 1234 COM RELAY / DRY CONTACT OUTPUT SELECTION 1234 M0 ADDRESS SETTINGS ON RELAY2 12V GND + NO/NC Backup Battery - CON22 Main Fail Signal + SW1 ON J2 COM AC Input - J1 RELAY1 12V GND + NO/NC + CON21 Relay 1 (Door 1) SETTING ON Loading Application No Application Detected Off On Off Blue, Yellow, Green, and Red blink sequentially Normal Operation Off Continues blinking - Continues blinking (1 sec. interval) Normal Operation (Busy) Off Continues blinking (slowly) - Continues blinking (1 sec. interval) Blue, Yellow, Green, and Red blink sequentially No Server Connection Fire Alarm Trigger Setup Mode Please refer to UPLINK STAT LED Off Off Off Continues blinking (1 sec. interval) Continues blinking Continues blinking - Continues blinking (1 sec. interval) Web Diagnostic On Buzzer beeps every 10 secs. Door Forced Open, Door Left Open, Tamper Triggered, Main Power Fail Buzzer beeps once MUD-SNet-UM-PC-003 REG No. 749921389


