Packet Tracer – Configuring GRE
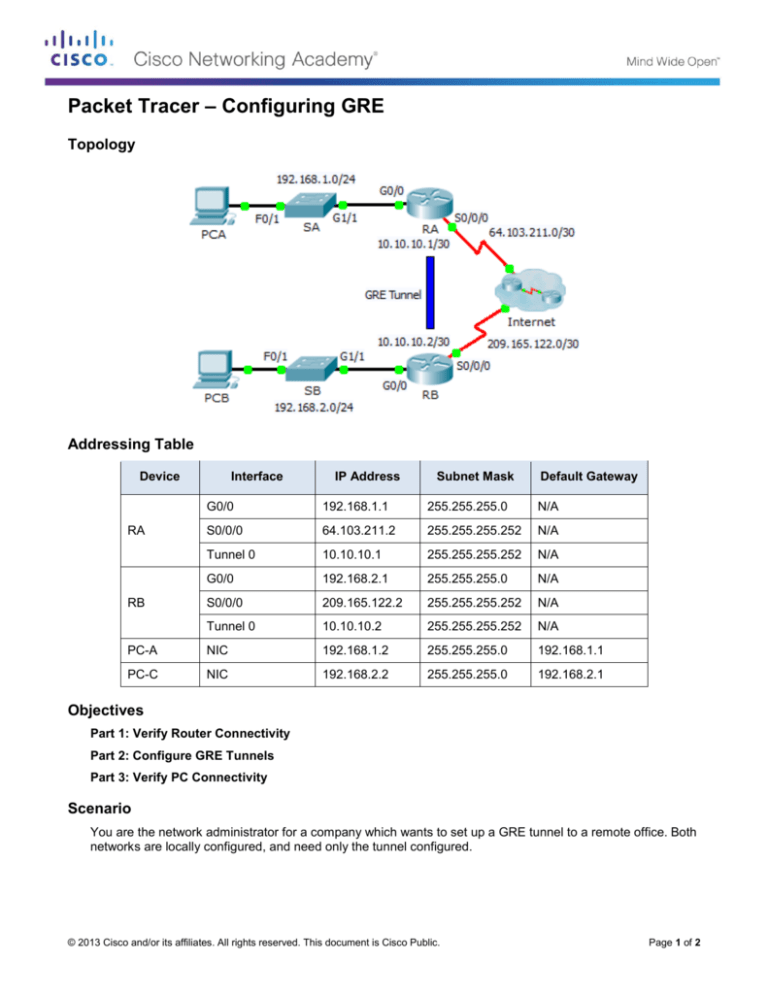
Topology
Addressing Table
Device
Interface
IP Address
Subnet Mask
Default Gateway
G0/0
192.168.1.1
255.255.255.0
N/A
S0/0/0
64.103.211.2
255.255.255.252
N/A
Tunnel 0
10.10.10.1
255.255.255.252
N/A
G0/0
192.168.2.1
255.255.255.0
N/A
S0/0/0
209.165.122.2
255.255.255.252
N/A
Tunnel 0
10.10.10.2
255.255.255.252
N/A
PC-A
NIC
192.168.1.2
255.255.255.0
192.168.1.1
PC-C
NIC
192.168.2.2
255.255.255.0
192.168.2.1
RA
RB
Objectives
Part 1: Verify Router Connectivity
Part 2: Configure GRE Tunnels
Part 3: Verify PC Connectivity
Scenario
You are the network administrator for a company which wants to set up a GRE tunnel to a remote office. Both
networks are locally configured, and need only the tunnel configured.
© 2013 Cisco and/or its affiliates. All rights reserved. This document is Cisco Public.
Page 1 of 2
Packet Tracer – Configuring GRE
Part 1: Verify Router Connectivity
Step 1: Ping RA from RB.
a. Use the show ip interface brief command on RA to determine the IP address of the S0/0/0 port.
b. From RB ping the IP S0/0/0 address of RA.
Step 2: Ping PCA from PCB.
Attempt to ping the IP address of PCA from PCB. We will repeat this test after configuring the GRE tunnel.
What were the ping results? Why?
_______________________________________________________________________________________
Part 2: Configure GRE Tunnels
Step 1: Configure the Tunnel 0 interface of RA.
a. Enter into the configuration mode for RA Tunnel 0.
RA(config)# interface tunnel 0
b. Set the IP address as indicated in the Addressing Table.
RA(config-if)# ip address 10.10.10.1 255.255.255.252
c.
Set the source and destination for the endpoints of Tunnel 0.
RA(config-if)# tunnel source s0/0/0
RA(config-if)# tunnel destination 209.165.122.2
d. Configure Tunnel 0 to convey IP traffic over GRE.
RA(config-if)# tunnel mode gre ip
e. The Tunnel 0 interface should already be active. In the event that it is not, treat it like any other interface.
RA(config-if)# no shutdown
Step 2: Configure the Tunnel 0 interface of RB.
Repeat Steps 1a – e with RB. Be sure to change the IP addressing as appropriate.
Step 3: Configure a route for private IP traffic.
Establish a route between the 192.168.X.X networks using the 10.10.10.0/30 network as the destination.
RA(config)# ip route 192.168.2.0 255.255.255.0 10.10.10.2
RB(config)# ip route 192.168.1.0 255.255.255.0 10.10.10.1
Part 3: Verify Router Connectivity
Step 1: Ping PCA from PCB.
Attempt to ping the IP address of PCA from PCB. The ping should be successful.
Step 2: Trace the path from PCA to PCB.
Attempt to trace the path from PCA to PCB. Note the lack of public IP addresses in the output.
© 2013 Cisco and/or its affiliates. All rights reserved. This document is Cisco Public.
Page 2 of 2


