231 Chapter 29 OXYGEN THERAPY What You Will Learn • Types of
advertisement
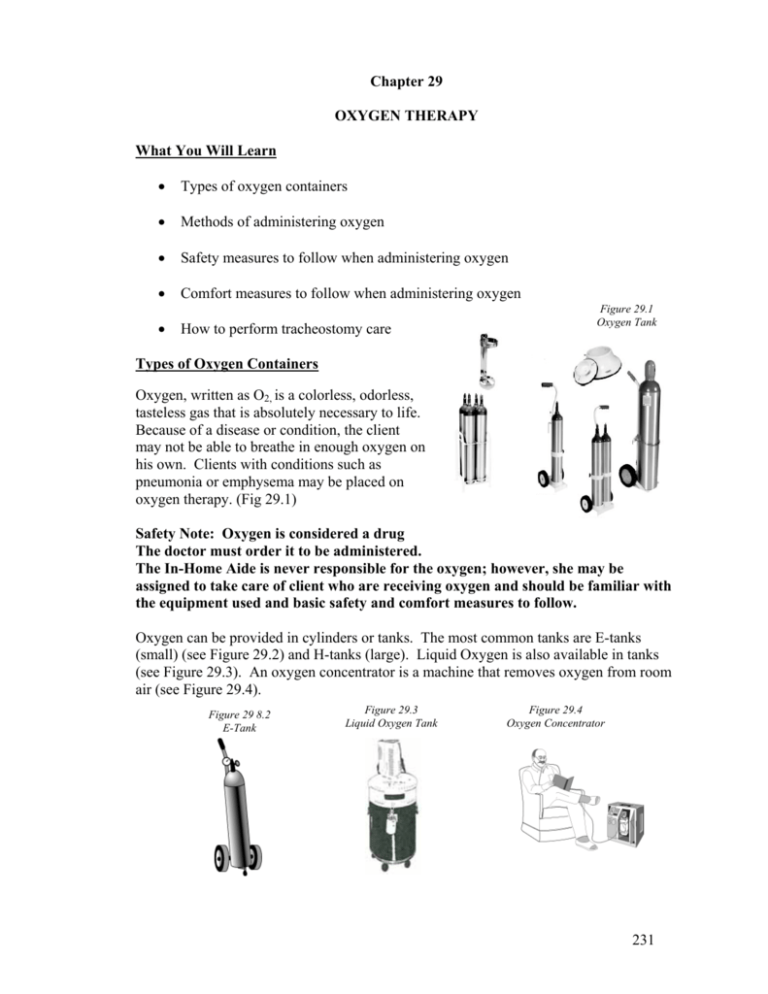
Chapter 29 OXYGEN THERAPY What You Will Learn • Types of oxygen containers • Methods of administering oxygen • Safety measures to follow when administering oxygen • Comfort measures to follow when administering oxygen • How to perform tracheostomy care Figure 29.1 Oxygen Tank Types of Oxygen Containers Oxygen, written as O2, is a colorless, odorless, tasteless gas that is absolutely necessary to life. Because of a disease or condition, the client may not be able to breathe in enough oxygen on his own. Clients with conditions such as pneumonia or emphysema may be placed on oxygen therapy. (Fig 29.1) Safety Note: Oxygen is considered a drug The doctor must order it to be administered. The In-Home Aide is never responsible for the oxygen; however, she may be assigned to take care of client who are receiving oxygen and should be familiar with the equipment used and basic safety and comfort measures to follow. Oxygen can be provided in cylinders or tanks. The most common tanks are E-tanks (small) (see Figure 29.2) and H-tanks (large). Liquid Oxygen is also available in tanks (see Figure 29.3). An oxygen concentrator is a machine that removes oxygen from room air (see Figure 29.4). Figure 29 8.2 E-Tank Figure 29.3 Liquid Oxygen Tank Figure 29.4 Oxygen Concentrator 231 NOTE: THE APPEARANCE OF THE EQUIPMENT BEING USED VARIES DEPENDING ON THE MANUFACTURER OR SUPPLIER. Methods of Administrating Oxygen (O2) A nasal cannula (see Figure 29.5) is commonly used to administer oxygen to a client. Two prongs leading from the tubing are placed in each nostril. The tubing is placed around the ears and is secured by tightening a plastic ring under the chin. Plastic tubing connects the oxygen source container to the cannula. The client should not breathe through his mouth since the oxygen goes out the opened mouth. However, oxygen still goes to the lungs even if the client breathes through his mouth; unless the nose is congested or closed. Figure 29.5 Nasal Cannula Figure 29.6 Oxygen Mask Nasal Cannula with Connected Tubing An oxygen mask (see Figure 29.6) is a plastic mask placed over the nose and mouth, fitted to nose with metal adjuster, and held in place by an elastic strap around the head. It is used for the client who is breathing through his mouth. An oxygen mask is the most effective way of delivering oxygen at high concentrations. Safety Measures The In-Home Aide’s role in oxygen therapy is to make good observations. Clients receiving oxygen may not be a common occurrence by all in-home care providers. The In-Home Aide should understand how dangerous oxygen can be if not handled properly and what she can do to keep the client comfortable while receiving oxygen. Oxygen speeds up combustion but does not cause a fire. Posting “No Smoking” signs (according to the client's request) outside and inside the room when oxygen is set up lets others know that oxygen is present. The client should not be near open flames (e.g., a candle, barbeque pit, gas stove) while the oxygen is in use. It is dangerous for anyone to smoke in a room that contains oxygen equipment. If the client wishes to smoke, he should be asked to turn off the oxygen, remove the nasal cannula, and move to another room. Family members or visitors should be asked to move to another room if they wish to smoke. If the client, visitor, or family member does not move into another room to smoke, the In-Home Aide should leave the client’s home and notify the supervisor/nurse immediately. Check to see that portable oxygen tanks are secured with straps or collars to prevent them from falling. 232 Check the oxygen gauge indicating the amount of oxygen left in the tank; notify the supervisor/nurse if the supply is low. An E-tank may last less than two (2) hours at a high rate of delivery. Check the flow-meter on oxygen tank to make sure it is delivering the prescribed rate. DO NOT change the setting; report to the supervisor/nurse immediately if it is not correct. (see Figure 29.7) Figure 29.7 View of Flowmeter and Gauge Check the tubing for kinks and disconnections. Check to see that the client is not lying on the tubing. Check the water level in the humidifier jar; it should be high enough (2/3 full) so that it bubbles as oxygen goes through it (see Figure 29.1). It should also appear clear – no particulate matter. If anything appears abnormal, report to supervisor/nurse. Remember, pure oxygen is very drying and is damaging to tissue at high concentrations. Comfort Measures When caring for a client on oxygen, check the elastic headband or ring that secures the face mask or cannula in place to see that it is not too tight and causing pressure areas. Look for irritation from the mask or cannula around the face and ears. Pad pressure areas with cotton. Pressure ulcers can result from tubing that rubs the skin on the top of the ear. Keep the skin clean and dry under the cannula or mask. Give frequent oral hygiene and adequate fluids to the client. Oxygen is drying to tissue, causing the client's mouth to become dry and stale tasting. Observe the nasal cannula for mucus buildup. Assist the client or family member to replace the tubing if it is plugged per agency policy. Make sure the client is not lying on the tubing and that the tubing is not crimped or kinked. This will cut off the flow of oxygen. Observe for any signs and symptoms that the client is not getting enough oxygen and report immediately to the supervisor/nurse. • • • • • • Client feels like he “can’t breathe” Restless, irritable, anxious, or frightened Decreased muscle coordination, slowed mental abilities, and confusion Dyspnea, cyanosis, or pallor (paleness) Change in breathing pattern Client complains of dizziness or faintness 233 Tracheostomy Care A tracheostomy is an opening through the neck into the trachea. It allows air to enter the lungs when the airway is blocked due to a tumor, swelling or foreign body. Some clients will have tracheostomies that are permanent. Other clients may have temporary tracheostomies. Proper stoma care is required to maintain healthy tissue. Secretions from the tracheostomy can cause the area around the stoma to become moist, irritated, or infected. The In-Home Aide is permitted to perform tracheostomy care on a site that is well healed and does not have open or irritated areas. You should observe the area around the stoma for redness, swelling, drainage, or bleeding and report your observations to the supervisor/nurse. The In-Home Aide is not permitted to suction the tracheostomy, change tracheostomy ties or remove and clean the tracheostomy cannula. It is important to avoid bumping or dislodging a tracheostomy tube when providing care to the client. 234 Chapter 29 OXYGEN THERAPY PROCEDURE FOR TRACHEOSTOMY CARE (UNCOMPLICATED ESTABLISHED TRACHEOSTOMY) CAUTION: THE IN-HOME AIDE MAY PROVIDE CARE ONLY FOR AN ESTABLISHED HEALED TRACHEOSTOMY. 1. Gather equipment-gloves, clean dry gauze sponge, precut gauze, or 4 x 4, plastic bag. 2. Provide privacy. 3. Explain what you are going to do. 4. Wash your hands and put on gloves. 5. Assist the client to a comfortable position. 6. Remove the gauze around the tracheostomy site carefully, discard in a plastic bag. 7. Observe the skin around the stoma for any redness, irritation or open areas in the skin. 8. Place a clean precut gauze sponge around the site. If a precut gauze sponge is not available, a 4 X 4 can be folded in half and the corners turned down to form a U-shape. 9. Remove gloves and wash hands. 10. Make client comfortable. 11. Report any unusual findings the supervisor/nurse. Chapter Review 1. What are types of oxygen containers? 2. What are methods of administering oxygen? 3. What safety measures should you follow when administering oxygen? 4. What comfort measures should you follow when administering oxygen? 5. How do you to perform tracheostomy care? 235 Student Exercise Complete the following short answer questions. 1. List two types of oxygen containers. a. b. 2. What are the two most common methods of administering oxygen in a home setting? a. b. 3. List five safety measures the In-Home Aide can take when providing care to a client receiving oxygen therapy. a. b. c. d. e. 4. List four comfort measures the In-Home Aide can provide for the client receiving oxygen therapy. a. b. c. d. Place an (X) in front of the signs or symptoms that indicate the client is not receiving enough oxygen. ____ 5. Restless, anxious or irritable. ____ 6. ____ 7. Alert and oriented. Client complains of dizziness or faintness. 236 ____ 8. Client complains that he is having trouble breathing. ____ 9. Decreased muscle coordination. ____ 10. Change in breathing pattern. ____ 11. Skin is pink, warm, and dry. ____ 12. Client complains of abdominal discomfort and bloating. ____ 13. Cyanosis or pallor. 237
