Response of Rigid Cellular Plastics to Thermal and Humid Aging1
advertisement

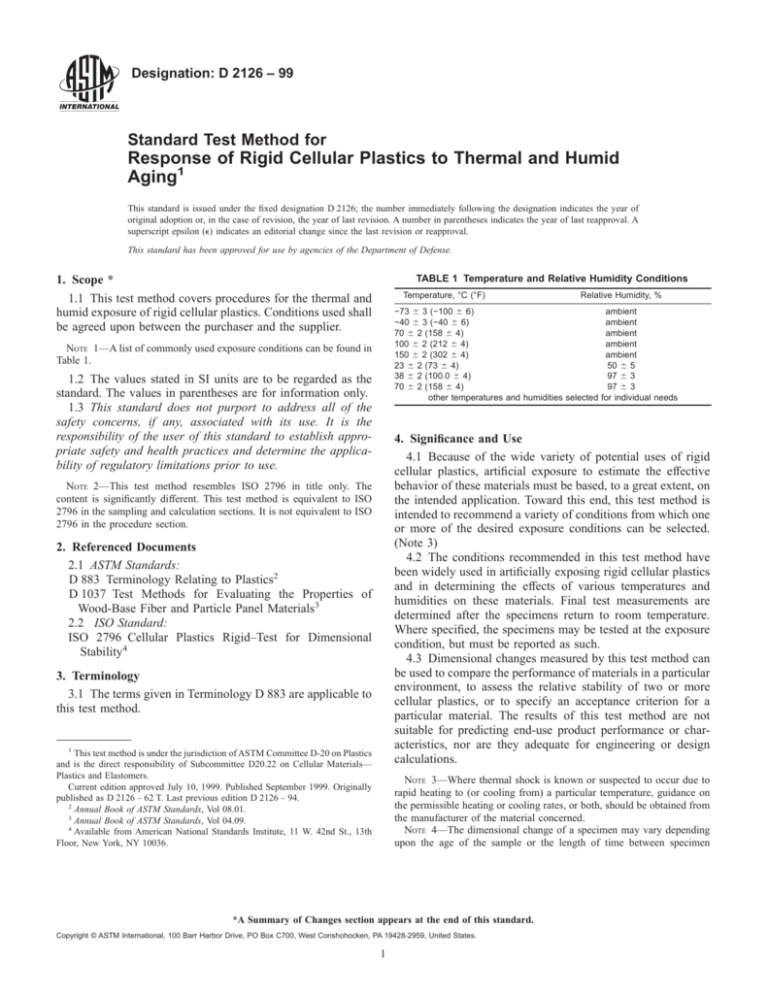
Designation: D 2126 – 99 Standard Test Method for Response of Rigid Cellular Plastics to Thermal and Humid Aging1 This standard is issued under the fixed designation D 2126; the number immediately following the designation indicates the year of original adoption or, in the case of revision, the year of last revision. A number in parentheses indicates the year of last reapproval. A superscript epsilon (e) indicates an editorial change since the last revision or reapproval. This standard has been approved for use by agencies of the Department of Defense. TABLE 1 Temperature and Relative Humidity Conditions 1. Scope * 1.1 This test method covers procedures for the thermal and humid exposure of rigid cellular plastics. Conditions used shall be agreed upon between the purchaser and the supplier. Temperature, °C (°F) Relative Humidity, % −73 6 3 (−100 6 6) −40 6 3 (−40 6 6) 70 6 2 (158 6 4) 100 6 2 (212 6 4) 150 6 2 (302 6 4) 23 6 2 (73 6 4) 38 6 2 (100.0 6 4) 70 6 2 (158 6 4) other temperatures and humidities selected NOTE 1—A list of commonly used exposure conditions can be found in Table 1. 1.2 The values stated in SI units are to be regarded as the standard. The values in parentheses are for information only. 1.3 This standard does not purport to address all of the safety concerns, if any, associated with its use. It is the responsibility of the user of this standard to establish appropriate safety and health practices and determine the applicability of regulatory limitations prior to use. ambient ambient ambient ambient ambient 50 6 5 97 6 3 97 6 3 for individual needs 4. Significance and Use 4.1 Because of the wide variety of potential uses of rigid cellular plastics, artificial exposure to estimate the effective behavior of these materials must be based, to a great extent, on the intended application. Toward this end, this test method is intended to recommend a variety of conditions from which one or more of the desired exposure conditions can be selected. (Note 3) 4.2 The conditions recommended in this test method have been widely used in artificially exposing rigid cellular plastics and in determining the effects of various temperatures and humidities on these materials. Final test measurements are determined after the specimens return to room temperature. Where specified, the specimens may be tested at the exposure condition, but must be reported as such. 4.3 Dimensional changes measured by this test method can be used to compare the performance of materials in a particular environment, to assess the relative stability of two or more cellular plastics, or to specify an acceptance criterion for a particular material. The results of this test method are not suitable for predicting end-use product performance or characteristics, nor are they adequate for engineering or design calculations. NOTE 2—This test method resembles ISO 2796 in title only. The content is significantly different. This test method is equivalent to ISO 2796 in the sampling and calculation sections. It is not equivalent to ISO 2796 in the procedure section. 2. Referenced Documents 2.1 ASTM Standards: D 883 Terminology Relating to Plastics2 D 1037 Test Methods for Evaluating the Properties of Wood-Base Fiber and Particle Panel Materials3 2.2 ISO Standard: ISO 2796 Cellular Plastics Rigid–Test for Dimensional Stability4 3. Terminology 3.1 The terms given in Terminology D 883 are applicable to this test method. 1 This test method is under the jurisdiction of ASTM Committee D-20 on Plastics and is the direct responsibility of Subcommittee D20.22 on Cellular Materials— Plastics and Elastomers. Current edition approved July 10, 1999. Published September 1999. Originally published as D 2126 – 62 T. Last previous edition D 2126 – 94. 2 Annual Book of ASTM Standards, Vol 08.01. 3 Annual Book of ASTM Standards, Vol 04.09. 4 Available from American National Standards Institute, 11 W. 42nd St., 13th Floor, New York, NY 10036. NOTE 3—Where thermal shock is known or suspected to occur due to rapid heating to (or cooling from) a particular temperature, guidance on the permissible heating or cooling rates, or both, should be obtained from the manufacturer of the material concerned. NOTE 4—The dimensional change of a specimen may vary depending upon the age of the sample or the length of time between specimen *A Summary of Changes section appears at the end of this standard. Copyright © ASTM International, 100 Barr Harbor Drive, PO Box C700, West Conshohocken, PA 19428-2959, United States. 1 D 2126 maintained at one of the combinations of temperature and relative humidity shown in Table 1. Care shall be taken such that substantially free air circulation around the test specimens occur. 8.2.1 Expose the specimen at this condition for 24 h (one day) 6 1 h, 168 h (one week) 6 2 h, and 336 h (two weeks) 6 2 h. Intermediate observations are recommended to serve as a guide to full-term performance. A round-robin study has shown that there is no significant difference between continuous exposure and exposure interrupted for up to 4 h for measuring purposes. 8.2.2 After exposure, allow the specimens to come to room temperature for 2 h before measuring and testing. 8.2.3 Measure specimen dimensions as described in section 8.1. 8.3 Visual Examination—Record change in general appearance at each stage of the testing procedure. (Use the terms defined in Terminology D 883 to describe defects.) preparation and the beginning of the test, or both. 4.4 Before proceeding with this test method, reference should be made to the specification of the material being tested. Any test specimen preparation, conditioning, dimensions, or testing parameters covered in the materials specification, or combination thereof, shall take precedence over those mentioned in this test method. If there are no specifications, then the default conditions apply. 5. Apparatus 5.1 Balance, capable of weighing, to 0.05 %, a test specimen having a mass of 100 g or less. 5.2 Oven, circulating-air, capable of holding the required temperature of exposure within 62°C (4°F). 5.3 Cold Box, capable of maintaining the required temperature of exposure within 63°C (5°F). 5.4 Gage, dial-type, with a minimum foot area of 6.5 cm2(1 in.2) (Note 5). A vernier caliper having graduations not larger than 0.1 mm (0.005 in.) may also be used. Care shall be taken that the specimen is not crushed in any way, regardless of which instrument is used. 9. Calculation 9.1 Calculate the changes in dimensions (and mass, when specified), expressed as a percentage of the original measurement, as follows: NOTE 5—A dial gage comparator for determining linear variations is illustrated in Test Methods D 1037. change, % 5 @~mf – mo!/mo# 3 100 5.5 Humidity Oven, suitable for maintaining 63 % humidity, and the required temperature within 62°C (4°F). (1) where: mf = final measurement, and mo = original measurement. 6. Sampling, Test Specimens, and Test Units 6.1 Test specimens shall be machined or sawed from the sample so as to have smooth edges free of cracks. All faces of the specimen shall be smooth. Finishing with No. 0 or finer sandpaper is permitted. Dust shall be blown off the specimens. 6.2 Test specimens shall have minimum dimensions of 100 by 100 mm by thickness supplied (4 by 4 in. by thickness supplied). Materials with and intended for use with natural or laminated skin surfaces shall be tested with skins intact. 6.3 A minimum of two specimens, but preferably three or more specimens, shall be used for each exposure condition. 6.4 Where destructive tests are to be made, several sets of specimens shall be used at the specified conditions. 10. Report 10.1 Report the following information: 10.1.1 Description of specimens, including type of material, anisotropy, and history if known, 10.1.2 Specific conditions used, 10.1.3 If two specimens were tested: 10.1.3.1 The individual percentage changes to the nearest 0.1 % of length, width, thickness, and mass (when specified) of each test specimen at each exposure period. 10.1.4 If three or more specimens were tested: 10.1.4.1 The mean percentage changes to the nearest 0.1 % of length, width, thickness, and mass (when specified), and the respective standard deviation at each exposure period. 10.1.5 Description of changes in appearance. 7. Conditioning 7.1 Unless otherwise specified, by the contract or relevant material specification, condition specimens at least to a constant mass at 23 6 2°C (73.4 6 4°F) and 50 6 5 % relative humidity before exposure. 11. Precision and Bias 11.1 Precision—The interlaboratory and intralaboratory precision of this test method can be expected to vary with material, test condition, and sample direction. Results of a five-laboratory round robin at three different test conditions showed that for certain materials, percent linear change measurements can be expected to agree within 0.9 % linear change (at 95 % confidence), both within a single laboratory and between laboratories. Percent mass change can be expected to agree within 1.1 % for the same material and conditions. Other materials may show substantially greater variability not related to the test procedure. Percent linear change for one round-robin material differed by as much as 1.5 % linear change within a laboratory, and by up to 5.6 % linear change between laboratories (95 % confidence). Percent change in mass differed by 8. Procedure 8.1 Make the following measurements after conditioning. 8.1.1 Mass—Determine mass, when specified, within 0.05 %. 8.1.2 Dimensions—Determine the dimensions of the three principal axes to the nearest 60.1 %. For standard-size specimens, make two measurements per dimension. If larger specimens are used, make three measurements of length and width, and five measurements of thickness. If specimens distort, report them as distorting under the specified aging conditions. 8.2 Expose the test specimens conditioned in accordance with 7.1 in a circulating air oven, humidity oven, or cold box 2 D 2126 3.9 % mass change within laboratories and 5.1 % mass change between laboratories for the most variable material (95 % confidence). 11.2 Bias—The bias for this test method has not yet been determined. 12. Keywords 12.1 dimensional change; humid aging; rigid cellular plastics; thermal aging SUMMARY OF CHANGES This section identifies the location of selected changes to this test method. For the convenience of the user, Committee D-20 has highlighted those changes that may impact the use of this test method. This section may also include descriptions of the changes or reasons for the changes, or both. (6) Combined sections for Measurements and Procedure into one section. (7) Reformatted Table 1. (8) Added a new Section 9—Calculations. (9) Added a keyword—dimensional stability. (10) Added a Summary of Changes section. D 2126 – 99: (1) Changed the name of the ASTM subcommittee that has responsibility for the standard. (2) Changed ISO equivalency statement. (3) Added 4.4, reference to material specifications. (4) Renamed Section 6. (5) Changed the wording in 7.1 to include- “by the contract or relevant material specification” and replace “overnight” with “16 h.” ASTM International takes no position respecting the validity of any patent rights asserted in connection with any item mentioned in this standard. Users of this standard are expressly advised that determination of the validity of any such patent rights, and the risk of infringement of such rights, are entirely their own responsibility. This standard is subject to revision at any time by the responsible technical committee and must be reviewed every five years and if not revised, either reapproved or withdrawn. Your comments are invited either for revision of this standard or for additional standards and should be addressed to ASTM International Headquarters. Your comments will receive careful consideration at a meeting of the responsible technical committee, which you may attend. If you feel that your comments have not received a fair hearing you should make your views known to the ASTM Committee on Standards, at the address shown below. This standard is copyrighted by ASTM International, 100 Barr Harbor Drive, PO Box C700, West Conshohocken, PA 19428-2959, United States. Individual reprints (single or multiple copies) of this standard may be obtained by contacting ASTM at the above address or at 610-832-9585 (phone), 610-832-9555 (fax), or service@astm.org (e-mail); or through the ASTM website (www.astm.org). 3


