© 2005 ASM International. All Rights Reserved.
Gear Materials, Properties, and Manufacture (#05125G)
www.asminternational.org
CHAPTER 6
Casting, Forming, and Forging
GEAR MANUFACTURE depends on machinery available, design specifications or
requirements, cost of production, and type of
material from which the gear is to be made.
There are many methods for manufacturing
gears including:
•
•
•
•
•
•
•
•
Metal removal processes (hobbing, shaping,
milling, shaving, grinding, honing, and lapping) as discussed in Chapter 5
Various casting processes for both production of gear blanks and near-net shape gears
Stamping and fine blanking
Cold drawing and extrusion
Powder metallurgy (P/M) processing as discussed in Chapter 7
Injection molding (applicable to plastic gear
materials as discussed in Chapter 4)
Gear rolling
Forging for production of gear blanks and
precision-forged near- and net-shape gears
Most of the processes listed are suited to gears
for low wear requirements, low power transmission, and relatively low accuracy of transmitted
motion (Ref 1). When the application involves
higher values of one or more of these characteristics, forged or cut/machined gears are used.
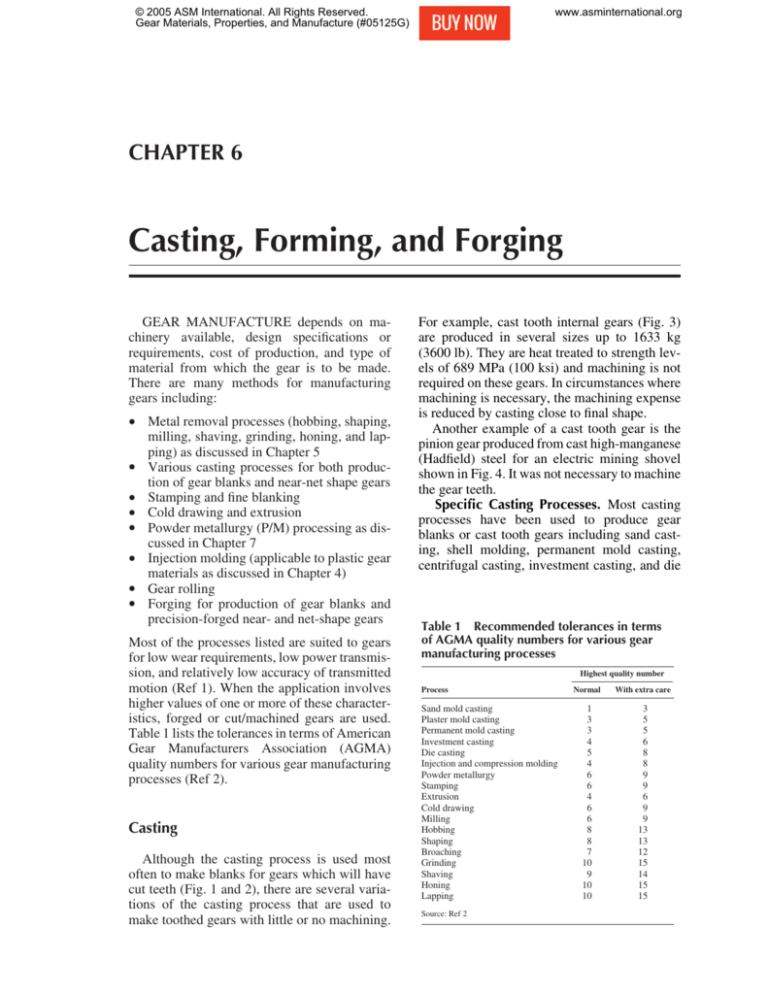
Table 1 lists the tolerances in terms of American
Gear Manufacturers Association (AGMA)
quality numbers for various gear manufacturing
processes (Ref 2).
Casting
Although the casting process is used most
often to make blanks for gears which will have
cut teeth (Fig. 1 and 2), there are several variations of the casting process that are used to
make toothed gears with little or no machining.
For example, cast tooth internal gears (Fig. 3)
are produced in several sizes up to 1633 kg
(3600 lb). They are heat treated to strength levels of 689 MPa (100 ksi) and machining is not
required on these gears. In circumstances where
machining is necessary, the machining expense
is reduced by casting close to final shape.
Another example of a cast tooth gear is the
pinion gear produced from cast high-manganese
(Hadfield) steel for an electric mining shovel
shown in Fig. 4. It was not necessary to machine
the gear teeth.
Specific Casting Processes. Most casting
processes have been used to produce gear
blanks or cast tooth gears including sand casting, shell molding, permanent mold casting,
centrifugal casting, investment casting, and die
Table 1 Recommended tolerances in terms
of AGMA quality numbers for various gear
manufacturing processes
Highest quality number
Process
Sand mold casting
Plaster mold casting
Permanent mold casting
Investment casting
Die casting
Injection and compression molding
Powder metallurgy
Stamping
Extrusion
Cold drawing
Milling
Hobbing
Shaping
Broaching
Grinding
Shaving
Honing
Lapping
Source: Ref 2
Normal
With extra care
1
3
3
4
5
4
6
6
4
6
6
8
8
7
10
9
10
10
3
5
5
6
8
8
9
9
6
9
9
13
13
12
15
14
15
15
© 2005 ASM International. All Rights Reserved.
Gear Materials, Properties, and Manufacture (#05125G)
www.asminternational.org
130 / Gear Materials, Properties, and Manufacture
casting. Cut gears have also been produced from
continuously cast bars. Some of the commonly
employed processes will be briefly reviewed
below. More detailed information on these
processes can be found in Casting, Volume 15
of the ASM Handbook.
Sand casting is used primarily to produce
gear blanks. In recent times there has been only
very limited use of gears with teeth made by
sand casting (Ref 4). In some instances gears for
farm machinery, stokers, and some hand-operated devices have used cast teeth. The draft on
the pattern and the distortion on cooling make it
difficult to obtain much accuracy in cast iron or
cast steel gear teeth. Table 1 shows that sand
cast gears have the lowest AGMA quality levels
of the major gear manufacturing methods.
The shell molding process is particularly
suited to castings for which:
•
Fig. 1
Cast steel gear blank. Weight: 478 kg (1053 lb).
Source: Ref 3
Fig. 2
Large machined cast steel gear. Source: Ref 3
The greater dimensional accuracy attainable
with shell molding (as compared with conventional green sand molding) can reduce
© 2005 ASM International. All Rights Reserved.
Gear Materials, Properties, and Manufacture (#05125G)
www.asminternational.org
Chapter 6: Casting, Forming, and Forging / 131
•
the amount of machining required for completion of the part
As-cast dimensions may not be critical, but
smooth surfaces (smoother than can be
obtained by sand casting) are the primary
objective. An example of a cast tooth bevel
gear with an excellent surface finish produced by shell molding is shown in Fig. 5.
The investment casting process has also had
limited use in gear manufacture. Its most apparent value lies in the making of accurate gear teeth
out of materials which are so hard that teeth cannot be readily produced by machining (Ref 4).
The process can be used with a variety of steels,
bronzes, and aluminum alloys. With machinable
materials, the process is still useful if the gear is
integral with some complicated shape that is
very difficult to produce by machining.
Large quantities of small, low-cost gears are
made by the cold chamber die casting process
(die cast gears are usually under 150 mm (6 in.) in
diameter and from 10 to 48 diametral pitch, DP).
Complicated gear shapes which would be quite
costly to machine can be made quickly and at low
cost by the die casting process. The main disadvantage of the process is that the low-melting
point metals suitable for die casting—aluminum,
zinc, and copper—do not have high enough hardness for high load-carrying capacity.
Many different types of gears can be die cast,
such as spur, helical worm, clusters, and bevel
gears. Applications for these types of gears
include toys, washing machines, small appliances, hand tools, cameras, business machines,
and similar equipment.
Forming
Fig. 3
Cast tooth internal gears. Weights up to 1633 kg (3600
lb). Source: Ref 3
Fig. 4
Cast tooth pinion gear for an electric mining shovel.
Weight: 212 kg (468 lb). Source: Ref 3
Stamping and Fine Blanking. Stamping is
a metalworking technique that has been compared to using a cookie cutter. In this process, a
sheet of metal is placed between the top and bottom portions of a die; the upper die is pressed
into the lower section and “removes” or cuts the
gear from the sheet. This is a low-cost, very
efficient method for producing lightweight
gears for no-load to medium-duty applications.
Stamping is restricted by the thickness of the
Fig. 5
Cast tooth bevel gear produced by the shell molding
process to obtain excellent surfaces and close tolerances. Source: Ref 3
© 2005 ASM International. All Rights Reserved.
Gear Materials, Properties, and Manufacture (#05125G)
www.asminternational.org
132 / Gear Materials, Properties, and Manufacture
workpiece and is used primarily for spur gears
and other thin, flat forms (Ref 5). Stamped gears
range in size from 20 through 120 DP and 0.25
to 3 mm (0.010 to 0.125 in.) thick (Ref 6). As
the pitch becomes finer, the materials specification must become thinner. Table 2 shows recommended stock thicknesses for various pitches
that are commonly used and require no special
care in die maintenance. As shown in Table 1,
tolerances for stamped gears are good and
AGMA quality class 9 can be achieved with
extra care.
A wide range of materials can be processed by
stamping, including all the low and medium carbon steels, brasses, and some aluminum alloys.
Nonmetallic materials can also be stamped.
Gears manufactured by this process are used in
toys, clock and timer mechanisms, watches,
small appliances such as mixers, blenders, toasters, and can openers, as well as larger appliances
such as washers and dryers.
Fine blanking (also known as fine-edge
blanking) is actually more akin to cold extrusion
than to a cutting operation such as stamping.
The process takes metal from a sheet like stamping but differs from it in that it uses two dies and
forms the workpiece by pressing it into the
desired shape. The metal is extruded into the die
cavities to form the desired shape. Also unlike
stamping, fine blanking offers the designer a
limited three-dimensional capability and can
thus be used to create bevels, multiple gear sets,
and other complex forms (Ref 5). Fine blanked
gears can be found in a wide range of applications including the automotive, appliance, office
equipment, hydraulic, and medical equipment
industries.
Cold Drawing and Extrusion (Ref 6). This
process requires the least tool expenditure for
mass production of spur gear toothed gear elements and is extremely versatile in that almost
any tooth form that can be desired can be pro-
Table 2 Recommended stock thicknesses for
stamped gears
Thickness
Pitch range
20–36
38–60
62–72
74–90
92–120
Source: Ref 6
mm
in.
0.51–1.98
0.38–1.57
0.25–1.02
0.25–0.89
0.25–0.64
0.020–0.078
0.015–0.062
0.010–0.040
0.010–0.035
0.010–0.025
duced. As the name implies, a bar is pulled
(drawn) or pushed (extruded) through a series of
several dies, the last having the final shape of
the desired tooth form. As the material is run
through these dies it is actually squeezed into
the shape of the die. Since the material is displaced by pressure, the outside surface is work
hardened and quite smooth.
The bars that are “blanks” for this process are
usually 3 to 3.7 m (10 to 12 ft) in length. After
passing through the dies, they are known as pinion rods, and often are put into screw machines
that finish the individual gears. Experience has
shown that it is more economical to slice a segment off an extruded bar than to cut an individual gear. In some cases it would be impossible
to produce the desired shape of pinion in any
other way. Pinion rods from 16 to 100 DP can
be obtained, but as the pitch becomes finer, it
becomes more difficult to obtain the close tolerances that are sometimes desired on fine-pitch
pinions. Any material that has good drawing
properties, such as high-carbon steels, brass,
bronze, aluminum, and stainless steel, may be
used for the drawn pinion rod.
Gears and pinions manufactured by this process have a large variety of applications and have
been used on watches, electric clocks, springwound clocks, typewriters, carburetors, magnetos, small motors, switch apparatus, taximeters,
cameras, slot machines, all types of mechanical
toys, and many other parts for machinery of all
kinds.
Gear Rolling (Ref 1). Spur and helical
gears, like splines, are roll formed. Millions of
high-quality gears are produced annually by this
process; many of the gears in automobile transmissions are made this way. As indicated in Fig.
6, the process is basically the same as that by
which screw threads are roll formed, except that
in most cases the teeth cannot be formed in a
single rotation of the forming rolls; the rolls are
gradually fed inward during several revolutions.
Because of the metal flow that occurs, the top
lands of roll-formed teeth are not smooth and
perfect in shape; a depressed line between two
slight protrusions can often be seen. However,
because the top land plays no part in gear tooth
action, if there is sufficient clearance in the mating gear, this causes no difficulty. Where desired, a light turning cut is used to provide a
smooth top land and correct addendum diameter.
Rolling produces gears 50 times as fast as
gear cutting and with surfaces as smooth as 0.10
µm (4 µin.). Not only does rolling usually need
© 2005 ASM International. All Rights Reserved.
Gear Materials, Properties, and Manufacture (#05125G)
www.asminternational.org
Chapter 6: Casting, Forming, and Forging / 133
no finish operation, but rolling refines the microstructure of the workpiece.
Production setup usually takes only a set of
rolling dies and the proper fixture to equip the
rolling machine. By either the infeed (plunge)
method or the throughfeed method, the rolling
dies drive the workpiece between them, forming
the teeth by pressure.
Limits. Spur gears can be rolled if they have
18 teeth or more. Fewer teeth cause the work to
roll poorly. Helical gears can be rolled with
fewer teeth if the helix angle is great enough.
It is usually impractical to roll teeth with
pressure angle less than 20°. Lower angles have
wide flats at root and crest that need more pressure in rolling. Lower angles also hinder metal
flow. Although 0.13 mm (0.005 in.) radius fillets can be rolled, 0.25 mm (0.010 in.) is a better minimum. For greater accuracy, gear blanks
are ground before rolling. Chamfers should be
30° or less.
Steels for gear rolling should not have more
than 0.13% S and preferably no lead. Blanks
should not be harder than 28 HRC.
Forging
Forging has long been used in the manufacture of gears. This is particularly true for the
production of gear blanks which would subsequently be cut/machined into the final desired
configuration. Gear blanks have been produced
by open-die forging, closed-die forging (Fig. 7),
and hot upset forging. During the past thirtyfive years there has been considerable research
and development aimed at producing near-net
or net-shape gears by precision forging. Today
precision forged gears requiring little or no finish machining are commonly used in the automotive, truck, off-highway, aerospace, railroad,
agriculture, and material handling industries, as
well as the energy and mining fields.
High-Energy Rate Forging
One of the first forging processes for manufacturing near- or net-shape gears was the highenergy rate forging process which is a closeddie hot or cold forging process in which the
work metal is deformed at unusually high velocities. Ideally, the final configuration of the forging is developed in one blow, or at most, a few
blows. Velocity of the ram, rather than its mass,
generates the major forging force.
It is possible to produce gears with a contoured grain flow that follows the configuration
of the teeth using high-energy-rate forging. In
the case of spur gears, this is achieved by pancaking to cause lateral flow of the metal in a die
containing the desired tooth configuration at its
periphery. Contoured grain increases the loadbearing capacity without increasing the tooth
size. In addition, the process minimizes the
machining required to produce the finished
gear. Although spur gears are the easiest to
forge, helical and spiral-bevel gears can also be
Fig. 7
Fig. 6
Method for forming gear teeth and splines by cold
forming. Source: Ref 1
Gear blank that was closed-die forged in four hammer
blows from pancaked stock (not shown), and then
trimmed and pierced in one press stroke. Dimensions are given
in inches.
© 2005 ASM International. All Rights Reserved.
Gear Materials, Properties, and Manufacture (#05125G)
www.asminternational.org
134 / Gear Materials, Properties, and Manufacture
forged if their configurations permit ejection of
the gear from the die cavity. Gears have been
forged from low-alloy steel, brass, aluminum
alloys, stainless steel, titanium, and some of the
heat-resistant alloys.
Gears with a DP of 5 to 20 are commonly
forged with little or no machining allowance.
The die life decreases significantly when forging finer-pitch gears.
The forging of 5 DP gears with an involute
tolerance of 0.013 mm (0.0005 in.) and total
composite error of 0.08 mm (0.003 in.) has been
reported. These gears were forged with a toothto-tooth spacing deviation of about 0.025 mm
(0.001 in.) and a total accumulated deviation of
0.089 mm (0.0035 in.). Over-the-pins dimensions were held to ±0.05 mm (0.002 in.) on
these gears, and the total composite error was
about 0.20 mm (0.008 in.).
Holding gear dimensions to extremely close
tolerances may eliminate finish machining, but
the savings may be exceeded by higher die making/maintenance costs. Consequently, most
forged gears have an allowance for machining.
A surface finish of 0.5 to 1.5 µm (20 to 60
µin.) on gear teeth is practical. However, even
with a 0.5 µm (20 µin.) finish, local imperfections can increase the average to 1.5 µm (60
µin.) or greater. Therefore, it would be difficult
to maintain a good surface finish on gear teeth
without grinding.
Typical Gear Forgings. The 4.5 kg (10 lb)
gear shown in Fig. 8 was forged from 8620 steel
billet 75 mm (3 in.) in diameter by 124 mm (4.9
in.) in length. An energy level of 353,000 J
(260,000 ft · lbf) was needed to forge the gear in
one blow at 1230 °C (2250 °F). The web on the
gear was forged to final thickness; the teeth
were forged with 0.51 mm (0.020 in.) of stock
for finish machining.
The die inserts originally used to forge this
gear were made of H11 or H13 tool steel. This
steel typically softened after producing 20 gears
because of its temperature rising above the 565
°C (1050 °F) tempering temperature of H13
steel. The use of Alloy 718 (UNS N07718) was
found to improve the die insert life.
The automotive flywheel shown in Fig. 9,
272.49 mm (10.728 in.) in diameter over the
teeth and weighing 11 kg (24 lb), was forged
from a machined blank cast from class 40 gray
iron (generally considered unforgeable). The
machined preform, a section of which is shown
in Fig. 9, was heated to 955 °C (1750 °F) and
forged at an energy level of 271,000 J (200,000
ft · lbf). This part had the smallest tolerance
specification. The diameter over the teeth and
the thickness of the body had a tolerance of
+0.00 mm, –0.18 mm (+0.000 in., –0.007 in.).
The largest tolerance on the part was ±1.02 mm
(±0.040 in.) on the diameter of a recess. Tolerances on the other recesses were ±0.18 mm
(±0.007 in.) and +0.48 mm, –0.00 mm (+0.019
in., –0.000 in.). This gear was forged to the finished dimensions.
Various gears with teeth as an integral part
have been forged. These have ranged in outside
diameter from 64 to 267 mm (2.5 to 10.5 in.)
and in weight from 0.54 to 11 kg (1.2 to 24 lb).
Most have been made with 0.13 to 0.51 mm
(0.005 to 0.020 in.) of stock on the flank of each
tooth for finish hobbing and grinding. Gears
forged with integral teeth normally have longer
Fig. 8
Fig. 9
Near-net shape cluster gear made by high-energy rate
forging. Dimensions are given in inches.
Near-net shape automotive flywheel made by highenergy rate forging. Dimensions are given in inches.
© 2005 ASM International. All Rights Reserved.
Gear Materials, Properties, and Manufacture (#05125G)
www.asminternational.org
Chapter 6: Casting, Forming, and Forging / 135
fatigue and wear life than those made from a
conventionally forged blank on which the teeth
are hobbed, shaped, or milled.
Precision Forging
The term “precision forging” does not specify a distinct forging process but rather describes a philosophical approach to forging. The
goal of this approach is to produce a net shape,
or at least a near-net shape, in the as-forged condition.
The term net indicates that no subsequent
machining or finishing of a forged surface is
required. Thus, a net shape forging requires no
further work on any of the forged surfaces,
although secondary operations may be required
to produce minor holes, threads, and other such
details. A near-net shape forging can be either
one in which some but not all of the surfaces are
net or one in which the surfaces require only
minimal machining or finishing. Precision forging is sometimes described as close-tolerance
forging to emphasize the goal of achieving,
solely through the hot forging operation, the
dimensional and surface finish tolerances
required in the finished part.
In recent years, computer-aided design and
manufacturing (CAD/CAM) techniques have
been applied to various forging processes (Ref
7). This computerized approach is applicable to
precision hot forging of spiral bevel, spur, and
helical gears in conventional presses in that it
allows the die designer to examine the effects of
various process variables (loads, stresses, and
temperature) on the die design.
Precision hot-forged gears have the same
advantages over cut gears as other molded gears
(cast, P/M processed, injection molded) in that
there is little or no material lost (Fig. 10). This is
a cost savings from the standpoint of both the
cost of the material itself and, more importantly,
the cost of machining. In addition, precision
forged gears also have the advantage over cut
gears of increased load-carrying capacity. This
added strength in the form of increased fatigue
strength is due to the difference in grain flow between gears cut from bar stock and forged gears.
The grain flow in cut gears is determined by the
hot rolled orientation of the bar stock and has no
relationship to gear tooth contour. On forged
specimens, the grain flow follows the tooth contour in every gear tooth. Figure 11 compares
the fatigue properties of cut and forged gears
(Ref 8).
Near-Net Shape Quality Gears. The majority of forged gears produced today are nearnet shape configurations. Gear teeth are forged
with an envelope of material (stock allowance)
around the tooth profile. This envelope is subse-
Fig. 10
Material/weight savings using the near-net shape
forging process. The large spur gear weighs 25 kg (55
lb) as a blank (left side). As a forged tooth gear (right side) with
1 mm (0.04 in.) of stock allowance on the tooth profile for finish
machining, it weighs 17 kg (37 lb). Source: Presrite Corporation
Fig. 11
Fatigue data for (a) cut gears and (b) near-net shape
forged gears. Source: Ref 8
© 2005 ASM International. All Rights Reserved.
Gear Materials, Properties, and Manufacture (#05125G)
www.asminternational.org
136 / Gear Materials, Properties, and Manufacture
quently removed by the forging house or the customer purchasing the forged gears.
The manufacturing process begins with steel
bar stock, usually turned and polished to
improve the surface, and cut to the exact weight.
The exact weight is critical because the amount
of steel must completely fill the die to produce
the complete gear profile. Prior to forging, billets are heated between 925 and 1230 °C (1700
and 2250 °F) in an electrical induction furnace
that is controlled by an optical pyrometer to ±14
°C (25 °F).
In a single stroke, standard mechanical forging presses, ranging from 14,235 to 53,375 kN
(1600 to 6000 tonf), form near-net shape gears
with the complete allowable stock allowance.
The purpose of this first operation, which forms
a “pancake,” is to break the scale off of the billet
and size the outside diameter to just under the
size of the root diameter in the gear die. Next, an
operator positions the billet into the finish die.
After forging, a hydraulic knockout system
immediately extracts the gear from the finish die.
After the raw forged gear is hydraulically
ejected from the die, it is placed in a trimming
nest where the hole is punched. It is then allowed
to cool to ambient temperature, which usually
takes up to 24 h. Once cooled, it is ready for finish machining.
Fig. 12
Near-net shape gears can be produced using
any carburizing or induction hardening steel in
five basic configurations: spiral bevel, helical,
straight bevel, spur gears with a 1 mm (0.04 in.)
stock allowance, and spur gears with a 0.1 to 0.3
mm (0.004 to 0.012 in.) stock allowance. The
near-net shape gears can be produced in diameters up to 425 mm (17 in.) with stock allowances
ranging from 0.1 to 1.5 mm (0.004 to 0.06 in.).
The specifications for various gear configurations include:
•
•
•
•
Spiral bevel gears can be produced up to 425
mm (17 in.) in diameter, with 0.5 mm (0.02
in.) minimum stock per flank. A maximum
spiral angle of 35° and a pitch range of less
than 7 DP can be achieved.
Straight bevel gears have configurations/
properties similar to spiral bevel gears
Helical gears can be produced up to 250 mm
(10 in.) in diameter and up to 40 kg (90 lb)
in weight, with a 0.5 mm (0.02 in.) minimum stock per flank. A maximum helix
angle of 25° and a pitch range of 4 to 12 DP
can be achieved.
Spur gears with a 1 mm (0.04 in.) stock
allowance can be produced up to 400 mm
(16 in.) in diameter and up to 135 kg (300 lb)
in weight, with a 1 mm (0.04 in.) minimum
Examples of near-net shape forged gears. (a) Spiral bevel gear with a 0.5 mm (0.02 in.) stock allowance developed for use
on gears with a DP less than 7. (b) Coarse-pitch (less than 5 DP) spur gear with a stock allowance of 1 to 2 mm (0.04 to
0.80 in.). Source: Presrite Corporation
© 2005 ASM International. All Rights Reserved.
Gear Materials, Properties, and Manufacture (#05125G)
www.asminternational.org
Chapter 6: Casting, Forming, and Forging / 137
•
stock allowance per flank. A pitch range of
less than 5 DP can be achieved. This type of
gear requires a finish process of hobbing,
hobbing and shaving, or hobbing and grinding, or skiving.
Spur gears with a 0.1 to 0.3 mm (0.004 to
0.012 in.) stock allowance can be produced
up to 250 mm (10 in.) in diameter and up to
150 mm (6 in.) maximum face width, with a
0.1 to 0.3 mm (0.004 to 0.012 in.) stock
allowance per flank. A pitch range of 4 to 12
DP can be achieved. This type of gear requires a finish process of grinding or skiving. A net root is possible.
Figure 12 shows examples of precision
forged near-net shape gears.
REFERENCES
1. T.T. Krenzer and J.W. Coniglio, Gear
Manufacture, Machining, Vol 16, ASM
Handbook, ASM International, 1989,
p 330–355
2. J.G. Bralla, Handbook of Product Design
for Manufacturing, Vol 16, McGraw-Hill
Book Company, 1986, p 355
3. M. Blair and T.L. Stevens, Ed., Steel Castings Handbook, Sixth Edition, Steel
Founders’ Society and ASM International,
1995, p 2–34
4. D.W. Dudley, Gear-Manufacturing Methods, Handbook of Practical Gear Design,
McGraw-Hill Book Company, p 5.86
5. C. Cooper, Alternative Gear Manufacturing, Gear Technol., July/Aug 1998, p 9–16
6. D.P. Townsend, Ed., Gears Made by Dies,
Dudley’s Gear Handbook: The Design,
Manufacture, and Application of Gears,
Second Edition, McGraw Hill Book Company, 1992, p 17.1–17.21
7. D.J. Kuhlmann and P.S. Raghupathi, Manufacturing of Forged and Extruded Gears,
Gear Technol., July/Aug 1990, p 36–45
8. T. Russell and L. Danis, Precision Flow
Forged Gears, Gear Manufacture and Performance, American Society for Metals,
1974, p 229–239
