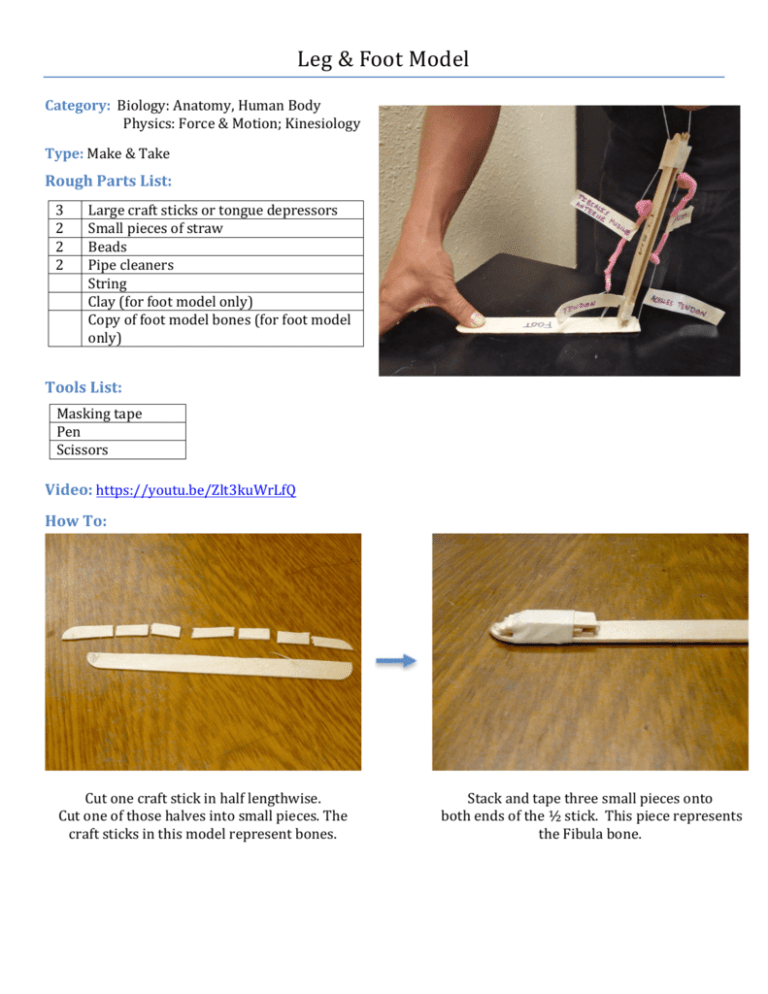
Leg & Foot Model Category: Biology: Anatomy, Human Body Physics: Force & Motion; Kinesiology Type: Make & Take Rough Parts List: 3 2 2 2 Large craft sticks or tongue depressors Small pieces of straw Beads Pipe cleaners String Clay (for foot model only) Copy of foot model bones (for foot model only) Tools List: Masking tape Pen Scissors Video: https://youtu.be/Zlt3kuWrLfQ How To: Cut one craft stick in half lengthwise. Cut one of those halves into small pieces. The craft sticks in this model represent bones. Stack and tape three small pieces onto both ends of the ½ stick. This piece represents the Fibula bone. Tape the two remaining sticks together. This represents the ankle joint. One craft stick represents the Tibia bone and the other represents the foot. Tape the Fibula stick onto the back of one of the whole sticks. Wrap a piece of string around each side of the ankle joint. Connect each string to a pipe cleaner and add another string to the other side of the pipe cleaner. The pipe cleaners represent muscles. The strings represent tendons. Tape a small piece of straw onto the top of the tibia and fibula bones. Run each string through a piece of straw. Tie a bead onto the end of each string. Label the tibia and fibula bones. Label the foot. Label two tendons. Label the tibialies anterior and gastrocnemius muscles. Pull on the strings in the model to move the foot in different directions. Foot Model: Place a printed copy of the bones of the feet on a table. Roll and shape pieces of clay to match each bone and place them on top of the printed model. Concepts Involved: •
•
•
•
•
•
The arrangement of muscles and bones makes different kinds of movements possible. Animals have different arrangements of muscles and bones to give them different movements. Muscles pull on bones to give the force that makes movement. Muscles only pull, never push. Bones provide the stiff structure that makes movements possible. Tendons connect bones to muscles. Ligaments connect bones to bones. Focus Questions: 1. The tibialis anterior muscle runs along the front of the shin, it lifts the foot muscle: label the tibialis anterior muscle on your model. 2. The gastrocnemius muscle runs along the shin; it is the power muscle responsible for running: label the gastrocnemius muscle on your model. 3. The tibia is the big bone in the front of the lower leg: label the tibia bone on your model. 4. The fibula is the bone in the back of the lower leg: label the fibula bone on your model. 5. The Achilles tendon connects the heel to the gastrocnemius muscle: label the Achilles tendon on your model. Elaboration: To understand how animals and humans move their bodies, it is necessary to understand both the physics of force and motion and the biology of muscles, tendons, bones and ligaments. The science of human movement is called kinesiology. Knowing the physics that describes a system of bones and muscles lets you understand better how animals and humans can move. Bones work like levers. A lever has three parts: the effort arm where the force goes into the lever, the resistance arm where the lever gives force out, and the fulcrum, which is the pivot point on the lever. Levers can multiply or reduce a force going in to them depending on the lengths of the arms. There are three classes of levers. Sea-­‐saws and scissors are examples of first-­‐class levers, where the fulcrum is in the middle and the effort and resistance arms are on the ends. Your foot is an example of a first-­‐class lever, with your ankle as the fulcrum, the Achilles tendon and Gastrocnemius muscle pulling on one end of the foot lever and the a person’s weight being supported on the other end. The leverage you get depends on the relative length of these two arms. Your arm has a first-­‐class lever composed of the triceps and the tiny tip of the elbow. Notice how hard it is to push down on something hard if your arm is bent. A broom with the top end held steady and ice tongs are examples of third-­‐class levers, where the fulcrum is at one end, the force is input in the middle and output at the other end. In this kind of lever the force in is greater than the force out. But the distance moved is multiplied: your hand has to move only a bit to get the broom to make a long motion on the floor. Your arm also has a third-­‐class lever composed of the biceps and radius. If you are lifting a plate of food, the biceps has to give a force larger than the weight of the food, but just over a small distance. (The final type of lever has the fulcrum at one end, the force in at the other and the force out in the middle. Wheel barrows and paper cutters are examples of this type of lever. No body systems make use of this arrangement.) The arms and legs have single bones near the top and a pair of bones near the end. The two bones make a larger range of motion possible, such as twisting and pivoting. When your tendon breaks, your muscle cannot pull on anything and must be reattached to the bone. Tendons and muscles heal fast and can be fixed easily in surgery. They are softer tissue than bones or ligaments. Most meat we eat is from animal muscles, but tendons are also edible. Damaged ligaments are much harder to fix and in some cases never heal. Take care of your ligaments! You can see the strong, stringy ligaments in a chicken leg holding the bones together. Label on Leg-­‐Ankle-­‐Foot Model: • Tibialis Anterior muscle (front of the shin – pulls foot up) • Gastrocnemius muscle (calf muscle – power muscle for running) • Tibia (big bone in front of lower leg) • Fibula (small bone in back of lower leg) • Achilles tendon (connects the heel to the gastrocnemius muscle) Cat Leg Dog Leg Label on Foot Bone model: o Phalanges (toe bones) o Metatarsels (5 longest bones in the foot) o Tarsals (all the other bones up near the ankle) Links to k-­‐12 CA Content Standards: Grades k-­‐8 Standard Set Investigation and Experimentation: Scientific progress is made by asking meaningful questions and conducting careful investigations. As a basis for understanding this concept and addressing the content in the other strands, students should develop their own questions and perform investigations. Grades k-­‐12 Mathematical Reasoning: 1.0 Students make decisions about how to approach problems: 1.1 Analyze problems by identifying relationships, distinguishing relevant from irrelevant information, sequencing and prioritizing information, and observing patterns. 1.2 Determine when and how to break a problem into simpler parts. 2.0 Students use strategies, skills, and concepts in finding solutions: 1.1 Use estimation to verify the reasonableness of calculated results. 1.2 2.2 Apply strategies and results from simpler problems to more complex problems. 1.3 Use a variety of methods, such as words, numbers, symbols, charts, graphs, tables, diagrams, and models, to explain mathematical reasoning. 2.5 Indicate the relative advantages of exact and approximate solutions to problems and give answers to a specified degree of accuracy. 3.0 Students move beyond a particular problem by generalizing to other situations: 3.1 Evaluate the reasonableness of the solution in the context of the original situation. 3.2 Note the method of deriving the solution and demonstrate a conceptual understanding of the derivation by solving similar problems. 3.3 Develop generalizations of the results obtained and apply them in other circumstances. © 2015 Watsonville Environmental Science Workshop. All Rights Reserved worldwide. When linking to or using WESW content, images, or videos, credit MUST be included.

