SINGER® FUTURATM – Water Bottle Carrier
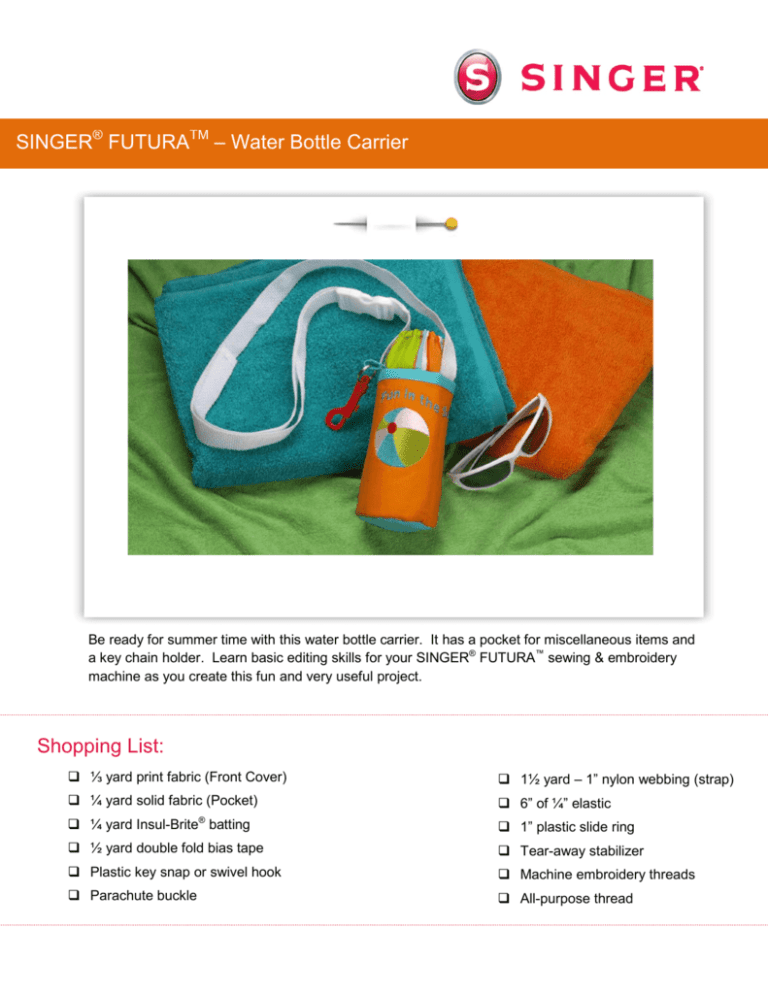
Be ready for summer time with this water bottle carrier. It has a pocket for miscellaneous items and
a key chain holder. Learn basic editing skills for your SINGER® FUTURA™ sewing & embroidery
machine as you create this fun and very useful project.
Shopping List:
⅓ yard print fabric (Front Cover)
1½ yard – 1” nylon webbing (strap)
¼ yard solid fabric (Pocket)
6” of ¼” elastic
®
¼ yard Insul-Brite batting
1” plastic slide ring
½ yard double fold bias tape
Tear-away stabilizer
Plastic key snap or swivel hook
Machine embroidery threads
Parachute buckle
All-purpose thread
Prepare the Fabric:
1. Printed Fabric:
Cut one - 3½” x 11” (Top band)
Cut two - 7” x 11” (Carrier base & lining)
Cut two - 3¾” circles (Bottom)
2. Solid Fabric:
Cut one - 12” x 16” (Pocket/embroidery)
3. Insul-Brite® batting: Cut one - 6½” x 11”
Cut one - 3¼” circle
4. Place the 12” x 16” pocket fabric in the large embroidery hoop
along with a two pieces of tear-away stabilizer underneath the
fabric. (Extra layer of stabilizer to ensure that the beach ball
design will not pucker the fabric.)
At the Computer:
5. Download the beach ball design from the website and save it to your
computer. Click here
6. Open the software for the SINGER® FuturaTM sewing & embroidery
machine.
•
•
•
•
Select the Open icon on the main tool bar.
Find the beach ball design that you saved, select it, then click
on OK.
The design appears in the hoop area on the screen in “ghost”
form, right click and select Apply.
In order to see the details of the design, select
Realistic View. To do this, click on View from
the main tool bar, then select Realistic View.
Now the beach ball appears in “stitches”. Notice
that the stitches are all running in the same
directions in each area of the beach ball. To
add more dimension to the design, we will be
editing the direction of the stitches in each
section or block of the beach ball changing each
section so that the stitch angles radiate out from
the center, much the same way spokes on a
wheel do. We will also be editing some of the
other settings as well.
Edit stitch angles so that they
radiate out from the center, in
the directions of the arrows.
2
7. Editing the design:
• Before starting the editing process, you
might find it helpful to get a closer look
at the design. Use the Zoom tool
found on the main tool bar to zoom in
closely around the areas that you will
editing. Select the Zoom icon,
then left click and hold the
cursor, drag the cursor over the beach
ball and then release the cursor.
Gaps between
blocks
•
As you take a closer look, one of the
first things that you notice is the gap
that is in between some of the blocks.
These gaps can be removed through
the editing process. More on this later
in the lesson.
•
Select the Editing icon from the main tool bar.
•
Click on the upper green
section or block of the ball to
highlight it. The block is
highlighted with nodes or
points that are connected by a
grey boundary line. Also
notice the blue line. This line
reflects the angle of the
stitches in this block. Click on
one end of the blue line and
swing it so that it radiates out
from the center of the ball.
Click on Stitch it to set the
changes.
•
Stitch angle –Swing one
end to change stitch
angle.
You may also wish to set the stitching
parameters of this block. One option is to use the
Preset Fabric function which takes the guess
work out of stitching parameters. Right click, then
select Embroidery Settings.
3
•
When the Embroidery Settings menu opens,
click on the arrow next to Manual Settings in
the drop down list. Select Preset Fabrics.
•
Another menu, Select Fabric, opens that
displays many different types of fabric
options. Scroll through the list until you
see an application using fabric that is
similar to the fabric you are using. In
this case, a table cloth would be close.
Select Housewares -Table Cloth. The
recommendation is to use a light tearaway stabilizer and a sharp needle.
When you’ve made your selections,
select OK. Your selection will also
change stitch parameters, such as
underlay, stitch density and stretch.
•
The parameters are set, and are reflected in the
Embroidery Settings box. Click on Apply.
•
Use this same process to make changes to the
remaining blocks. In some cases, it will be
necessary to remove the gaps in between the
blocks. You can do this by moving individual nodes
or move the lines themselves. Click on an individual
node or line to move them to a new position. When
working with blocks that are densely filled with
stitches, it is best to slightly overlap the adjacent
blocks to remove any gaps that can result from the
pull of the stitches on the fabric. Selecting “Stretch”
in the Embroidery settings box will also help with
this.
Also, in some cases, you may wish to change the
node from round to square, square to round or filled in to outlined, as each type
has a different function. The round nodes create a smooth curve from one point
to the other, and the square nodes create a sharp point from one point to
another.
4
It’s easy to change the nodes from round to square and vice versa. Click on the node you
wish to change. The highlighted node appears
with a dashed
Remove gaps between
box around it. The cursor changes and a
message will
blocks by moving lines and
appear at the bottom of the screen below the
Object List
nodes.
Click
on
the
line
or
instructing you how to change or move the
node. In this
node
and
drag
to
a
new
case, hold the Ctrl button down on the key
board while left
position
filling
in
the
gaps.
clicking to change the corner point to a smooth
point.
•
Click on Stitch it to set the
changes.
Message on bottom of screen instructs
how to change the node from square to
round.
8. Adding lettering:
• Select the Lettering icon from the main tool bar.
• Type – Fun in the Sun!
• Select Font - Arial Rounded
• Height .44
• Space .04
• Justify left
• Wave Frame
• Right click
and select Stitch it.
• Click on the
Lettering icon once again to deactivate the
lettering.
5
9. Center the design:
• Select Design from the main tool bar.
• Select Center Design.
10. Send the design to the machine for
embroidering:
• Select the Transmit to Machine icon on the
toolbar.
• In the Machine Navigator box, select Send Design
to send the embroidery data to the machine.
•
•
•
Once the design data has been sent to the
machine, embroider the design.
When the design is finished embroidering, remove
the fabric from the hoop, remove the
stabilizer and press.
Fold the fabric in half widthwise, so that
the lettering is about 1 inch or so from
the fold. Trim the fabric to 6½” x 11”6½”
centering the embroidery along the
sides.
Fold
11”
Sewing Directions:
11. Prepare the machine for regular sewing:
• Remove the embroidery unit & embroidery foot; Attach the General Purpose foot
• Thread the machine with the all-purpose thread.
• Select a straight stitch.
6
12. Pin a piece of bias tape along the folded edge of the pocket, enclosing in the folded
edge. Stitch in place.
13. Cut a 3” piece of bias tape. Stitch folded edges closed. Slide one end of the strip
through the key ring. Bring raw ends together and stitch to secure.
14. Place the 6½” x 11” batting behind the carrier on one of the 7” x 11” carrier base pieces,
having raw edges even at the top, pin together. Cut a 7” piece from the nylon webbing.
Pin one end of the strap to the top edge of the carrier base about 2½” from the left
edges. Follow manufacturer’s instructions to apply the one half of the parachute buckle
to the end of the strap.
2½”
Pin one end of
7” strap to top
edge
7
15. Pin one end of the remaining strap to the top edge of the carrier base, 5” from the other
strap. Apply the other half of the parachute buckle to the end of the strap, using the
slide ring on the strap to make it adjustable. Pin the fabric loop that holds the key ring
next to the left strap, having raw edges even with the top edge of the carrier base.
Stitch using a ⅜” seam across the top edge to secure all pieces in place.
2½”
Pin the loop from
the key ring next
to the left strap.
5”
Pin one end of the
remaining strap to
the top edge of the
carrier base.
16. Casing: Fold under ½” along one long edge of the top band. Fold under ½” again.
Stitch close to folded edge to form casing.
8
17. With right sides together, pin the raw edges of the top band to top edge of the carrier
base, enclosing straps. Stitch across the top, using a ½” seam. Note: all remaining
seams will be ½” unless otherwise indicated.
18. Place the remaining 7” x 11” carrier base (lining) piece on top of the band, right side of
lining to wrong side of top band. Stitch in place along top edge.
19. Bring the band up to the top, bringing the lining down toward the back. Edge stitch
close to the seam line.
20. Place the embroidered pocket on top of the carrier base, having the raw edges even at
the bottom, pin in place along the sides and bottom edges. Baste layers together within
the seam lines. Note: The straps and key ring will not be shown in the remaining
illustrations.
9
21. Thread the elastic through the casing. Stitch across the ends of the elastic to secure in
place.
22. With right sides together, fold the water bottle carrier in half matching side seams.
Stitch the sides together, reinforcing the beginning and the ending of the seam. Finish
seam edges with a zig-zag or over edge stitch.
23. Place the circle of batting on top of one of the circle fabric pieces. Lay the remaining
circle fabric on top of the batting creating a fabric sandwich. Baste edges together.
24. With right sides together, pin the circle to the bottom of the water bottle carrier. Stitch,
finish seam. Turn to the right side out. Insert bottle.
SINGER is sewing made easy™
SINGER, the Cameo “S” Desig, FUTURA and SINGER is SEWING MADE EASY are exclusive trademarks of The Singer Company Limited S.à r.l. or its
Affiliates. © 2014 The Singer Company Limited S.à r.l. or its Affiliates. All rights reserved.
10

