Training Young Apple Trees to the
Central Leader System
Guide H-333
Shengrui Yao1
Cooperative Extension Service • College of Agricultural, Consumer and Environmental Sciences
WHAT ARE TRAINING AND PRUNING?
Training is the practice of directing tree growth to a desired shape and form; it is usually performed on young
trees. Pruning is the removal of a terminal portion of
a branch or a whole branch to adjust or maintain tree
structure. Pruning is part of the training process, but
training also uses other techniques like clothespins,
branch spreaders, tying, etc. Mature trees need to be
pruned regularly.
PURPOSE OF TRAINING AND PRUNING
The purpose of training and pruning is to maintain desired tree shapes that are capable of early production of
large, high-quality crops with balanced vegetative and
reproductive growth.
TIME OF TRAINING AND PRUNING
The training practice starts immediately after planting
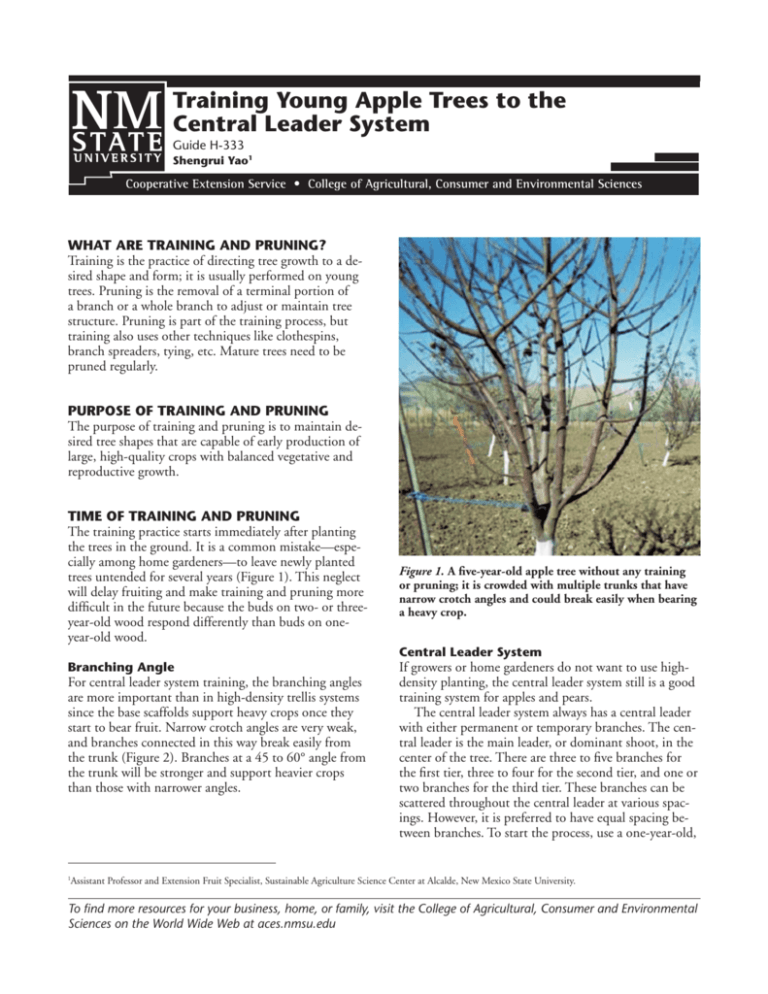
the trees in the ground. It is a common mistake—especially among home gardeners—to leave newly planted
trees untended for several years (Figure 1). This neglect
will delay fruiting and make training and pruning more
difficult in the future because the buds on two- or threeyear-old wood respond differently than buds on oneyear-old wood.
Branching Angle
For central leader system training, the branching angles
are more important than in high-density trellis systems
since the base scaffolds support heavy crops once they
start to bear fruit. Narrow crotch angles are very weak,
and branches connected in this way break easily from
the trunk (Figure 2). Branches at a 45 to 60° angle from
the trunk will be stronger and support heavier crops
than those with narrower angles.
Figure 1. A five-year-old apple tree without any training
or pruning; it is crowded with multiple trunks that have
narrow crotch angles and could break easily when bearing
a heavy crop.
Central Leader System
If growers or home gardeners do not want to use highdensity planting, the central leader system still is a good
training system for apples and pears.
The central leader system always has a central leader
with either permanent or temporary branches. The central leader is the main leader, or dominant shoot, in the
center of the tree. There are three to five branches for
the first tier, three to four for the second tier, and one or
two branches for the third tier. These branches can be
scattered throughout the central leader at various spacings. However, it is preferred to have equal spacing between branches. To start the process, use a one-year-old,
Assistant Professor and Extension Fruit Specialist, Sustainable Agriculture Science Center at Alcalde, New Mexico State University.
1
To find more resources for your business, home, or family, visit the College of Agricultural, Consumer and Environmental
Sciences on the World Wide Web at aces.nmsu.edu
Figure 2. The weak connection of a narrow angle between the branch and trunk.
barerooted, unbranched whip with a trunk diameter of
1/2 to 5/8 inches, or plant well-feathered trees.
After planting, the whip should be headed down
to about 30 inches, which will balance the size of the
aboveground and the damaged root system during
digging and transportation. If you head back too low,
it may induce excessive vegetative growth, and the
branches will be too low in position. If you cut off at
36 inches, it will result in short branches with weak
growth, which will be hard to use as a framework structure. Also, make sure there are five to seven good buds
under the cut. If the buds around that height are damaged, adjust the cut height to ensure there are several
good buds under the cut.
If well-feathered trees are planted, select three to four
well-spaced branches as scaffolds and cut the branches
back 1/3 or 1/2 of their length after planting, making
sure that their lengths are roughly equal. These branches
should be spaced several inches apart on the trunk, but
they should not be next to each other. If these scaffold
branches are too close, they could choke the central
leader in the future. Remove the branches below 24
inches and top the central leader 24 inches above the
first tier of branches.
The First Growing Season After Planting
Several weeks after planting, new shoots will emerge below the cut, and the first one will be used as the future
central leader. If the second and third shoots are too
strong and compete with the first one, then they should
be removed (Figure 3). For the rest, the good ones will
be used as scaffolds. If the branching angle is too narrow, use wooden clothespins to push the branches flat
(Figure 3). When the new shoots are 4 to 6 inches long,
put the clothespins on top of the young shoots and leave
them there for the season; the branches should achieve
the desired wide angle. Using clothespins to push the
branching angle early on is easier than using branch
spreaders later.
By the end of the first growing season, select three to
four well-spaced scaffolds with good branching angles
that are evenly spaced around the trunk, and remove
all other branches below 24 inches or that have narrow
angles. If clothespins were used, these selected branches
should have good crotch angles. If some grew too vigorously with narrow angles, branch spreaders should be
used the next spring to push them to 45 to 60°. If the
tree is weak without enough useful branches, cut the
Guide H-333 • Page 2
A
After
clothespins
B
C
Before
clothespins
Figure 3. Using clothespins to widen branching angles, before (left) and after clothespins (right): A. central leader,
B. strong and competitive shoot with narrow angle next to central leader has been removed, C. useful shoots for
permanent branches.
central leader short to try to get enough branches for the
first tier by the end of the second year.
The Second Growing Season After Planting
The main objective during the second growing season is
to develop a second layer of scaffolds, which should be
24 to 36 inches above the first layer established during
the first year after planting. Remember to use clothespins to widen the crotch angle of the new shoots. Select
branches that do not lie directly above any first-tier
scaffolds, but that instead fill the space between scaffolds of the first tier. Remove shoots that compete with
the central leader and other undesirable shoots. Branch
spreaders, weights, or ties should be used for scaffolds
with narrower crotch angles to widen them to 45 to 60°.
The spreader can be made of a wooden board with a V
or sharp nails on each end. Do not push the branches
more than 60° or there could be suckers growing on top
of the branch. The spreaders can stay in place for one or
two years until the branches are able to keep their position. The limb spreaders, weights, or ties should be used
before or during the winter pruning process.
Figure 4. A model central leader tree structure.
After the Second Growing Season
During winter pruning, keep three to four branches
with wide crotch angles for the second tier. Cut back
1/4 of the new terminal growth of the scaffolds. Keep
using limb spreaders or ties if necessary. Remove diseased or broken branches. Always maintain the central leader as the highest point of the tree. If you have
enough good-angled branches for the second tier, cut
the central leader 24 inches above the second tier of
branches to stimulate the third tier of branches.
Three or Four Years After Planting
Similar to year two, use clothespins to position the
young shoots. Remove upright, competitive, and other
undesired shoots during the growing season. Keep the
central leader’s dominance as the highest point of the
tree. All other branch terminals should be lower than
the central leader. The mature tree should be maintained
with a pyramid shape (Figure 4) with a dominant central leader. The first-tier scaffolds should be the strongest
Guide H-333 • Page 3
and longest, and the second and third tier of branches
should be shorter in length and smaller in diameter.
Successive Years
Continue to prune these trees each winter by removing
weak, hanging, and overcrowded branches. Once the
trees start to bear fruit, stop pruning the terminals of
the scaffolds. After a few more years, lower the central
leader to the third tier of branches. Since New Mexico
has intense sunlight, try to select a south-facing branch
to shade the trunk and avoid sunscald.
Nowadays, high-density planting with dwarfing rootstocks is becoming increasingly popular with training
systems like vertical axe, super spindle, and tall spindle.
These high-density plantings require more trees per acre
and tree supports or trellises, which means increased
early investment. However, these trees are precocious
and give better early return.
REFERENCES
Clements, J., and W. Cowgill. 2002. Techniques for
training young apple trees [Online]. Available at http://
fruit.umext.umass.edu/tfruit/clements/articles/
youngtreetraining.htm
Hoying, S., T. Robinson, and M. Fargione. n.d. The tall
spindle planting system [Online]. Available at http://
www.fruit.cornell.edu/tree_fruit/resources/
The%20Tall%20Spindle%20Planting%20System.pdf
Hoying, S., T. Robinson, and M. Fargione. n.d. The vertical axis planting system [Online]. Available at http://
www.fruit.cornell.edu/tree_fruit/resources/
The%20Vertical%20Axis%20Planting%20System.pdf
Penn State Extension. n.d. Pruning and training to a
central leader [Online]. Available at http://extension.
psu.edu/gardening/fphg/pome/pruning/pruning-andtraining-to-a-central-leader
Shengrui Yao is Assistant Professor and
Extension Fruit Specialist at New Mexico
State University’s Sustainable Agriculture
Science Center at Alcalde. She earned her
Ph.D. in pomology/horticulture at Cornell
University. Her research and Extension
work focus on tree fruit and small fruit
production, conventional and organic
production, and orchard floor and soil
fertility management.
Contents of publications may be freely reproduced for educational purposes. All other rights reserved. For permission to use
publications for other purposes, contact pubs@nmsu.edu or the authors listed on the publication.
New Mexico State University is an equal opportunity/affirmative action employer and educator. NMSU and the U.S. Department
of Agriculture cooperating.
October 2013
Las Cruces, NM
Guide H-333 • Page 4


