BIOS replacement instructions
advertisement
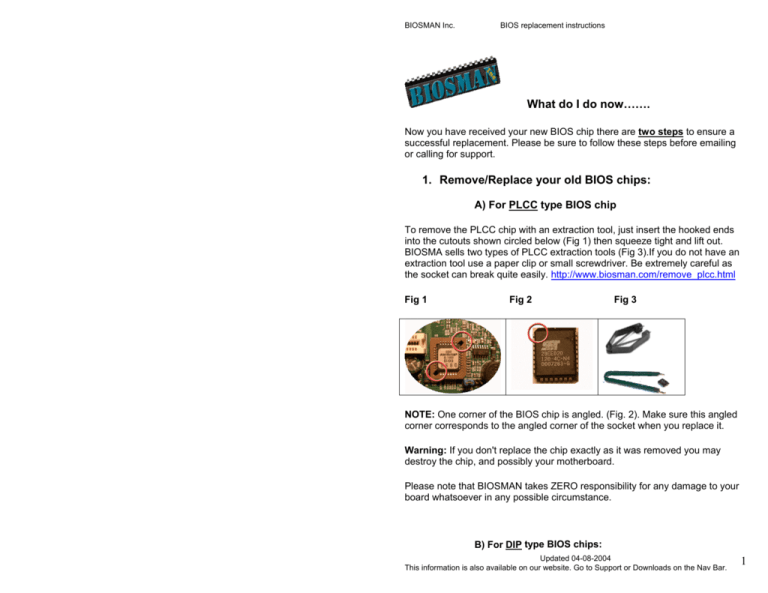
BIOSMAN Inc. BIOS replacement instructions What do I do now……. Now you have received your new BIOS chip there are two steps to ensure a successful replacement. Please be sure to follow these steps before emailing or calling for support. 1. Remove/Replace your old BIOS chips: A) For PLCC type BIOS chip To remove the PLCC chip with an extraction tool, just insert the hooked ends into the cutouts shown circled below (Fig 1) then squeeze tight and lift out. BIOSMA sells two types of PLCC extraction tools (Fig 3).If you do not have an extraction tool use a paper clip or small screwdriver. Be extremely careful as the socket can break quite easily. http://www.biosman.com/remove_plcc.html Fig 1 Fig 2 Fig 3 NOTE: One corner of the BIOS chip is angled. (Fig. 2). Make sure this angled corner corresponds to the angled corner of the socket when you replace it. Warning: If you don't replace the chip exactly as it was removed you may destroy the chip, and possibly your motherboard. Please note that BIOSMAN takes ZERO responsibility for any damage to your board whatsoever in any possible circumstance. B) For DIP type BIOS chips: Updated 04-08-2004 This information is also available on our website. Go to Support or Downloads on the Nav Bar. 1 BIOSMAN Inc. BIOS replacement instructions The easiest way to remove a DIP type BIOS chip is to purchase our DIP extraction tool (Fig 5). You can also get a very small slot screw driver and lever each side slowly until chip can be removed. NOTE: It is VERY easy to bend and break the legs of the chip so you must take your time and use slow precise movements until it is free. Fig 4 Fig 5 Pay special attention to the chip orientation when you remove it. Notice where the cutout half circle notch is (Fig 4), and notice the orientation of the writing on the chip. Insert the new chip with the same orientation as the old one. Warning: If you don't replace the chip exactly as it was removed you will destroy the chip, and possibly your motherboard. Please note that BIOSMAN takes ZERO responsibility for any damage to your board whatsoever in any possible circumstance. 2. Clear the CMOS The most accurate way to clear the CMOS after replacing your BIOS chip is to follow the steps below. Most boards do have a clear CMOS jumper but we recommend our method. 1. 2. 3. 4. Remove the battery (use a pen or screw driver to lever it out). Remove the power source (unplug or turnoff power supply). Wait 30 seconds Replace the battery being sure to insert it the correct side up. The side with the writing on it goes up (+) For any other problems, please visit the FAQ page located here: http://www.biosman.com/faq.html Updated 04-08-2004 This information is also available on our website. Go to Support or Downloads on the Nav Bar. 2 BIOSMAN Inc. BIOS replacement instructions Fatal errors, which halt the boot process, are communicated through a series of audible beeps. For example, if the BIOS POST can initialize the video but an error occurs, an error message will be displayed. If it cannot display the message, it will report the error as a series of beeps. In General 80% of beep codes are memory related and 10% video card related. Beep codes that are used by AMIBIOS: Number of Beeps 1 2 3 4 5 6 7 8 9 10 11 Description Memory refresh timer error Parity error Main memory read / write test error Motherboard timer not operational Processor error Keyboard controller BAT test error General exception error Display memory error ROM checksum error CMOS shutdown register read/write error Cache memory bad Troubleshooting BIOS Beep Codes Number of Beeps 1, 2 or 3 4-7, 9-11 8 Trouble shooting action Reseat the memory, or replace with known good modules. Fatal error indicating a serious problem with the system. Consult your system manufacturer. Before declaring the motherboard beyond all hope, eliminate the possibility of interference by a malfunctioning add-in card. Remove all expansion cards except the video adapter. • If the beep codes are generated even when all other expansion cards are absent, the motherboard has a serious problem. Consult your system manufacturer. • If the beep codes are not generated when all other expansion cards are absent, one of the add-in cards is causing the malfunction. Insert the cards back into the system one at a time until the problem happens again. This will reveal the malfunctioning add-in card. If the system video adapter is an add-in card, replace or reseat the video adapter. If the video adapter is an integrated part of the system board, the board may be faulty. Updated 04-08-2004 This information is also available on our website. Go to Support or Downloads on the Nav Bar. 3 BIOSMAN Inc. BIOS replacement instructions Beep codes that are used by Phoenix BIOS: Beeps 1-2-2-3 1-3-1-1 1-3-1-3 1-3-4-1 1-3-4-3 1-4-1-1 2-1-2-3 1-2 POST Code 16h 20h 22h 2Ch 2Eh 30h 46h 98h 1 1 B4h F4h POST Routine desription BIOS ROM checksum Test DRAM refresh Test 8742 Keyboard Controller RAM failure on address line xxxx* RAM failure on data bits xxxx* of low byte of memory RAM failure on data bits xxxx* of high byte of memory bus ROM copyright notice Search for option ROMs. One long, two short beeps on checksum failure One short beep before boot Output one beep before boot Beep codes that are used by Award BIOS: Currently there are two kinds of beep codes in Award BIOS. This 1st beep code indicates that a video error has occurred and the BIOS cannot initialize the video screen to display any additional information. The 2nd beep code indicates that a DRAM error has occurred. This beep code consists of a single long beep repeatedly. For Award BIOS setup instructions: http://www.phoenix.com/en/customer+services/bios/awardbios/setup+index.htm More info on BIOS: For more detailed trouble shooting you will require a POST card to view POST codes. BIOSMAN Inc sells POST cards. Please go to our home page for information on POST cards. Thanks for using BIOSMAN! Updated 04-08-2004 This information is also available on our website. Go to Support or Downloads on the Nav Bar. 4
