BIOPAC lab: Pulmonary Function I V1.5 1 Pulmonary Function I
advertisement
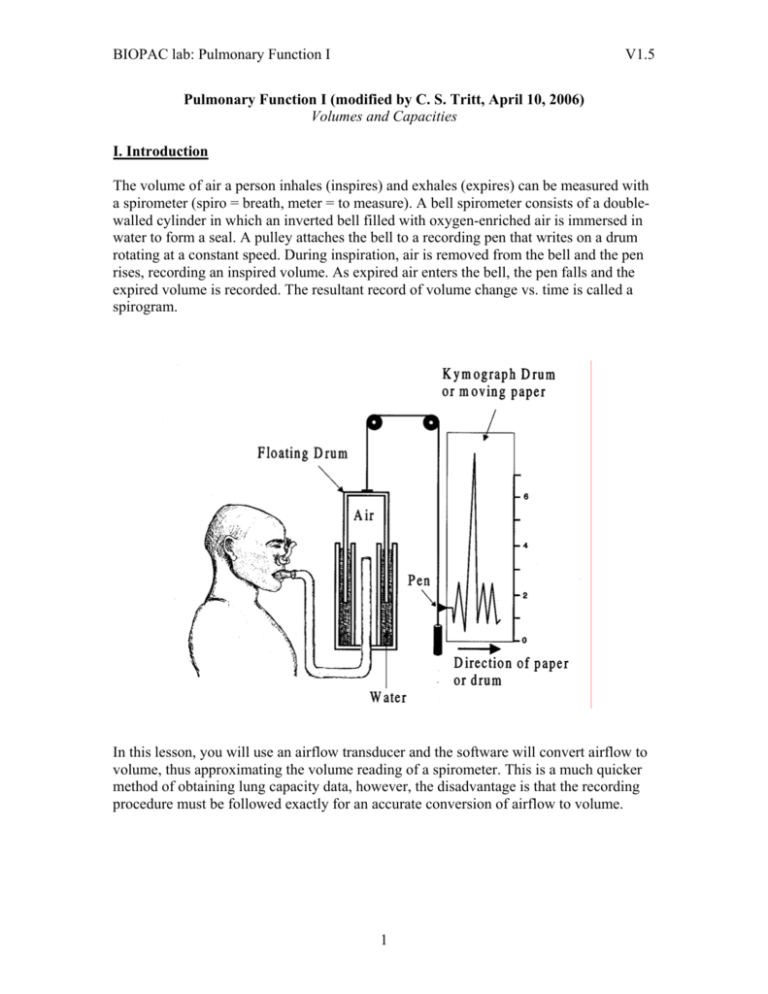
BIOPAC lab: Pulmonary Function I V1.5 Pulmonary Function I (modified by C. S. Tritt, April 10, 2006) Volumes and Capacities I. Introduction The volume of air a person inhales (inspires) and exhales (expires) can be measured with a spirometer (spiro = breath, meter = to measure). A bell spirometer consists of a doublewalled cylinder in which an inverted bell filled with oxygen-enriched air is immersed in water to form a seal. A pulley attaches the bell to a recording pen that writes on a drum rotating at a constant speed. During inspiration, air is removed from the bell and the pen rises, recording an inspired volume. As expired air enters the bell, the pen falls and the expired volume is recorded. The resultant record of volume change vs. time is called a spirogram. In this lesson, you will use an airflow transducer and the software will convert airflow to volume, thus approximating the volume reading of a spirometer. This is a much quicker method of obtaining lung capacity data, however, the disadvantage is that the recording procedure must be followed exactly for an accurate conversion of airflow to volume. 1 BIOPAC lab: Pulmonary Function I V1.5 There are four non-overlapping primary compartments of total lung capacity: 1. Tidal volume (TV) is the volume of air inspired or expired during a single breath. When a resting person breathes normally, tidal volume is approximately 500 ml. During exercise, tidal volume can be more than 3 liters. 2. Inspiratory reserve volume (IRV) is the volume or air that can be maximally inhaled at the end of a tidal inspiration. Resting IRV is approximately 3300 ml in young adult males and 1900 ml in young adult females. 3. Expiratory reserve volume (ERV) is the volume of air that can be maximally exhaled at the end of a tidal respiration. Resting ERV is approximately 1000 ml in young adult males and 700 ml in young adult females. 4. Residual volume (RV) is the volume of gas remaining in the lungs at the end of a maximal expiration. In contrast to IRV, TV and ERV, residual volume does not change with exercise. Use the following equations (originally from Crapo, 1981; obtained from the Medal website) for the residual volume (in ml) RV = 19.7 * (height in cm) + 20.1 * (age in years) − 2421 (for males) and RV = 21.6 * (height in cm) + 20.7 * (age in years) − 2840 (for females). Residual volume reflects the fact that after the first breath at birth inflates the lungs, they are never completely emptied during any subsequent respiratory cycle. Pulmonary capacity is the sum of 2 or more primary lung volumes. There are 5 pulmonary capacities, which can be calculated as follows: 1. Inspiratory capacity (IC) IC = TV + IRV 2 BIOPAC lab: Pulmonary Function I V1.5 2. Expiratory capacity (EC) EC = TV + ERV 3. Functional Residual Capacity (FRC) FRC = ERV + RV 4. Vital Capacity (VC) VC = IRV + TV + ERV 5. Total Lung Capacity (TLC) TLC = IRV + TV + ERV + RV Pulmonary volumes and capacities are generally measured when assessing health of the respiratory system because the volume and capacity values change with pulmonary disease. For example, inspiratory capacity is normally 60-70% of the vital capacity. In this experiment, you will measure tidal volume, inspiratory reserve volume, and expiratory reserve volume. Residual volume cannot be measured using a spirogram or airflow transducer. You will then calculate inspiratory capacity, vital capacity, and the % observed vital capacity to the average values for comparison. Next, you will compare your observed vital capacity with the predicted vital capacity. The following equations can be used to obtain the predicted vital capacities for men or women of your height and age. Vital capacities are dependent on other factors besides age and height. Therefore, 80% of the calculated values are still considered normal. Male Female V.C. = 0.052H – 0.022A – 3.6 V.C. = 0.041H – 0.018A – 2.69 V.C = vital capacity in liters H = height in centimeters A = age in years II. Experimental Objectives 1. To observe experimentally, record and/or calculate selected pulmonary volumes and capacities. 2. To compare the observed values of volume and capacity with average values. 3. To compare the normal values of pulmonary volumes and capacities of Subjects differing in sex, age, weight and height. III. Materials 1. BIOPAC Airflow Transducer (SS11LA) 2. BIOPAC Bacteriological Filter (AFT1) 3. BIOPAC Disposable Mouthpiece (AFT2) 4. BIOPAC Noseclip (AFT3) 3 BIOPAC lab: Pulmonary Function I V1.5 5. BIOPAC Calibration Syringe (AFT6) 6. BIOPAC student lab software V3.0 7. BIOPAC acquisition unit (MP30) 8. BIOPAC wall transformer (AC100A) 9. BIOPAC serial cable (CBLSERA) IV. Experimental Methods A. Set Up 1. Turn on the computer, but make sure the BIOPAC MP30 unit is turned off. 2. Plug the airflow transducer (SS11LA) into Channel 1. 3. Turn on the MP30 Data Acquisition Unit 4. Place a filter onto the end of the calibration syringe. a. The filter is necessary for calibration because it forces the air to move smoothly through the transducer. This assembly can be left connected for future use. You only need to replace the filter if the paper inside the filter tears. 5. Insert the Calibration Syringe/Filter Assembly into the airflow transducer. ** Always insert into the side labeled “Inlet” 6. Start the Biopac Student Lab program. 7. Choose lesson 12 (L12-PUL.1) 8. Type in a unique filename 4 BIOPAC lab: Pulmonary Function I V1.5 B. Calibration 1. Pull the calibration syringe all the way out and hold the Calibration Syringe/Filter Assembly upright. a. The airflow transducer is sensitive to gravity so it needs to be held upright throughout the calibration and recording. b. Important: never hold onto the airflow transducer handle when using the calibration syringe or the syringe tip may break. 2. Click on the Calibrate button. a. The first calibration procedure will run for 8 seconds and end with an alert box. b. Important: leave the plunger extended and hold the assembly steady and upright during the entire calibration procedure. Do not touch the plunger because any pressure at this stage will cause inaccurate results. 3. Prepare for the second calibration stage. Make sure to read the alert box, and do not click Yes until you are completely ready to proceed. When you click Yes, the second stage of the calibration procedure will begin, and will run until you click End Calibration. 4. Cycle the syringe plunger in and out completely 5 times (10 strokes). a. Use a rhythm of about 1 second per stroke with 2 seconds rest in between strokes, i.e. push the plunger in for approximately 1 second, wait 2 seconds, pull the plunger out, wait 2 seconds, etc. b. Stop the calibration procedure by clicking End Calibration. Important: Never hold onto the airflow transducer handle when using the calibration syringe or the syringe tip may break. 5 BIOPAC lab: Pulmonary Function I V1.5 5. Check the calibration data. If your data shows 5 downward deflections and 5 upward deflections, you may proceed to the Data Recording section. a. If the first stroke resulted in an upward deflection, you will need to change the calibration assembly by inserting the assembly into the other port of the airflow transducer. Then, you will need to redo the calibration. C. Data Recording In order to work efficiently, read this entire section so you will know what to do for each recording segment. *** Following the procedure precisely is very important, as the calculation from airflow to volume is very sensitive. *** Note: Residual volume (RV) cannot be determined using a normal spirometer or transducer, so the BIOPAC student lab software uses a default of 1 liter. Hints for obtaining optimal data: a. Keep the airflow transducer upright at all times. b. If you start the recording on an inhale, try to end on an exhale, and vice-versa. This is not absolutely critical, but does increase the accuracy of the Airflow to Volume calculations. c. The Subject should not look at the screen during the recording. d. Always insert on and breathe through the transducer side labeled “Inlet” 1. Insert a clean mouthpiece into the airflow transducer as described below. a. Have the Subject personally remove the filter and mouthpiece from the plastic packaging. This mouthpiece will be the Subject’s personal mouthpiece. It is advisable to label it as such. b. If using SS11LA transducer and sterilizing the head after each use, insert a disposable mouthpiece (BIOPAC AFT2) or an autoclavable mouthpiece (BIOPAC AFT8) into the airflow transducer on the side labeled “Inlet”. b. If using SS11LA transducer and not sterilizing the head after each use, insert a filter and a mouthpiece into the airflow transducer on the side labeled “Inlet”. 2. Place your personal nose clip on your nose and begin breathing through the airflow transducer. Make sure to keep the transducer upright at all times. 6 BIOPAC lab: Pulmonary Function I V1.5 3. Click on Record a. Breathe normally for 3 breaths. b. Inhale as deeply as you can. c. Exhale just to the point of normal breathing. d. Breathe normally for 3 breaths. e. Exhale out completely f. Breathe normally for 3 breaths. 4. Click on Stop 5. Review the data on the screen. If it is incorrect, redo the experiment. 6. Click on Done and choose the appropriate action. a. If you choose the “Record from another Subject” option: 1. You will need to recalibrate the airflow transducer. 2. Remember to have each person use his/her own mouthpiece, bacterial filter and nose clip. 3. Each person will need a unique filename. V. Data Analysis 1. Enter the “Review Saved Data” mode. 2. Determine all volumes and capacities from the subject. 7
