Hardness Testing: Brinell, Vickers, Rockwell - Lab Report
advertisement

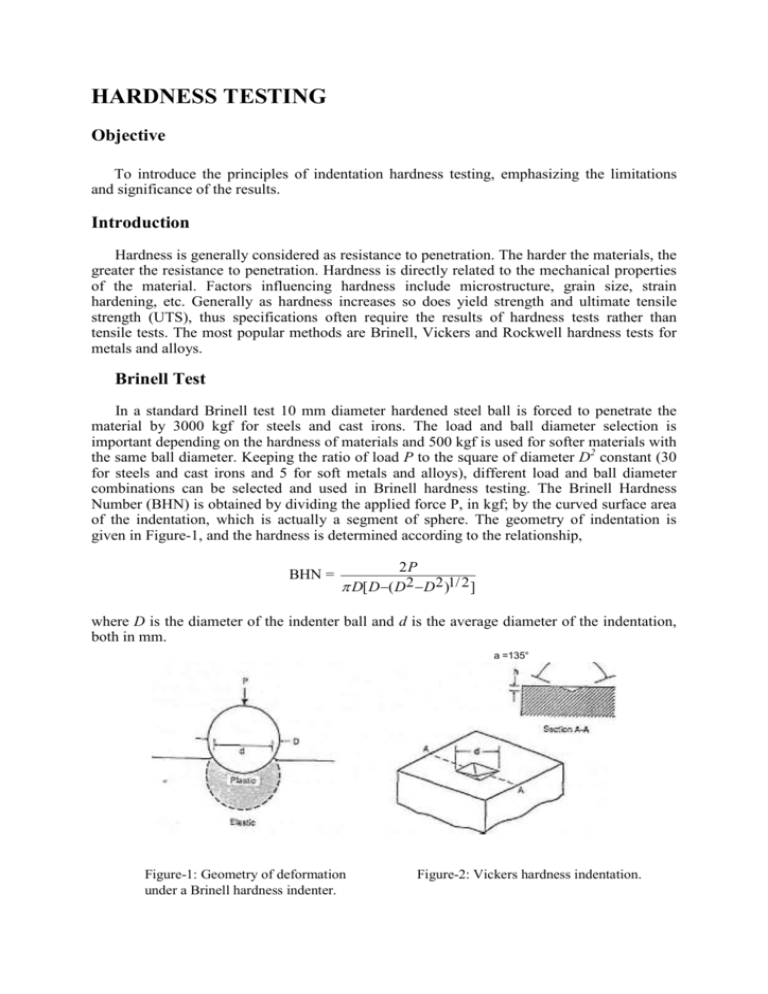
HARDNESS TESTING Objective To introduce the principles of indentation hardness testing, emphasizing the limitations and significance of the results. Introduction Hardness is generally considered as resistance to penetration. The harder the materials, the greater the resistance to penetration. Hardness is directly related to the mechanical properties of the material. Factors influencing hardness include microstructure, grain size, strain hardening, etc. Generally as hardness increases so does yield strength and ultimate tensile strength (UTS), thus specifications often require the results of hardness tests rather than tensile tests. The most popular methods are Brinell, Vickers and Rockwell hardness tests for metals and alloys. Brinell Test In a standard Brinell test 10 mm diameter hardened steel ball is forced to penetrate the material by 3000 kgf for steels and cast irons. The load and ball diameter selection is important depending on the hardness of materials and 500 kgf is used for softer materials with the same ball diameter. Keeping the ratio of load P to the square of diameter D2 constant (30 for steels and cast irons and 5 for soft metals and alloys), different load and ball diameter combinations can be selected and used in Brinell hardness testing. The Brinell Hardness Number (BHN) is obtained by dividing the applied force P, in kgf; by the curved surface area of the indentation, which is actually a segment of sphere. The geometry of indentation is given in Figure-1, and the hardness is determined according to the relationship, BHN = 2P D[ D ( D2 D2 )1/ 2 ] where D is the diameter of the indenter ball and d is the average diameter of the indentation, both in mm. a =135° Figure-1: Geometry of deformation under a Brinell hardness indenter. Figure-2: Vickers hardness indentation. Vickers Test The Vickers hardness test is based on the same principle as the Brinell test, except the indenter is a diamond pyramid with square base. The angle between the faces of pyramid is 1360 as shown in Figure-2. The Vickers Hardness Number (VHN) of materials is obtained by dividing the applied force P, in kgf, by the surface of the pyramidal depression yielding the relationship VHN= 1.8544 P d2 (in some sources VHN is cited as DPH) where d is the average length of diagonals in mm. Due to the shape and hardness of indenter the method is applicable to metals and alloys with wide variety of hardness. Test load is selected between 1 and 120 kgf depending on the hardness of materials. It is also possible to apply micro hardness testing by keeping the force between 5 grf and 2 kgf in Vickers scale. Rockwell Test In the Rockwell test, a diamond cone or a hard steel ball is employed as the indenter depending on the hardness of materials. Diamond cone or Brale indenter with cone angle of 1200 is used to test hard materials and the balls of sizes between 1.6 mm (1/16") and 12.7 mm (1/2") are used in testing softer materials. Rockwell tests differ from other indentation hardness tests in that the depth of indentation determines the hardness rather than the indentation size (see Figure-3). Therefore, surface condition of specimens is very important in Rockwell testing because of its high dependency on the accuracy in indentation depth measurements. In order to establish a reference position a minor load of 10 kgf. is first applied, and the major load is then applied. Additional penetration due to major load is measured and readings are obtained from a calibrated scale (dial) directly, which has a maximum value of 100, depending on the depth of penetration. Most commonly used Rockwell hardness scales are given in Table-l with typical applications. The hardness numbers are designated HRX, where X indicates the scale used (i.e. 50 HRC for 50 points on the C scale of dial). It should be noted that a Rockwell hardness number is meaningless unless the scale is not specified. HR = E-e Figure-3: Increasing depth of penetration in the Rockwell test Table-I: Commonly used Rockwell hardness scales. Indenter Type Major Load Scale Typical Applications X (kgf) I A D C Diamond Brale Diamond Brale Diamond Brale 60 100 150 B 1/16" Diameter Ball 100 E 1/8" Diameter Ball 100 F M R 1/16" Diameter Ball 1/4" Diameter Ball 1/2" Diameter Ball 60 100 60 Tool Materials Cast Irons, Sheet Steels Hardened steels and cast irons, Ti alloys Annealed steels, Cu and Al alloys Al and Mg alloys, reinforced polymers Soft sintered products Very soft metals, polymers Very soft metals, polymers Since the deformations caused by an indenter are of similar magnitude to those occurring at the ultimate tensile strength in a tension test, some empirical relationships have been established between hardness and engineering ultimate tensile strength of metals and alloys. For example, for steels UTS can be roughly estimated from Brinell hardness as follows: Equipment • • • • UTS (in MPa) = 3.45 x BHN Rockwell hardness tester Brinell hardness tester Microhardness (Vickers) tester Different test specimens Procedure . 1. Determine the proper Rockwell hardness scale, 2. calibrate the Rockwell hardness tester, 3. take five readings per specimen, 4. Perform Brinell hardness measurements on designated specimens (3 readings) 5. Using microhardness tester, determine the VHN at 0.20 mm distances from the surface to the center of case carburized specimen, until the hardness remains unchanged. 6. Determine the core hardness of the carburized steel. Analysis Calculate the range and mean in hardness values for each test specimen which will be considered in lab report. Lab Report Requirements 1. Results • List hardness values of Rockwell and Brinell for each specimen. • List VHN versus distance from surface for carburized specimen. • Determine the effective carburizing depth that corresponds to 400 VHN 2. Discussion (only those indicated will be answered in the lab report) 1. How do the Rockwell and Brinell tests actually measure hardness? Give any appropriate sketches and formulae. Are there any units involved? Describe the procedure for the Rockwell test, explaining the reason for the pre-load. 2. What is the limitation on the thickness of specimens for a hardness test? Explain. Calculate the minimum thickness for one specimen for the Rockwell test and one for the Brinell test. 3. What are the limitations for distance from specimen edge to indentation and distance between indentations? Explain why these limitations exist in both cases. . 4. What surface condition is necessary for Brinell, Rockwell and Vickers? 5. Why is the mean pressure (stress) under the indentor much greater than the yield stress? How much greater is it? 6. What are the advantages of Vickers test against Brinell test? References 1. Metals Handbook, 9th ed., Mechanical Testing, Vol. 8, 1990. 2. G. Dieter, Mechanical Metallurgy, S1 ed., Mc Graw Hill, 1986. 3. N. Dowling, Mechanical Behavior of Materials, Prentice Hall, 1993. 4. "An Evaluation of the Impression Test for Estimating the Tensile Properties of Metallic Materials, "H.N. Jones, Journal of Testing and Evaluation, Vol. 20, pp. 403407, Nov. 1992.


