Getting Started with . . .
The Grade Center
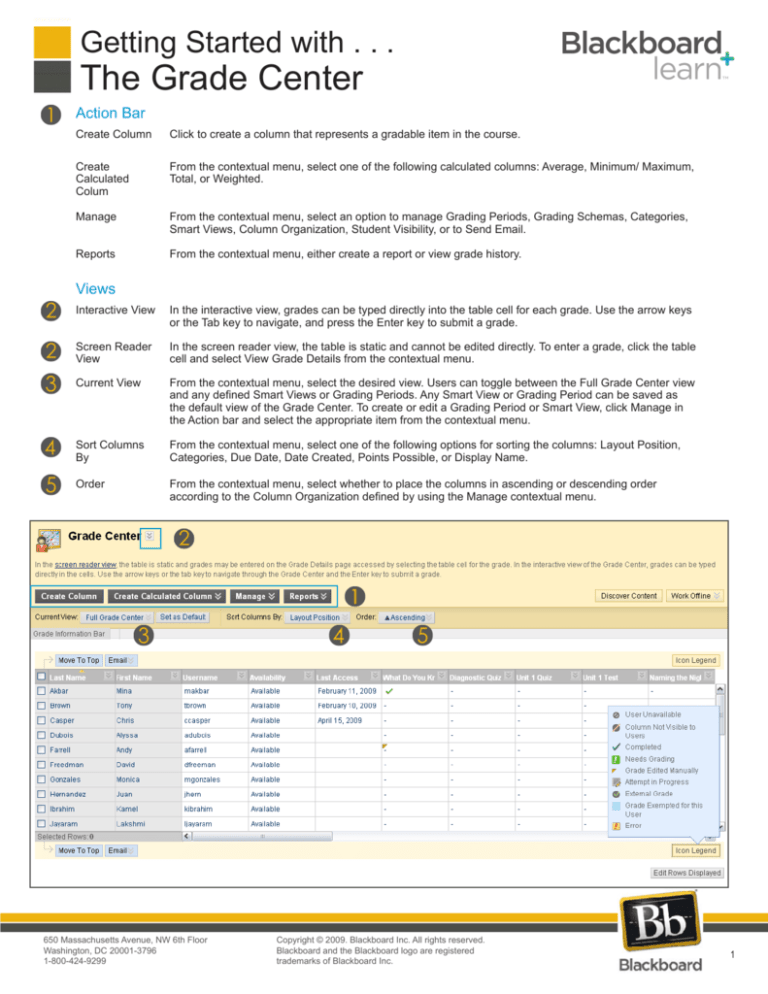
Action Bar
Create Column
Click to create a column that represents a gradable item in the course.
Create
Calculated
Colum
From the contextual menu, select one of the following calculated columns: Average, Minimum/ Maximum,
Total, or Weighted.
Manage
From the contextual menu, select an option to manage Grading Periods, Grading Schemas, Categories,
Smart Views, Column Organization, Student Visibility, or to Send Email.
Reports
From the contextual menu, either create a report or view grade history.
Views
Interactive View
In the interactive view, grades can be typed directly into the table cell for each grade. Use the arrow keys
or the Tab key to navigate, and press the Enter key to submit a grade.
Screen Reader
View
In the screen reader view, the table is static and cannot be edited directly. To enter a grade, click the table
cell and select View Grade Details from the contextual menu.
Current View
From the contextual menu, select the desired view. Users can toggle between the Full Grade Center view
and any defined Smart Views or Grading Periods. Any Smart View or Grading Period can be saved as
the default view of the Grade Center. To create or edit a Grading Period or Smart View, click Manage in
the Action bar and select the appropriate item from the contextual menu.
Sort Columns
By
From the contextual menu, select one of the following options for sorting the columns: Layout Position,
Categories, Due Date, Date Created, Points Possible, or Display Name.
Order
From the contextual menu, select whether to place the columns in ascending or descending order
according to the Column Organization defined by using the Manage contextual menu.
650 Massachusetts Avenue, NW 6th Floor
Washington, DC 20001-3796
1-800-424-9299
Copyright © 2009. Blackboard Inc. All rights reserved.
Blackboard and the Blackboard logo are registered
blackboard
com
trademarks ofwww
Blackboard
Inc.
.
.
1
Getting Started with . . .
The Grade Center
Task
What You Need to Know
Steps to Accomplish
Enter or Change a
Grade
Manual Grades: Grades can be entered or changed
(overridden) manually from the Grade Center or the
Grade Details page.
Automatic Grades: Some grades are added
automatically to the Grade Center from work
generated in other areas of Blackboard Learn. Each
gradable item that is created in another area of the
course automatically generates a Grade Center
column. These automatic grades can be changed
(overridden) manually in the Grade Center. All
changes are recorded in the Grade History.
To enter or change a grade from the Grade
Center:
1. Point to and click the desired cell.
2. Type the value.
3. Press Enter.
Delete a Grade
Grades can be deleted from the Grade Center.
Deleting a grade also deletes the Override Grade and
any associated comments.
1. Point to and click the grade to be deleted.
2. Press Delete or Backspace.
3. Press Enter.
4. On the popup message, click OK.
Grades that are set to NULL display a dash (-).
Note: Grades can also be set to null by typing the
NULL character in the cell.
Exempt a Grade
Students can be exempted from a grade from the
Grade Center or the Grade Details page. Exempted
grades are not added into any statistical or total grade
calculations. Exempted grade display an Exempted
icon in the cell. Comments can be added to any
exempted grade.
To exempt a grade, point to the desired cell, click
the Action Link, and select Exempt Grade.
To add a comment, point to the desired cell, click
the Action Link, and select Quick Comment.
To clear the exemption and go back to the
previous score, select Clear Exemption from the
contextual menu.
Edit or Erase an
Attempt
Grades for specific attempts can be edited or erased.
The other attempts are unaffected, and the most
recent attempt becomes the Current Grade. This is
useful if, for example, a Student began a test but
was interrupted and unable to complete it. Clearing
the attempt allows the Student to take the test again
without having the interruption count.
To edit an attempt:
1. Point to the desired cell, click the Action Link,
and select View Grade Details.
2. Under Attempts, click the Action Link for the
desired attempt and select Edit Grade.
3. Type the new score in the Value box and add
any Feedback to User or Grading Notes.
4. Click Save.
To erase an attempt:
1. Point to the desired cell, click the Action Link,
and select View Grade Details.
2. Under Attempts, click the Action Link for the
desired attempt and select Clear Attempt.
3. On the popup message, click OK.
Undo a Grade Change After a grade has been changed (overridden), it can
be reverted to the original value.
650 Massachusetts Avenue, NW 6th Floor
Washington, DC 20001-3796
1-800-424-9299
To change a grade from the Grade Details page:
1. Point to the desired cell, click the Action Link,
and select View Grade Details.
2. Under Attempts, click the Action Link for the
desired attempt, and select Edit Grade.
3. Type the new score In the Value box and add
any Feedback to User or Grading Notes.
4. Click Save.
1. Point to the desired cell, click the Action Link,
and select View Grade Details.
2. Under Current Grade Value, click Revert.
3. Click OK when the warning message
appears.
Copyright © 2009. Blackboard Inc. All rights reserved.
Blackboard and the Blackboard logo are registered
trademarks of Blackboard Inc.
2
Getting Started with . . .
The Grade Center
Create a Grade
Column
Grade Columns represent gradable items such as
1. In the Action Bar, click Create Column.
tests and papers. You can manually create Columns in 2. Provide a Column Name.
the Grade Center or automatically generate them from
3. Provide a Grade Center Display Name. This
outside of the Grade Center.
appears as the column header in the Grade
Center.
4. Provide a Description to help Instructors and
other graders identify the column.
5. Select the other settings as appropriate.
6. Click Submit.
Create a Weighted
Column
A Weighted Grade is a Calculated Column that
1. In the Action Bar, click Create Calculated
displays the calculated result of quantities and their
Column and select Weighted Column.
respective percentages. A Weighted Grade can be
2. Type a Column Name.
displayed as a column in the Grade Center. Instructors
3. Type a Grade Center Display Name. This
control the visibility of the column in the Grade Center
appears as the column header in the Grade
as well as the release of the column to students and
Center.
other users.
4. Type a Description to help Instructors and
other graders identify the column.
5. Select the Columns and Categories to
include.
6. Set the percentage of the total for each
Column or Category.
7. Select the other settings as appropriate.
8. Click Submit.
Delete a Column
Manual Columns: Columns that are created manually
can be deleted directly from the Grade Center.
Automatic Columns: Columns that are generated
automatically when a test, survey, assignment, group
assignment, or graded forum or thread is added
to the course cannot be deleted directly from the
Grade Center. The item itself must be deleted from
the Content Area. The column then will be removed
automatically from the Grade Center.
To delete a manually created column, click the
contextual menu in the column header and select
Delete Column.
Deleting a Column is a final action and cannot be
undone.
Group Grade Columns Categories can be created to organize the Grade
into Categories
Center and run reports on specific types of grades.
Default categories include Assignment, Discussion,
Survey, and Test. Create Categories before creating
Grade Center Items.
650 Massachusetts Avenue, NW 6th Floor
Washington, DC 20001-3796
1-800-424-9299
To create a Category:
1. In the Action Bar, click Manage and select
Categories.
2. Click Create Category.
3. Provide a Name for the Category.
4. Provide a Description for the Category. This
field can help differentiate Categories and
explain the purpose of the Category.
5. Click Submit.
Copyright © 2009. Blackboard Inc. All rights reserved.
Blackboard and the Blackboard logo are registered
blackboard
com
trademarks ofwww
Blackboard
Inc.
.
.
3
Getting Started with . . .
The Grade Center
Glossary
Calculated Columns
A calculated Column gathers data from multiple Grade Center columns and performs a calculation to attain performance results, such as an average grade for a set of assignments. In turn, data
from multiple Calculated Columns can be gathered to create a composite Calculated Column. New
Courses and Restored Courses contain two Calculated columns by default: a Total Points column
and a Weighted Grade column. The following Calculated Columns are available: Average, Minimum/
Maximum, Total, and Weighted.
Categories
A Grade Center Category is a classification for columns. For example, Homework, Test, or Quiz.
Categories may also be used to create Smart Views comprised of columns associated with specific
Categories. Categories can be used with Grade Center columns such as a Weighted Grade Column,
Total Points Column, or Average Grade Column.
Download Grade Center
Grade Center data can be downloaded as a delimited (separated) file and used in spreadsheet or
statistical analysis applications such as Microsoft Excel. Instructors can download the complete
Grade Center page or select specific data to download.
Freezing Columns
Grade Center columns can be frozen in place so that they do not move while scrolling through the
other data. The columns that contain the first and last names of students are frozen by default. This
feature can be used to easily match up individual students with their data across the length of the
Grade Center. Freeze and unfreeze any of the columns on the Column Organization page.
Grade Center Statistics
The Grade Center can show various statistical information related to columns and Students. Column
Statistics displays statistics for a Grade Item, such as average, median, and standard deviation.
Grade History
The Grade History page lists all of the changes that occurred to grades within a Course during the
selected time frame. The Grade History entries can be sorted by column and that current view can
be downloaded.
Grading Period
Grading Periods are time segments that can help manage the Grade Center. Grading Periods can be
defined as Terms, Semesters, Quarters, or Years, and can have date ranges that further define them.
Instructors can filter the Grade Center by Grading Period to display only the relevant columns in the
segment. Grading Periods can also be used to view the performance of students in a certain Grading
Period, create a Report that displays the performance for a Grading Period, and calculate a Grade
column for a Grading Period.
Grading Schema
A Grading Schema is a mapping of percentage ranges to specific grade displays. For example, a
student’s raw numeric score on a quiz that has 100 possible points is an 88. In a Grading Schema in
which a percentage of 87.5 to 89.5 equals a B+, this score results in a B+. If the grade display option
is Letter, the B+ will display to the Student.
Hide Columns
Hiding a column saves all existing information associated with the column, but prevents it from being
seen in the Grade Center. Hiding columns that are not currently being used reduces the length of the
grid and the need for scrolling.
Upload Grade Center Columns
Grades can be created off-line and then uploaded to the Grade Center. Grades that were created
in another grade system can also be uploaded for inclusion in the Grade Center. The data in the file
must be synchronized to the Grade Center data by using unique identifiers for each student (User
Name) and each Grade Center column (Column ID number). Column ID numbers are generated by
the system and should not be changed or removed.
Reports
Printable Reports, such as a progress report, can be created by clicking Reports in the Action Bar,
selecting Create Reports, and then defining the report data. Reports can display all or a number of
Students or Groups; Grade Columns or Calculated Columns; a Grading Period; or all of the columns
in a Category. Reports print the data for one Student per page. Reports can be customized in a
variety of ways, including unique report header and footer information. Reports can also include a
signature line, date, Course Information, and many other data elements.
Smart Views
Smart Views are specific views of the Grade Center based on a variety of criteria. After a Smart View
has been created and saved, it becomes an item on the Current View contextual menu on the Grade
Center page. Users can toggle between the Full Grade Center view and any defined Smart Views or
Grading Periods. Any Smart View or Grading Period can be saved as the default view of the Grade
Center.
650 Massachusetts Avenue, NW 6th Floor
Washington, DC 20001-3796
1-800-424-9299
Copyright © 2009. Blackboard Inc. All rights reserved.
Blackboard and the Blackboard logo are registered
blackboard
com
trademarks ofwww
Blackboard
Inc.
.
.
4


